Category: howto

Getting HP-1020 Laserjet Printer working on Snow Leopard

Since upgrading to snow leopard from leopard, this was the biggest problem and most frustrating thing for me. My HP Laser-jet 1020 stopped working. I’ve downloaded all possible updates from apple and none works. My good old printer just became a piece of brick (lol, yeah really)

So how did I finally get it running? almost 10-20 hours of googling+downloading+trial and error+cursing and drinking a lot of coffee, open source stuffs saved my day 🙂 – here you go .

#1 – download foomatic-RIP from here http://www.linuxfoundation.org/collaborate/workgroups/openprinting/macosx/foomatic (choose the snow leopard package)
#2 – download ghostscript from http://www.linuxfoundation.org/collaborate/workgroups/openprinting/macosx/foomatic )choose snow leopard package)
#3 – download foo2zjs from here http://mac.softpedia.com/progDownload/foo2zjs-Download-33222.html

#4 Ok, now install GhostScript First, then Install Foomatic-RIP. Just perform a default install. no extra thingy – nothing 🙂

#5 Now install foo2zjs package. while installing, it will ask for admin access. Then it will open a shell window and display you a list of firmware to choose from. You will find HP-1020 listed on #7 – so type “7” and hit enter. Now if it asks you whether you want to delete the installation file, choose “yes”.

#6 Now open the “helper” folder inside this foo2zjs package and copy the load_LaserJet_firmware_v4 file to anywhere else. We need this file later.

#7 Connect HP-1020 in USb port and Add the printer from your printer preference panel.

#8 Now double click on load_LaserJet_firmware_v4 file that you have copied earlier and run it 🙂

Ok, now you have a working HP-1020 in your snow leopard. Until HP or Apple releases a patch, this is the only way to get it working. Well, dont forget to send me a cup of coffee for saving you from buying a new printer – lol!

Using new PECL Memcached extension for storing session data

Many of you already know that managing session is a critical task for web applications, specially when you want to avoid I/O hop and also a significant load over your database by writing a custom session handler. Beside that, if your application makes use of multiple web servers behind a proxy, then its more than a critical job to share and manage session data among these servers effectively. This is why a central session manager is very important for your application to scale. In this article I am going to show you how you can use the latest Memcached extension (developed by Andrei Zmievski and his team) to isolate the session storage from web servers. I will show you how to compile the extension and use it.

Step1: Install Memcached Server
If you are using Debian its just plain simple
[sourcecode lang=”bash”]
apt-get install memcached
[/sourcecode]

Step 2: Run memcached instances
Lets run two instances of memcached in same machine (well, this article is just for demonstrating you how you can get things done. In the production environment, you can deploy as many memcached instances as you want in different servers in same network)
[sourcecode lang=”bash”]
memcached -d -l 127.0.0.1 -p 11211 -u <username> -m 16
memcached -d -l 127.0.0.1 -p 11212 -u <username> -m 16
[/sourcecode]

Above commands will run two instances of memcached listening on port number 11211 and 11212, same IP 127.0.0.1. Each of them get an allocation of 16 MB of memory (on RAM).

Step 3: Install the PECL Memcached extension.
Lets install the new PECL memcached extension in your web server. This new extension depends on libmemcached. You can grab the latest distribution of libmemcached from https://launchpad.net/libmemcached and compile it in your own machine. Make sure you have the dependencies met.

[sourcecode lang=”bash”]
wget http://launchpad.net/libmemcached/1.0/0.34/+download/libmemcached-0.34.tar.gz
tar -zxvf libmemcached-0.34.tar.gz
cd libmemcached-0.34
./configure
make && make install
[/sourcecode]

Considering everything went fine, lets install the PECL memcached extension
[sourcecode lang=”bash”]
pecl install memcached
[/sourcecode]

If everything goes fine, you should see the output similar like this
[sourcecode]
Build process completed successfully
Installing ‘/usr/lib/php5/20060613/memcached.so’
install ok: channel://pecl.php.net/memcached-1.0.0
configuration option "php_ini" is not set to php.ini location
You should add "extension=memcached.so" to php.ini
[/sourcecode]

Make sure that memcached.so is placed in your PHP extension_dir folder (here /usr/lib/php5/20060613). Add the line “extension=memcached.so” in your php.ini and restart your web server.

To make sure, everything’s done and working – run a phpinfo() and check the output. There should be a “memcached” sesction which will look like the following one.

Memcached PECL Extension

Now we need to make change in our php.ini to register Memcached as a session handler and set the necessary properties there. Open your php.ini and add the following two lines. If you find any similar line un-commented, comment them out first.

[sourcecode lang=”php”]
session.save_handler=memcached
session.save_path="127.0.0.1:11211, 127.0.0.1:11212"
[/sourcecode]

Restart your web server. And …… you are done! 🙂 – Now all your session data will be saved and served from these memcached servers. No matter whenever you need to extend your setup by adding extra web servers, all user data and session data will remain valid and served from a central location. No I/O issue, no huge write load on DB servers.

RackSpace Cloud Server Client Library for PHP

We, the developers at Leevio are currently developing an open source group collaboration application. We are using RackSpace Cloud servers since the very beginning of the development and we will also deploy in on rack space cloud.

As a part of our study we’d found that RackSpace provides excellent API to manage your cloud services. Unfortunately there are no language binding library released yet (for Cloud Server). But they’ve mentioned that they are developing one for python.

So we have spend our time for last two days and developed a PHP client library to use RackSpace cloud server API from inside a PHP application.

This client library is released under New BSD license. And is available to download/svn-checkout from it’s project page at http://code.google.com/p/phprackcloud/

There is plenty of documentation and example included. The code is mostly self explanatory. Please dont forget to check the Wiki page to get some idea on how to use this library and how far you can go. We have covered all available methods by RackSpace cloud server in our client library.

Happy clouding.

Project Page and Download: http://code.google.com/p/phprackcloud

Using iPaper API to convert office documents to flash movie on the fly :)

Embedding documents in web applications is a challenging work. Because you need to convert these documents into flash movie and only then you can embed them in your web applications. There are many converters available out their for use. Some of them are proprietary, Some of them comes for free. There are command line tools as well as web services also to perform these conversions and make your life easier. In this post I am going to introduce you to IPaper, an excellent service from Scribd. Using IPaper API you can upload and convert your documents to flash movie on the fly, and then you can embed them using Scribd’s excellent document viewer. Scribd offers a collection of client libraries and fortunately, we have a PHP lib in that collection.

Scribd API can convert numbers of document types including the followings

* Adobe PDF (.pdf)
* Adobe PostScript (.ps)
* Microsoft Word (.doc, .docx)
* Microsoft PowerPoint (.ppt, .pps, .pptx)
* Microsoft Excel (.xls, xlsx)
* OpenOffice Text Document (.odt, .sxw)
* OpenOffice Presentation Document (.odp, .sxi)
* OpenOffice Spreadsheet (.ods, .sxc)
* All OpenDocument formats
* Plain text (.txt)
* Rich text format (.rtf)

To use IPaper API, you need to create a developer account in ScribD and get your API key and secret key. Also, download the PHP client library from http://www.scribd.com/developers/libraries

You are ready to go once you get your Scribd api key and secret key. You can upload different types of files to scribd server and of course you can make them private or publicly accessible. After successful upload and conversion you will receive a doc_id and access_key from Scribd web service. Using those data you can embed your document in your web app. Lets have a look. In the following code examples, you may find the getEmbedUrl() and getEmbedCode() functions handy. You can also use SWFObject for quick embedding 🙂

[sourcecode lang=”php”]
<?php
include_once("scribd.php");

$UpdloadData = createIPaper("gpl.pdf","pdf","public");
$EmbedUrl = getEmbedUrl($UpdloadData);
echo $EmbedUrl;
$EmbedCode = getEmbedCode($UpdloadData);
echo $EmbedCode;

function createIPaper($File, $FileType, $Access="private")
{
$scribd_api_key = "<your API key>";
$scribd_secret = "<your Secret key>";

if (empty($FileType))
throw new Exception("Filetype cannot be empty");
$Scribd = new Scribd($scribd_api_key,$scribd_secret);

$UploadData = $Scribd->upload($File,$FileType,$Access,1);
return $UploadData;
}

function getEmbedUrl($UploadData)
{
if($UploadData){
$EmbedUrl = "http://d1.scribdassets.com/ScribdViewer.swf?document_id={$UploadData[‘doc_id’]}&access_key={$UploadData[‘access_key’]}&page=1&version=1&viewMode=list";
return $EmbedUrl;
}
}

function getEmbedCode($UploadData, $Width=450, $Height=500)
{
$EmbedCode = <<<EOD
<object codebase="http://download.macromedia.com/pub/shockwave/cabs/flash/swflash.cab#version=9,0,0,0"
id="doc_512761847372423" name="doc_512761847372423"
classid="clsid:d27cdb6e-ae6d-11cf-96b8-444553540000"
align="middle"
height="{$Height}"
width="{$Width}" >
<param name="movie" value="http://d1.scribdassets.com/ScribdViewer.swf?document_id={$UploadData[‘doc_id’]}&access_key={$UploadData[‘access_key’]}&page=1&version=1&viewMode=list">
<param name="quality" value="high">
<param name="play" value="true">
<param name="loop" value="true">
<param name="scale" value="showall">
<param name="wmode" value="opaque">
<param name="devicefont" value="false">
<param name="bgcolor" value="#ffffff">
<param name="menu" value="true">
<param name="allowFullScreen" value="true">
<param name="allowScriptAccess" value="always">
<param name="salign" value="">
<param name="mode" value="list">
<embed src="http://d1.scribdassets.com/ScribdViewer.swf?document_id={$UploadData[‘doc_id’]}&access_key={$UploadData[‘access_key’]}&page=1&version=1&viewMode=list"
quality="high"
pluginspage="http://www.macromedia.com/go/getflashplayer"
play="true"
loop="true"
scale="showall"
wmode="opaque"
devicefont="false"
bgcolor="#ffffff"
name="doc_512761847372423_object"
menu="true"
allowfullscreen="true"
allowscriptaccess="always"
salign=""
type="application/x-shockwave-flash"
align="middle"
mode="list"
height="{$Height}"
width="{$Width}">
</embed>
</object>
EOD;
return $EmbedCode;
}
?>
[/sourcecode]

and here is how it will look after embedding
[scribd id=20736638 key=key-1dg5q0bof480cv4pjebo]

download the source code from here http://www.box.net/shared/5dav7hnkm9

By the way, IPaper PHP client library has some cool methods like uploadFromUrl() – Check them out )

Stay in touch, In next post I will show you how to use some other exciting tools which you can use and host in your own server :). that will be fun to host your own service like this 🙂

Thanks to Rana for helping me out with iPaper.

removing empty elements from an array, the php way :)

removing empty elements from array is most likely a very common task for everyday programming. different people work on it differently. some runs N times loop and some other tries by finding offset and then by unsetting that. let me show you some common approach of doing it and possibly the best way too :), needless to say, in a php way – most of the time such a microsecond does not matter, but well, its still good to find out the best solution 🙂

first of all, lets write a function which will create a random array with empty elements
[source lang=’php’]
function generateRandomArray($count=10000)
{
$array = range(0,($count-1));
for($i = 0;$i<1000;$i++)
{
$offset = mt_rand(0,$count);
$array[$offset] = “”;
}
return $array;
}
[/source]

now lets see some different approaches to get it done.
probably most common approach
[source lang=’php’]
$array = generateRandomArray();
$len = count($array);
$start = microtime(true);
for ($i=0;$i< $len;$i++) { if(""==$array[$i]) unset($array[$i]); } $end = microtime(true); echo ($end-$start); [/source] you can see the output varies from 0.13-0.14 seconds for an array with 10000 elements in a 2.66 ghz core 2duo machine running mac osx 10.5.8 with 4GB ram. here is another better approach using array_diff() [source lang='php'] $array = generateRandomArray(); $start= microtime(true); $empty_elements = array(""); $array = array_diff($array,$empty_elements); $end = microtime(true); echo ($end-$start); [/source] this one takes 0.052-0.059 seconds and surely is a significant improvement over the last one here is another improved version using array_filter() [source lang='php'] $array = generateRandomArray(); $start= microtime(true); $array = array_filter($array); $end = microtime(true); echo ($end-$start); [/source] it takes like 0.002 seconds to complete 🙂 - pretty good one, eh? (thanks damdec, for reminding about it) and this is the last one which was my favorite one using array_keys() taking advantage of the optional search_values parameter 🙂 [source lang='php'] $array = generateRandomArray(); $start= microtime(true); $empty_elements = array_keys($array,""); foreach ($empty_elements as $e) unset($array[$e]); $end = microtime(true); echo ($end-$start); [/source] this is an amazing improvement over the previous solutions, it takes only around 0.0008 - 0.0009 seconds for an array of 10000 elements. i hope you enjoyed this post with micro benchmarks 😀 - happy phping

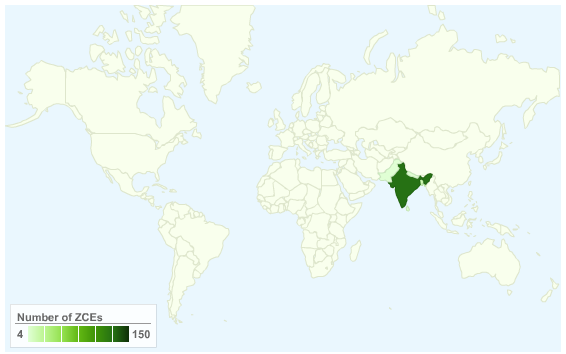
Using Google WorldMap visualization component in your applications

Its really hard to find a good flash based world map component to use in your web applications. They are either too complex to add or they cost quite a lot. And even sometime if you pay that, its tough to customize the chart as you want it to look like. But you know there is someone called “Uncle G” (i.e google) here who has almost all the components in his Pandora’s box. So lets see how can we use the geomap component from their Visualization Library.

First we need to create a datatable which will act as a data source for this world map, as usual like all other google visualization component.

[source lang=’javascript’]
var data = new google.visualization.DataTable();
data.addRows(5);
data.addColumn(‘string’, ‘Country’);
data.addColumn(‘number’, ‘Number of ZCEs’);
data.setValue(0, 0, ‘Bangladesh’);
data.setValue(0, 1, 19);
data.setValue(1, 0, ‘India’);
data.setValue(1, 1, 150);
data.setValue(2, 0, ‘Pakistan’);
data.setValue(2, 1, 4);
data.setValue(3, 0, ‘Nepal’);
data.setValue(3, 1, 5);
data.setValue(4, 0, ‘Sri Lanka’);
data.setValue(4, 1, 7);
[/source]

now we will initialize the google visualization framework and draw this component using this data source

[source lang=’javascript’]
var geomap = new google.visualization.GeoMap(document.getElementById(‘‘));
geomap.draw(data, null);
[/source]

but wait, we are not done yet – to make sure that everything works properly, we need to wrap all of these code inside a function (for example name this function as drawGeoMap) and we will use that function as a callback to draw this map. and of course, we need to load the google visualization library and geomap component first

so here is the complete code of this
[source lang=’javascript’]


[/source]

you can check the demo at http://sandbox.ofhas.in/geomapv1.php

it will display a world map with highlighted countries like below
Geomap V 1

but wait – lets make ca nifty change and add event listeners to it. we will add event listeners in such a way so that whenever users click on any country in the map, it will take you to zend yellow page corresponding to that country 🙂 that will make it really an useful component :). here is the code

[source lang=’javascript’]


[/source]

check the demo at http://sandbox.ofhas.in/geomapv2.php

now you can click on any country and it will open a new tab with that particular country pre selected – and you can see who are the zend certified engineers from that country. i hope you’ve liked this :). Thanks goes the theam Visualization team at google for creating these awesome components and to make them free for use

For reference – check out geomap reference at google code at http://code.google.com/apis/visualization/documentation/gallery/geomap.html. you can do many other cool things like displaying only US states map or Canadian States map with this 🙂

Building services like FriendFeed using PHP – Part2

Following the first installment in this series, here is the second part. In this part I will focus mainly on Bookmarking and News services supported by FriendFeed . Here we go

Supported bookmarking services by FriendFeed
1. Del.icio.us
2. Furl
3. Google shared stuffs
4. Mag.nolia
5. Stumbleupon

Except google shared stufss, all of the rests require just an username to generate the access point for retrieving user’s bookmarked items. And for the google shared stuffs, it requires the fully functional url of the feed available from your google bookmark service.

Access points

Del.icio.us

AP: http://feeds.delicious.com/rss/<user name>
example: http://feeds.delicious.com/rss/anduh


Furl

AP: http://rss.furl.net/member/<user name>.rss;
example: http://rss.furl.net/member/pigge.rss


Google Shared Stuffs
you can find your google shared stuff url from http://www.google.com/s2/sharing/stuff

example: http://www.google.com/s2/sharing/stuff?user=110703083499686157981&output=rss


Ma.gnolia

AP: http://ma.gnolia.com/rss/lite/people/<user name>.rss;
example: http://ma.gnolia.com/rss/lite/people/gerryquach


Stumbleupon
Whoops, Double Whoops, Tripple Whoops. It took quite a time for me to find the feed url. I dont know why it is kept so “SECRET” – LOL

AP: http://www.stumbleupon.com/syndicate.php?stumbler=<user name>.rss;
example: http://www.stumbleupon.com/syndicate.php?stumbler=jd001


Supported news services by FriendFeed
1. Digg
2. Google Reader
3. Mixx
4. Reddit

Here are the access points


Digg

AP: http://digg.com/users/<user name>/history.rss;
example: http://digg.com/users/msaleem/history.rss


Google Reader

You can find your shared item’s feed url here http://www.google.com/reader/view/user/-/state/com.google/broadcast


Mixx

Unfortunately during the time of writing this article, Mixx was napping – here is the screenshot. Once they are awake, I will update this section 🙂


Reddit

AP: http://www.reddit.com/user/<user name>/.rss;
example: http://www.reddit.com/user/jack_alexander/.rss

In next installation I will focus on scaling such a huge load successfully. Hope that will be interesting to many of you. Following installation will focus again on the access points.

Building services like FriendFeed using PHP – Part 1

Friendfeed is an excellent life streaming service aggregating all your feeds from different service providers, compile them together, build a social network among your known people and finally deliver all these feeds as a mashup. As a result you can immediately track activities of your friends on all the different service they use (like jaiku, twitter, flickr) and stay up-to-date. Hats off to the developers of FriendFeed for delivering such a nice application to us.

In this blog post I will try to focus on how to develop such a service like Friendfeed using PHP and JS and how to scale such a huge load successfully. Previously I’d also written another article focusing “How to develop services like SpringLoops using PHP“. The complete article will be delivered in multiple installments and in current installment, I will focus on Photo sharing services used by friendfeed.

Area to focus
1. Services to be supported
2. Update discovery
3. Parsing the feeds
4. Storing the data
5. Scaling

FriendFeed parses feeds from a total of 35 popular services from around the web 😉 – lets have a look at them one by one and I will give you idea about the access points of these services. Though Not all of them are feed, so I will try to focus those services as well to give you a basic idea.

Service 1 : Flickr
Usable PHP Library: PHPFlickr

Flickr is an excellent photo sharing services under the banner of Yahoo. Friendfeed parses all the photo from a user and also the list of his/her favorite photos. Given an username you can easily find the Flickr ID like (76536911@N00)of that user and once you got it, here is the access points for list of public photos and favorites

List of photos
http://api.flickr.com/services/feeds/photos_public.gne?id=<user’s flickr id>&lang=en-us&format=rss_200
example: http://api.flickr.com/services/feeds/photos_public.gne?id=76536911@N00&lang=en-us&format=rss_200

List of favorites
http://api.flickr.com/services/feeds/photos_faves.gne?nsid=<user’s flickr id>&lang=en-us&format=rss_200
example:http://api.flickr.com/services/feeds/photos_faves.gne?nsid=76536911@N00&lang=en-us&format=rss_200

Service 2: Picasa Web Album
Picasa is another photo sharing service under the banner of the Giant, Google. Given a picasa user name , here are the access point of user’s public photos

List of public photos
http://picasaweb.google.com/data/feed/base/user/<picasa user name>?kind=album&alt=rss&hl=en_US&access=public
example:http://picasaweb.google.com/data/feed/base/user/countdraculla?kind=album&alt=rss&hl=en_US&access=public

Service 3: Smugmug
Here comes another photo sharing service where users can buy and sell their photos. Given a smugmug user name you can find the feed of this user’s photos

List of public photos
http://<smugmug user name>.smugmug.com/hack/feed.mg?Type=nickname&Data=Ifocus&format=rss200
example:http://ifocus.smugmug.com/hack/feed.mg?Type=nickname&Data=Ifocus&format=rss200

Service 4: Zoomr
Zoomr is another photo sharing service started in late 2005 by Kristopher Tate as a place for him to share photos with his friends and later became a public services, is currently supported by FriendFeed. And here we go with the access points 🙂

List of public photos
http://www.zooomr.com/services/feeds/public_photos/?id=<zoomr user name>&format=rss_200
example:http://www.zooomr.com/services/feeds/public_photos/?id=wolfmank&format=rss_200

In next part, I will highlight the access points of supported bookmark services and news services supported by FriendFeed 🙂 Have a nice weekend.

WorldTimeEngine – How about making your own in PHP?

I recently came by this site WorldTimeEngine where users can search the local time of any place using the name, street address or just latitude and longitude. Since that time I was thinking how easily you can make your own. As long there are some good people over there (For Geocoding API) – its a not a big deal, you know? Lets have a look at the following PHP code.


<?
$place = "Bucharest";

$geodata = getGeoCode($place);
print_r($geodata);
echo getTime($geodata['lat'],$geodata['lng']);

function getTime($lat, $lng)
{
$url = "http://ws.geonames.org/timezone?lat={$lat}&lng={$lng}";
$timedata = file_get_contents($url);
$sxml = simplexml_load_string($timedata);
return $sxml->timezone->time;
}
function getGeoCode($address)
{
$_url = 'http://api.local.yahoo.com/MapsService/V1/geocode';
$_url .= sprintf('?appid=%s&location=%s',"orchid_geocode",rawurlencode($address));
$_result = false;
if($_result = file_get_contents($_url)) {
preg_match('!<Latitude>(.*)</Latitude><Longitude>(.*)</Longitude>!U', $_result, $_match);
$lng = $_match[2];
$lat = $_match[1];
return array("lat"=>$lat,"lng"=>$lng,"address"=>$address);
}
else
return false;
}
?>

Changing the variable “$place” to “Bucharest”,”Dhaka”, “Toronto” and “Oslo” gives me the following result


Array
(
[lat] => 44.434200
[lng] => 26.102955
[address] => Bucharest
)
2008-03-01 08:41

Array
(
[lat] => 23.709801
[lng] => 90.407112
[address] => Dhaka
)
2008-03-01 12:42

Array
(
[lat] => 43.648565
[lng] => -79.385329
[address] => Toronto
)
2008-03-01 01:42

Array
(
[lat] => 59.912280
[lng] => 10.749980
[address] => Oslo
)
2008-03-01 07:43

Nice, Huh?

Getting Dell BCM4328 Wifi Card Working on Ubuntu 7.10

After trying,searching and crying for more than one month, I finally get it working today in my laptop (Dell Inspiron 6400) 🙂 – I am one of the happiest ever in this world right now :D. here’s how to. All the credit goes to “kayvortex

Model of my wifi card is “Broadcom BCM4328 802.11a/b/g/n (rev 01)”

Steps

1. Install Ndiswrapper Common and Ndiswrapper Utils (You can do it using synaptic)
2. Download The Driver from ftp://ftp.dell.com/network/R151517.EXE and unzip it somewhere. You will see a folder named DRIVER
3. Execute the following commands


sudo ndiswrapper -i /download_directory/DRIVER/bcmwl5.inf
sudo ndiswrapper -l
sudo modprobe ndiswrapper

4. Then, set ndiswrapper to load on startup:

sudo ndiswrapper -m
gksudo gedit /etc/modules

and add the following module to the list


ndiswrapper

5. Restart (This is a must)

Now you can use Fn+F2 to turn on your wifi 😀 )