Category: howto

How to create a page and assign a page template automatically in WordPress

Sometime your theme depends on a few special pages, and it’s better to create them automatically after theme activation. You could also ask your users to create these pages and assign a few specific page template, but why would you do that if there is a scope of doing it automatically from your theme. Here is a simple snippet to take care of that 🙂

Step 1: Create a page template in your theme (say awesome-page.php) which has the following code
[sourcecode language=”php”]
<?php
/**
* Template Name: Awesome Page
*/
[/sourcecode]

Step 2: Add the following code in your theme’s functions.php file 🙂

[sourcecode language=”php”]
add_action(‘after_setup_theme’, ‘create_pages’);
function create_pages(){
$awesome_page_id = get_option("awesome_page_id");
if (!$awesome_page_id) {
//create a new page and automatically assign the page template
$post1 = array(
‘post_title’ => "Awesome Page!",
‘post_content’ => "",
‘post_status’ => "publish",
‘post_type’ => ‘page’,
);
$postID = wp_insert_post($post1, $error);
update_post_meta($postID, "_wp_page_template", "awesome-page.php");
update_option("awesome_page_id", $postID);
}
}
[/sourcecode]

And you are done!

Improving UX in the WordPress Admin Panel with Interactive Meta Boxes

Our goal is simple today, we want to add interactivity to our boring metaboxes. Instead of showing lots and lots of irrelevant input boxes at once, we will properly group them into different metaboxe containers and then display the required one based on the action of another one.

We will create a custom post called “profession”, then we will let our user choose from two pre defined professions, for example “photographer” and “programmer”. Based on his choice we will display another set of metaboxes to get the details of that profession.

Step 1: Register the custom post
Here is a simple custom post register script, add the following snippet in your functions.php

[sourcecode language=”php”]
add_action( ‘init’, ‘mytheme_custom_post_profession’ );
function mytheme_custom_post_profession() {

$labels = array(
‘name’ => _x( ‘Professions’, ‘profession’ ),
‘singular_name’ => _x( ‘Profession’, ‘profession’ ),
‘add_new’ => _x( ‘Add New’, ‘profession’ ),
‘all_items’ => _x( ‘Professions’, ‘profession’ ),
‘add_new_item’ => _x( ‘Add New Profession’, ‘profession’ ),
‘edit_item’ => _x( ‘Edit Profession’, ‘profession’ ),
‘new_item’ => _x( ‘New Profession’, ‘profession’ ),
‘view_item’ => _x( ‘View Profession’, ‘profession’ ),
‘search_items’ => _x( ‘Search Professions’, ‘profession’ ),
‘not_found’ => _x( ‘No professions found’, ‘profession’ ),
‘not_found_in_trash’ => _x( ‘No professions found in Trash’, ‘profession’ ),
‘parent_item_colon’ => _x( ‘Parent Profession:’, ‘profession’ ),
‘menu_name’ => _x( ‘Professions’, ‘profession’ ),
);

$args = array(
‘labels’ => $labels,
‘hierarchical’ => false,
‘public’ => true,
‘show_ui’ => true,
‘show_in_menu’ => true,
‘supports’ => array( ‘title’, ‘thumbnail’),
);

register_post_type( ‘profession’, $args );
}
[/sourcecode]

Step 2: Add the necessary libraries in your theme/plugin
Creating metaboxes is a tedious and boring task. So we will take help of one of the fantastic metabox libraries out there. We will be using Custom-Metabox-Framework which is also widely known as “CMB”. It will make our code a lot less cluttered. So download (or checkout) the library, unzip and rename the folder as “cmb” and place it inside your theme folder. Now add the following code in your functions.php

[sourcecode language=”php”]
add_action( ‘init’, ‘mytheme_initialize_cmb_meta_boxes’ );
function mytheme_initialize_cmb_meta_boxes() {
if ( !class_exists( ‘cmb_Meta_Box’ ) ) {
require_once( ‘cmb/init.php’ );
}
}
[/sourcecode]

Step 3: Create some metaboxes for this profession custom post
Now we have all the necessary tools available, lets create three metaboxes and attach them with only this “profession” type custom post.

[sourcecode language=”php”]
function mytheme_profession_metaboxes( $meta_boxes ) {
$prefix = ‘_mytheme_’; // Prefix for all fields
$meta_boxes[] = array(
‘id’ => ‘profession_details’,
‘title’ => ‘Profession Details’,
‘pages’ => array(‘profession’), // post type
‘context’ => ‘normal’,
‘priority’ => ‘high’,
‘show_names’ => true, // Show field names on the left
‘fields’ => array(

array(
‘name’ => ‘Your Name’,
‘id’ => $prefix . ‘name’,
‘type’ => ‘text’
),
array(
‘name’ => ‘Profession Type’,
‘id’ => $prefix . ‘profession_type’,
‘type’ => ‘select’,
‘options’=>array(
array("name"=>"Select a Profession","value"=>0),
array("name"=>"Photographer","value"=>1),
array("name"=>"Programmer","value"=>2),
)
),
),
);

$meta_boxes[] = array(
‘id’ => ‘profession_photographer’,
‘title’ => ‘Some details of your <b>photography</b> job’,
‘pages’ => array(‘profession’), // post type
‘context’ => ‘normal’,
‘priority’ => ‘high’,
‘show_names’ => true, // Show field names on the left
‘fields’ => array(
array(
‘name’ => "Your Camera",
‘id’ => $prefix . ‘photography_camera’,
‘type’ => ‘text_medium’
),
array(
‘name’ =>"Your primary interest is",
‘desc’ => ‘Landscape/Portrait/Street/Lifestyle’,
‘id’ => $prefix . ‘photography_interest’,
‘type’ => ‘text_medium’
),
),
);

$meta_boxes[] = array(
‘id’ => ‘profession_programmer’,
‘title’ => ‘Some details of your <b>programming</b> job’,
‘pages’ => array(‘profession’), // post type
‘context’ => ‘normal’,
‘priority’ => ‘high’,
‘show_names’ => true, // Show field names on the left
‘fields’ => array(
array(
‘name’ => "Your Favorite IDE",
‘id’ => $prefix . ‘programming_ide’,
‘type’ => ‘text_medium’
),
array(
‘name’ =>"Your primary language",
‘desc’ => ‘C/PHP/Java/Python/Javascript’,
‘id’ => $prefix . ‘programming_lang’,
‘type’ => ‘text_medium’
),
),
);

return $meta_boxes;
}

add_filter( ‘cmb_meta_boxes’, ‘mytheme_profession_metaboxes’ );
[/sourcecode]

At this point, if we click on “New Profession” from our WordPress admin panel, we will see the editor screen like this. Please notice that we have already disable the “editor” field while registering this custom post (using the “supports” attribute)
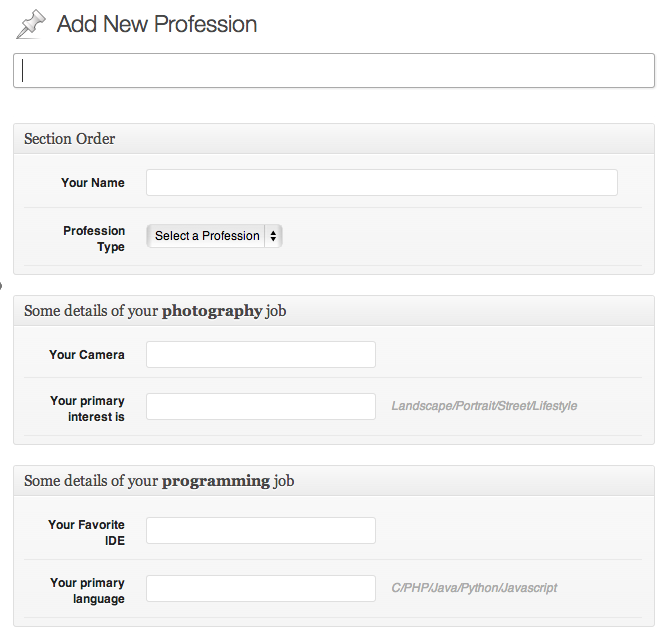
The Profession Screen

Uh, oh! that looks very confusing for people of both professions. I mean asking the photographer about their favorite language and ide is utter nonsense, and vice versa. So How can we make sure that only photographers will see the second metabox container, and programmers will see the third metabox container? Lets do this!

Step 4: The Magical Ingredient: Adding the interactivity using Javascript
We need to add some javascript at this point to improve the user experience at this point. Create a new javascript file inside the “js” folder inside your theme folder. Name the file as “profession-admin.js”. Now we need to make sure that this file is loaded properly in the admin panel.

[sourcecode language=”php”]
function mytheme_admin_load_scripts($hook) {
if( $hook != ‘post.php’ && $hook != ‘post-new.php’ )
return;

wp_enqueue_script( ‘custom-js’, get_template_directory_uri()."/js/profession-admin.js" );
}
add_action(‘admin_enqueue_scripts’, ‘mytheme_admin_load_scripts’);
[/sourcecode]

Now open the js/profession-admin.js and add the following code. Please keep in mind that jQuery is loaded in wordpress admin panel by default, and it works in no-conflict mode. So we want code like this if we want to use our favorite $ as a reference to the jQuery object.

[sourcecode language=”javascript”]
(function($){
$(document).ready(function(){
$("#profession_photographer").hide();
$("#profession_programmer").hide();

//lets add the interactivity by adding an event listener
$("#_mytheme_profession_type").bind("change",function(){
if ($(this).val()==1){
// photographer
$("#profession_photographer").show();
$("#profession_programmer").hide();
}else if ($(this).val()==2){
//programmer
$("#profession_photographer").hide();
$("#profession_programmer").show();
} else {
//still confused, hasn’t selected any
$("#profession_photographer").hide();
$("#profession_programmer").hide();
}
});

//make sure that these metaboxes appear properly in profession edit screen
if($("#_mytheme_profession_type").val()==1) //photographer
$("#profession_photographer").show();
else if ($("#_mytheme_profession_type").val()==2) //programmer
$("#profession_programmer").show();

})
})(jQuery);
[/sourcecode]

At this moment, when you click on the “New Profession” you will see like this.
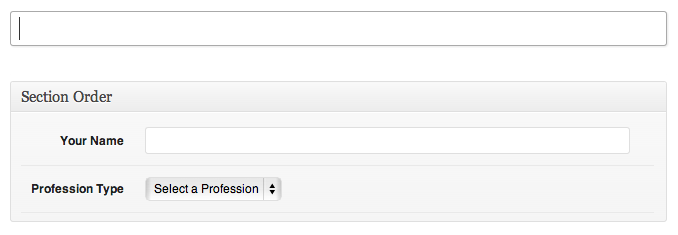
Improved Profession Screen

And if you select a profession, the appropriate metabox will be displayed instantly.
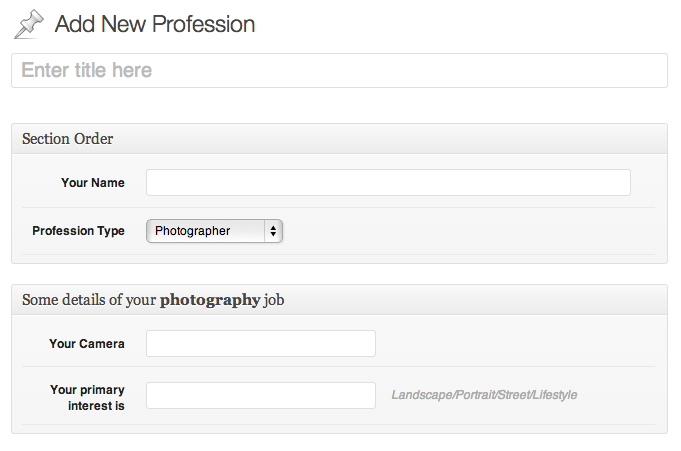
Photography

That looks good eh? So what did our javascript do? Lets have a look at the things it does

  • It passes the jQuery object to our function as $
  • It hides all the secondary metaboxes related to the professions
  • It registers a new event listener that monitors the change event in our profession select box
  • It displays the appropiate metabox when someone picks a profession
  • It also displays the correct metabox when someone edits a profession

So that’s mainly it. We have made our profession screen look much better. And we are now collecting details about the particular profession without confusing people from other professions. And most of all, it is much friendlier than before 🙂

I hope you have enjoyed this article and already started planning to implement it in your next wordpress project. Have fun!

Shameless Plug
If you are looking for a fantastic NGinx+PHP-fpm based WordPress hosting with Solid Performance, give WPonFIRE a try. You will never be disappoint at all. And if you want a 25% discount coupon for life, let me know in the comment and I will arrange you one.

WPonFIRE Premium WordPress Hosting for Everyone

বোয়ার নিয়ে কথাবার্তা

bower

বোয়ার (Bower) হল ফ্রন্ট এন্ড ডেভেলপমেন্টের সময় যেসব জাভাস্ক্রিপ্ট ফাইল বা সিএসএস ফাইল লাগে সেগুলো ম্যানেজ করার জন্য টুইটার টিমের তৈরী করা একটা প্যাকেজ ম্যানেজার টুল। বোয়ার দিয়ে খুব সহজেই অ্যাপ্লিকেশনের জন্য প্রয়োজনীয় জেএস বা সিএসএস ফাইল অ্যাড/রিমুভ করা যায়, আপগ্রেড করা যায়। এই কাজের জন্য রয়েছে বোয়ারের বিশাল প্যাকেজ রিপোজিটরি যেখানে আপনি স্ক্রিপ্ট সার্চ করতে পারবেন খুব সহজেই। এই আর্টিকেলে আমরা দেখব কিভাবে বোয়ার ব্যবহার করতে হয় 🙂

বোয়ার ইনস্টল করা
বোয়ার ইনস্টল করার জন্য আমাদের কম্পিউটারে নোডজেএস এবং এনপিএম টুল ইনস্টল করা থাকতে হবে। নোড এবং এনপিএম ইনস্টল করার জন্য আপনারা http://nodejs.org/ থেকে ইনস্টলার টি ডাউনলোড করে চালান, একইসাথে নোড এবং এনপিএম ইনস্টল হয়ে যাবে

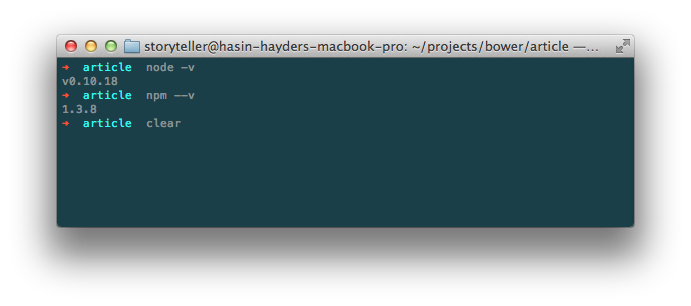
নোড এবং এনপিএম ঠিক মত ইনস্টল হয়েছে কিনা সেটা বোঝার জন্য আপনার কমান্ড লাইন/টার্মিনাল ওপেন করে কমান্ড দিন node -v এবং npm –v । একটু খেয়াল রাখবেন যে একটিতে -v এবং আরেকটি কমান্ডে –v ব্যবহার করা হয়েছে। । সবকিছু ঠিকঠাক থাকলে আপনারা টার্মিনালে নোড এবং এনপিএমের ভার্সন নাম্বার দেখতে পারবেন। আর কোন এরর পেলে আবার নোড অথবা এনপিএম ইনস্টল করুন অথবা ওদের সাইটে গিয়ে ট্রাবলশুটিং সেকশন দেখতে পারেন

node-npm

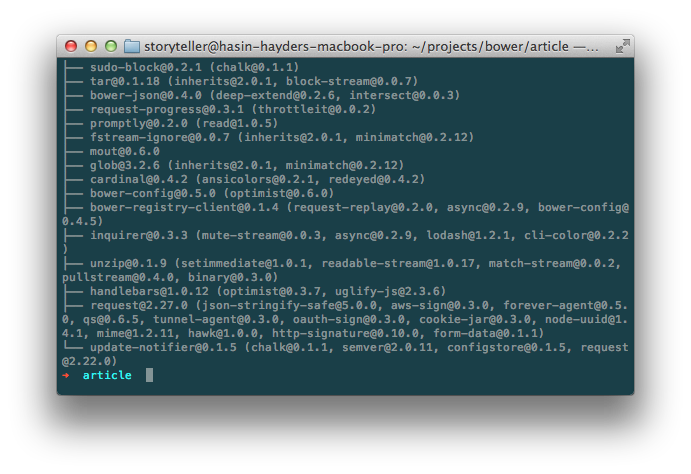
এবার বোয়ার ইনস্টল করার পালা, আর সেটা করার জন্য আপনার টার্মিনালে কমান্ড দিন npm install -g bower। কিছুক্ষনের মধ্যেই দেখতে পাবেন কনসোলে লেখা উঠেছে যে বোয়ার ইনস্টলেশন সাকসেসফুল হয়েছে। সহজ না?

bower-install

এবার চলুন দেখি কিভাবে আমরা বোয়ার ব্যবহার করব

বোয়ার ব্যবহার করা
প্রথমে টার্মিনাল ওপেন করে আপনার প্রজেক্ট ডিরেক্টরীতে প্রবেশ করুন, অথবা নতুন একটি ফোল্ডার তৈরী করে সেখানে প্রবেশ করুন। আমরা ধরে নিব আমাদের প্রজেক্টের জন্য নিচের তিনটি ফাইল লাগবে

  • জেকোয়েরী
  • ম্যাগনিফিক পপআপ
  • বুটস্ট্র‍্যাপ সিএসএস

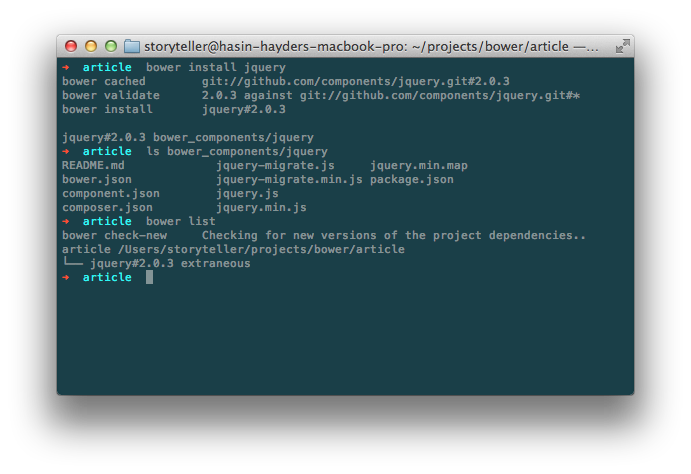
আমরা টার্মিনালে এসে প্রথমে জেকোয়েরী ইনস্টল করার জন্য কমান্ড দিব bower install jquery। কিছুক্ষনের মাঝেই বোয়ার আপনাকে জানিয়ে দেবে যে জেকোয়েরী ইনস্টল করা সফল হয়েছে। আপনি আপনার প্রজেক্ট ডিরেক্টরীতে দেখবেন bower_components নামে নতুন একটি ফোল্ডার তৈরী হয়েছে, যার মাঝে জেকোয়েরী নামের একটা ফোল্ডারে jquery.js রয়েছে।

এছাড়াও আপনি bower list কমান্ড দিলে দেখবেন বোয়ার খুব সুন্দর করে ইনস্টল করা স্ক্রিপ্ট এবং তাদের ভার্সন নম্বর দেখিয়ে দেবে।

bower-jquery

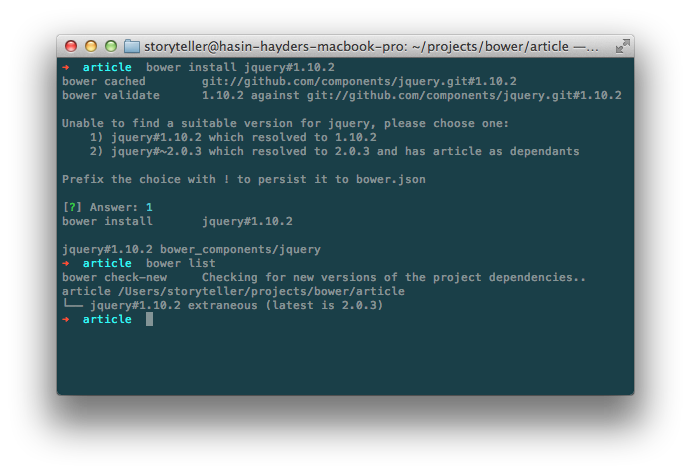
খেয়াল করলে দেখবেন যে বোয়ার ডিফল্ট ভাবে প্যাকেজের বর্তমান ভার্সন ইনস্টল করেছে। কিন্তু আপনার যদি অন্য কোন ভার্সন দরকার হয় তাহলে কি করবেন? ধরুন আপনের দরকার জেকোয়েরীর ১.১০.২ ভার্সন। বোয়ারে যেকোন প্যাকেজ ইনস্টল করে দেয়ার সময় তার ভার্সন নম্বরও উল্লেখ করে দেয়া যায়। যেমন এই ক্ষেত্রে আমরা টার্মিনালে কমান্ড দেব bower install jquery#1.10.2, তাহলে বোয়ার তার ইন্টারঅ্যাকটিভ প্রম্পটের মাধ্যমে গাইড করবে ১.১০.২ ভার্সন ইনস্টল করে নেয়ার জন্য। নিচের স্ক্রিনশটটি দেখলে এটা আরও পরিষ্কার হতে পারে

bower-jquery-1.10.2

বোয়ারে প্যাকেজ সার্চ করা
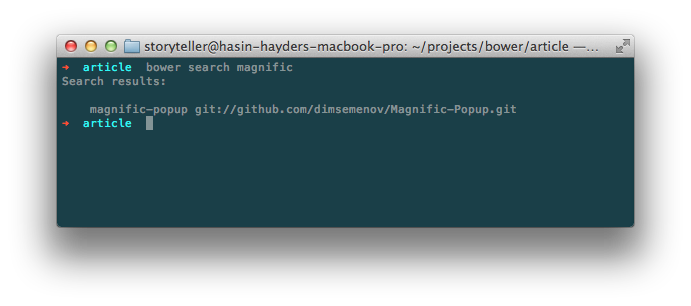
কোন প্যাকেজ বা স্ক্রিপ্ট বোয়ারের রিপোজিটরীতে আছে কিনা সেটা জানতে হলে bower search কমান্ড দিলেই বোয়ার সেই প্যাকেজের বিষয়ে বিস্তারিত তথ্য দেখাবে। যেমন আমরা যদি magnigic popup জাভাস্ক্রিপ্ট প্যাকেজ ইনস্টল করার আগে চেক করে নিতে চাই যে এই নামে আসলেই কোন প্যাকেজ আছে কিনা তাহলে আমরা টার্মিনালে কমান্ড দিব bower search magnific

bower-magnific

বোয়ার দেখাচ্ছে যে magnific-popup নামে একটা প্যাকেজ আছে। সেটা ইনস্টল করতে হলে আমরা আগের মতই কমান্ড দিব bower install magnific-popup। ঠিক মত ইনস্টল হয়েছে কিনা সেটা চেক করার জন্য আমরা bower_components ফোল্ডারে দেখতে পারি অথবা bower list কমান্ড দিয়ে দেখতে পারি ।

প্যাকেজ আনইনস্টল করা
বোয়ারের মাধ্যমে কোন প্যাকেজ আনইনস্টল করা খুবই সহজ। শুধু install এর বদলে uninstall কমান্ড দিন, ব্যাস হয়ে গেল।

প্যাকেজ লিস্ট সংরক্ষন করা
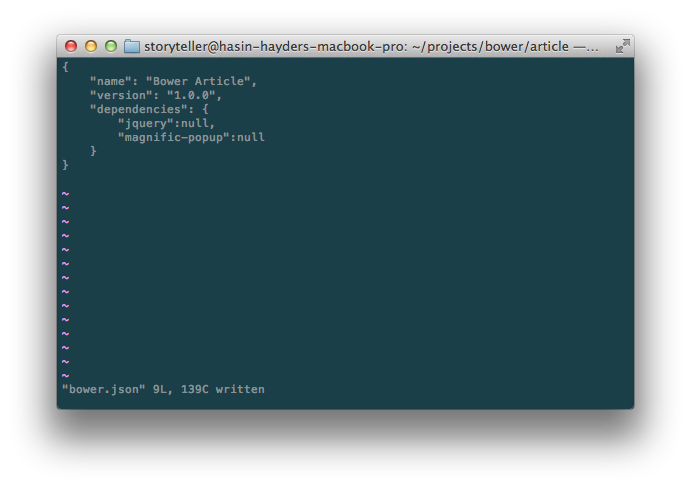
এইযে আমরা এইসব প্যাকেজ ইনস্টল করলাম, এগুলো আমরা একটা লিস্ট হিসেবে সংরক্ষন করতে পারি যাতে পরবর্তীতে আপডেট করতে হলে বা ইনস্টল করতে হলে এক এক করে করতে না হয়। এজন্য অ্যাপ্লিকেশনের কারেন্ট ডিরেক্টরীতে (যেখান থেকে আমরা bower কমান্ড চালাব) একটি ফাইল তৈরী করি bower.json নামে। যেকোন টেক্সট এডিটর দিয়ে এই ফাইল এডিট করা যাবে (তবে ওয়ার্ড প্রসেসর দিয়ে নয়)। যেমন আমাদের আজকের প্রজেক্টের জন্য আমরা নিচের মত করে bower.json ফাইল লিখব, যেখানে dependencies সেকশনে আমাদের যাবতীয় প্যাকেজের লিস্ট লিখে রাখা হবে
bower-json

বোঝার সুবিধার্থে আমি এখানে আবার লিখে দিলাম
[sourcecode language=”javascript”]
{
"name": "Bower Article",
"version": "1.0.0",
"dependencies": {
"jquery":null,
"magnific-popup":null
}
}
[/sourcecode]

এরপর থেকে আমরা অ্যাপ্লিকেশন ডিরেক্টরীতে এই bower.json ফাইল কপি করে কমান্ড দিব bower install। ব্যাস তাহলেই বোয়ার এই bower.json ফাইল থেকে ডিপেন্ডেন্সী লিস্ট পরে এক এক করে সেগুলো ইনস্টল করে ফেলবে

আমরা যদি কোন প্যাকেজের কোন পার্টিকুলার ভার্সন ইনস্টল করতে চাই তাহলে null এর বদলে সেই ভার্সন নম্বর লিখে দিব, আর লেটেস্ট ভার্সন চাইলে null লিখব। যেমন যদি আমরা জেকোয়েরীর ১.১০.১ ভার্সন চাই তাহলে আমাদের bower.json ফাইল হবে নিচের মত

[sourcecode language=”javascript”]
{
"name": "Bower Article",
"version": "1.0.0",
"dependencies": {
"jquery":"1.10.1",
"magnific-popup":null
}
}
[/sourcecode]
এরপর আমরা অ্যাপ্লিকেশন ডিরেক্টরীতে কমান্ড দিব bower install, ব্যাস!

প্যাকেজ লিস্টে নতুন প্যাকেজ বা ডিপেন্ডেন্সী যোগ করা
আমরা তো ইতোমধ্যেই bower.json ফাইলে দুইটি প্যাকেজ যোগ করেছি। এখন আমরা চাই নতুন একটি প্যাকেজ bootstrap ইনস্টল করতে। সেক্ষেত্রে আমরা দুই ভাবে করতে পারি

১. আমরা ম্যানুয়ালী bower.json ফাইল এডিট করে bootstrap কে একটা নতুন ডিপেন্ডেন্সী হিসেবে যোগ করে, সেই bower.json ফাইল সেভ করে টার্মিনালে কমান্ড দিতে পারি bower install। আমরা দেখব যে বোয়ার স্বয়ংক্রীয় ভাবে bootstrap ইনস্টল করে ফেলছে

অথবা

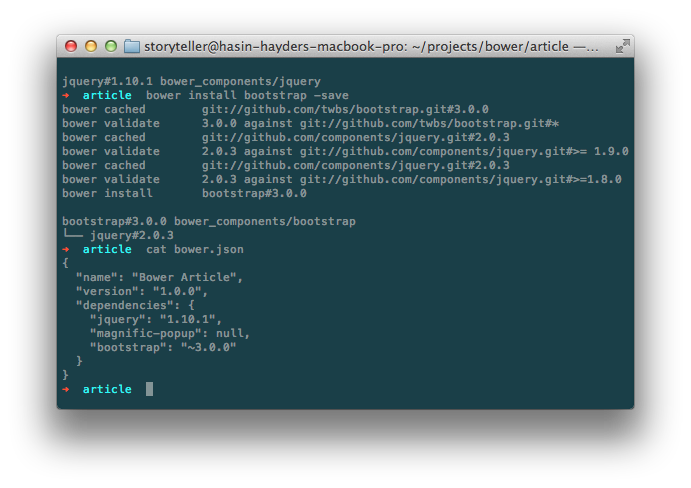
২. আমরা bower.json ফাইল ম্যানুয়ালী এডিট না করে বরং টার্মিনালে সরাসরি কমান্ড দিতে পারি bower install bootstrap -save । খেয়াল করুন এখানে একটা অতিরিক্ত প্যারামিটার/স্যুইচ যোগ করা হয়েছে -save নামে। এর ফলে বোয়ার দুইটি কাজ করবে। প্রথমত বোয়ার bootstrap ইনস্টল করবে, দ্বিতীয়ত বোয়ার নিজেই bower.json ফাইল এডিট করে bootstrap কে ডিপেন্ডেন্সী সেক্শনে যোগ করে ফেলবে। আমরা bower install bootstrap -save এই কমান্ড দেয়ার পর bower.json ফাইল চেক করলে দেখব এটা নিচের মত কনটেন্ট দেখাচ্ছে 🙂

bower-auto-update

বোয়ার কম্পোনেন্ট নিজের পছন্দমত ডিরেক্টরীতে ইনস্টল করা
আমরা এতক্ষন দেখেছি যে বোয়ার ডিফল্টভাবে bower_components নামের ডিরেক্টরীতে সব স্ক্রিপ্ট ইনস্টল করছে। কিন্তু আমরা যদি চাই যে আমাদের সব ইনস্টল করা স্ক্রিপ্ট গুলো bower_components এর বদলে “scripts/vendor” ডিরেক্টরীতে ইনস্টল হবে, তাহলে অ্যাপ্লিকেশন ডিরেক্টরীতে নিচের মত করে .bowerrc ফাইল তৈরী করুন (খেয়াল রাখবেন নামের শুরুতে একটি . রয়েছে)। সেই .bowerrc ফাইলে নিচের মত করে নিজের পছন্দের ডিরেক্টরী উল্লেখ করে দিন
[sourcecode language=”javascript”]
{
"directory":"scripts/vendor/"
}
[/sourcecode]
এরপর আমরা অ্যাপ্লিকেশন ডিরেক্টরীতে কমান্ড দিব bower install, ব্যাস! বোয়ার নিজেই scripts/vendor ফোল্ডার তৈরী (আগে থেকে তৈরী করা না থাকলে) করে তার ভেতরে সব স্ক্রিপ্ট ইনস্টল করে ফেলবে

উপসংহার
অ্যাপ্লিকেশনে স্মার্ট ভাবে প্যাকেজ ম্যানেজ করতে বোয়ারের জুড়ি নেই। সময় বাঁচানোর জন্য এইসব টুল তৈরী হচ্ছে দিন কে দিন, এবং স্মার্ট ডেভেলপাররা সেগুলো ব্যবহার করে নিজেদের সময় যেমন বাঁচাচ্ছে পাশাপাশি তাদের প্রজেক্ট ম্যানেজমেন্ট করছে অত্যন্ত সহজভাবে। আগে বোয়ার ব্যবহার করে না থাকলে আজকে থেকেই শুরু করে দিন 🙂

এর পরের আর্টিকেলে আমরা দেখব কিভাবে আমরা রিকোয়ারজেএস (ReuireJS) ব্যবহার করে আমাদের অ্যাপ্লিকেশনে স্বয়ংক্রীয়ভাবে আমাদের জাভাস্ক্রিপ্ট ফাইল লোড করতে পারি, এবং সেখনেও বোয়ার আমাদের কিভাবে সাহায্য করে।

এই সিরিজের সব শেষের আর্টিকেলে আমরা দেখব টাস্ক ম্যানেজার গ্রান্টের (Grunt) ব্যবহার যার মাধ্যমে আমরা আমাদের অ্যাপ্লিকেশনের যাবতীয় কাজ অটোমেট করে আরও স্মার্টভাবে ডেভেলপ করতে পারব।

how to add custom meta boxes in wordpress

Custom meta boxes are very useful for collecting arbitrary information from the post authors, and then take decisions based on those information. For example, if you have a custom post type as “stores” and you want to collect “latitude” and “longitude” for each “store” type post, meta boxes are the way to do it conveniently. So how you can create a meta box and collect meta information from the users? The whole workflow is divided into three parts

1. Create the meta box design/markup
2. Attach them with the post/custom-post
3. Save the user input (and reuse it when required)

Creating the metabox markup: Inside your theme folder, lets create a new folder named “metaboxes” to organize all the metaboxes in same place. So once the folder is created, create a new file name coordinates.php inside the metabox folder. So the final path to the coordinates.php is your.theme.folder/metaboxes/coordinates.php. This file contains the simple markup to accept latitude and longitude from the users for our custom post type “stores”. Here comes the markup for that file

[sourcecode lang=”html”]
<fieldset id="coordinates">
<table width="100%">
<tr>
<td>
Latitude:
</td>
<td>
<input style="width:140px;" type="text" name="store_latitude" id="store_latitude" />
</td>
<tr>
<td>
Longitude:
</td>
<td>
<input style="width:140px;" type="text" name="store_longitude" id="store_longitude" />
</td>
</tr>
</table>
</fieldset>
[/sourcecode]

It’s just a simple form – no big deal, eh? At this moment this form can only take user input. But to retain the previously entered value we need to work on it and add some extra lines. I will come back later to this file.

Registering the custom post: There is a nifty tool out there which can help you to create the essential code to register a custom post type, unless you want to write all of them by yourself (I prefer writing my own, always). Create a new file named “custom-post-stores.php” inside your theme folder and include this file in the functions.php of your theme. Here is the code of the custom-post-stores.php

[sourcecode lang=”php”]
<?php
add_action(‘init’, ‘createPostType’);
function createPostType(){
register_post_type(‘stores’,
array(
‘labels’ => array(
‘name’ => __(‘Stores’),
‘singular_name’ => __(‘Store’),
‘add_new’ => __("Add New Store"),
‘add_new_item’ => __("Add New Store"),
),
‘public’ => true,
‘has_archive’ => true,
‘rewrite’ => array(‘slug’ => ‘stores’),
‘supports’ => array("title", "editor", "thumbnail")
)
);
}
[/sourcecode]

I am not going to explain what all of these parameters do in the register_post_type function, but of course, please, have a look at the beautiful reference in codex.

The code above will register a new custom post “stores” and once you logged into the wordpress admin panel, you will notice a new “Stores” menu visible on the left side. From there you can add new stores type posts.

Attaching metaboxes to the custom post: Lets attach the previously created metabox with this new “stores” type posts. In the same “custom-post-stores.php” append the following codeblock

[sourcecode lang=”php”]
/*this function will include the metabox in current posts scope*/
function customPostGeoinfo()
{
global $post;
include_once("metaboxes/coordinates.php");
}

/*this function will save the user input from the meta box*/
function customPostSave($postID)
{
// called after a post or page is saved
if ($parent_id = wp_is_post_revision($postID)) {
$postID = $parent_id;
}

$items = array("store_latitude","store_longitude"); //form elements of the meta box

foreach ($items as $item) {
if ($_POST[$item]) {
updateCustomMeta($postID, $_POST[$item], $item);
}
}

}

function updateCustomMeta($postID, $newvalue, $field_name)
{
// To create new meta
if (!get_post_meta($postID, $field_name)) {
add_post_meta($postID, $field_name, $newvalue);
} else {
// or to update existing meta
update_post_meta($postID, $field_name, $newvalue);
}
}

/* now make them working via wordpress action hooks */

function myPostOptionsBox()
{
add_meta_box(‘geoinformation’, ‘Geo Info’, ‘customPostGeoinfo’, ‘stores’, ‘side’, ‘high’);
}

add_action(‘admin_menu’, ‘myPostOptionsBox’);
add_action(‘save_post’, ‘customPostSave’);
[/sourcecode]

Tada, we are done. But only one thing left and that is revising our metabox to retain the old user value. So lets rewrite the metaboxes/coordinates.php with the following code

[sourcecode lang=”html”]
<fieldset id="coordinates">
<table width="100%">
<tr>
<td>
Latitude:
</td>
<td>
<input style="width:140px;" type="text" name="store_latitude" id="store_latitude" value="<?php echo get_post_meta($post->ID, ‘store_latitude’, true); ?>"/>
</td>
<tr>
<td>
Longitude:
</td>
<td>
<input style="width:140px;" type="text" name="store_longitude" id="store_longitude" value="<?php echo get_post_meta($post->ID, ‘store_longitude’, true); ?>"/>
</td>
</tr>
</table>
</fieldset>
[/sourcecode]

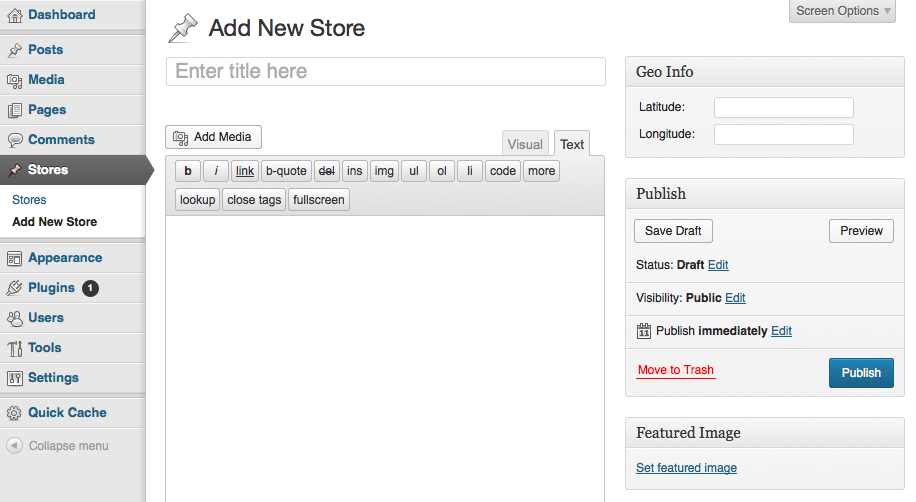
That’s it. The out put will look like the following one. Please notice the “Geo Info” metabox on the top right corner and “Stores” menu on the left menu.

Custom post with meta box

Shameless Plug: We develop beautiful themes and admin panel templates for your web applications. Why don’t have a look at our portfolio in themeforest and purchase a few to support us on the long run.

Parsing inbound emails with Mailgun, how to

Parsing incoming emails is a common task for many web application which deals with emails, and then take decision on the parsed contents. However, piping the incoming mail stream to an external script is not everyone’s food and it needs good knowledge on shell scripting and also you need to be good with your mail server to install/configure the pipe properly. So there are third party services out there which makes it easy for you by accepting your emails to predefined mailboxes. They also parse the email and post the content over HTTP to an external script (i.e webhook) which makes the whole process a lot easier. You just outsource the email parsing to these third party providers and spend time rather on analyzing the content of the email leveraging their email->http webhook. Cloudmailin, MailNuggets, and MailGun are one the few providers which I’ve tested and they work really good with very low latency. In this article I am going to show you how to configure your free Mailgun account to accept incoming mails, parse and then accept the mail content to your php script.

Step1: Register a free account with MailGun

Don’t worry – they dont charge. And Mailgun’s free plan is quite good with 200 mails/day which is pretty good during development phase. Once you are ready, you may opt in to purchase their plans which suit you best.

Step 2: Add a domain

Free accounts are restricted to use *.mailgun.org domain for now. So just log into you Mailgun control panel and create your own domain.

Configure your Mailgun Domain

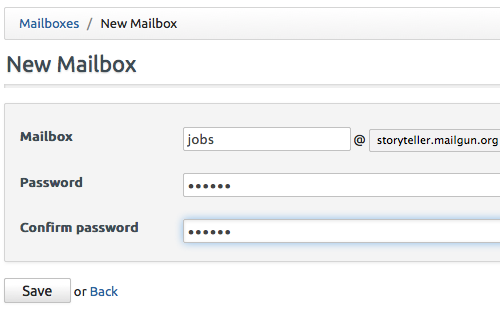
Step 2: Create a mailbox to accept incoming mails

You need to configure a mailbox to start accepting inbound emails first, so you can process them later using different rules. Just go to your mailboxes tab in the Mailgun control panel and create a new mailbox.

Creating new Mailbox

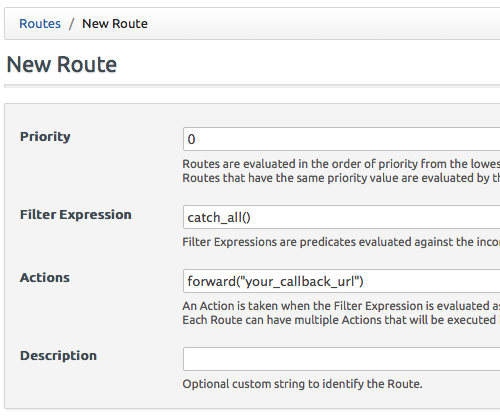
Step 4: Link your incoming emails to your external script.

This step was a little confusing at first and I really didnt understand how to achieve the result. Mailgun will automatically parse these incoming mails, which you can filter by recipients or senders or by wildcard and then forward to your external script. To do that, just go to your Routes tab in the Mailgun control panel and create a new route, like the one shown in the screenshot below.

Configuring Routes and Linking to external scripts

See the forward() function does the job where my confusion began – I was almost clueless 😛

Ok we are done. Mailgun will now accept all mails to this mailbox [email protected] and parse the mail content including attachments, and then post the parsed contents as an array to the external PHP script we have configured in step 4. In your php script just capture those data from $_POST and do whatever you want to.

Shameless Plug

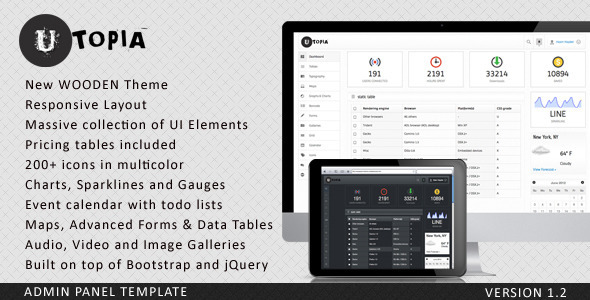
We develop beautiful dashboard and admin panel templates for the web application developers, which you can plug into your application easily. These templates comes with well documented code, even better documentation of components and a pack of essential plugins. Check out one of our admin template “Utopia” and grab your copy if you like it

Utopia Dashboard Template by Themio


Story about Blue E, iFramed Web Application, Wastage of 6 hours, Missed Lunch and what not!

Long story short, I was developing a Facebook page application which runs from inside a page tab. Such applications runs inside an iframe on Facebook Fanpage. Everything was going perfectly, until, we started checking it in IE!! The symptoms were simple, PHP Session is not working when user logs in. The application works perfectly in Safari, Opera, Chrome and Firefox and only the Elite of the Elites Internet Explorer is not accepting any cookie generated from the application.

I was hungry, almost lunch time – client was kicking my ass, so I couldn’t even think to grab a bite. I was VERY HUNGRY, clueless, lost and I was feeling like yelling at everything that walks in front of me. Oh boy, I was absolutely clueless about what was done wrong to satisfy this King Blue E.

After discussing my problem with Uncle G for over 5 hours, trial and error, do this and that, I realized that the problem is actually related to p3p privacy policy and how Internet Explorer deals with it. It doesn’t accept any cookie from any web application which is running inside an iframe within another application. Let me clarify

1. Web application A with domain a.com has an iFrame in one of its page
2. Inside that iFrame, it loads another web application B with domain b.com
3. Now Internet Explorer doesnt accept any cookie which generates by Web Application B, resulting a catastrophe, a real disaster.

The Solution: send the following header in your web application which runs inside the iFrame.

[sourcecode language=”php”]
<?php
header(‘P3P: CP="CAO PSA OUR"’);
header(‘P3P: CP="HONK"’);
?>
[/sourcecode]

and it fixes this weird behavior of Internet Explorer. Freaking p3p! wastage of 6 hours, remaining hungry, missing lunch, get kicked on the ass and what not.

I hate you Internet Explorer. You are the worst thing ever made in the history of web development. I sincerely hate you. And Microsoft, with all the Blue E fan-boys out there, GO TO HELL and let us live our life.

Morons!

RSA Encrypting and Decrypting data with Zend_Crypt_Rsa Library

Public/private key based encryption is very popular because of the strength it sets in encryption, specially above 1024 bits. Now there are external library to encrypt data using RSA encryption like RSA in phpclasses.org – the fun is we were also using this library in one of our ZF based project. But last week I’ve found that there is a hidden gem in the Library/Zend/Crypt folder (Zend_Crypt_Rsa) which can do the same thing using openssl library. The bad thing is that there is no official documentation on how to use this library 🙁 Thats why I’ve decided to write a blog post to show you how to use Zend_Crypt_Rsa and encrypt your data with your public/private key and decrypt to get it back in original form.

Step 1: Create your RSA public/private key using ssh-keygen
[sourcecode lang=”bash”]
cd /path/to/keyfolder/
ssh-keygen -t RSA
[/sourcecode]

When it will ask for the path of the key file, input “./id_rsa” . It will then prompt for passphrase which actually works like a password and you cant retrieve your data if you forget this. So input something like “MySecretWord” – This will output something like this
[sourcecode lang=”bash”]
ssh-keygen -t rsa
Generating public/private rsa key pair.
Enter file in which to save the key (/Users/hasinhayder/.ssh/id_rsa): ./id_rsa
Enter passphrase (empty for no passphrase):
Enter same passphrase again:
Your identification has been saved in ./id_rsa.
Your public key has been saved in ./id_rsa.pub.
The key fingerprint is:
c8:dc:cd:a8:90:98:67:42:65:45:20:f8:58:39:74:66 [email protected]
The key’s randomart image is:
+–[ RSA 2048]—-+
| oo.E+o |
|. +B |
| +.. |
|…o + o + |
| + = + S o |
| + . . |
| . |
| |
| |
+—————–+
[/sourcecode]

After a while you will see that there are two files in the same directory named “id_rsa” and “id_rsa.pub”. First one is your private key and the second one is the public key.

Step 2: Encrypt data using your public key
As we have our RSA public and private keys in our hand, its time to start playing with these. We will now encrypt our data with our public key. In that way you can only decrypt it with your private key. I hope it is clear now that why we should encrypt using public key only? If now, let me clarify it a bit more. Your public key is “public” to the world. Now if you encrypt your data with your private key, anyone will be able to decrypt it with your public key – so that’s plain meaningless 🙂

[sourcecode lang=”php”]
public function encAction(){
$this->_helper->viewRenderer->setNoRender();
$this->_helper->layout->disableLayout();
$zrsa =new Zend_Crypt_Rsa(array("passPhrase"=>"MySecretWord","pemPath"=>"/path/to/your/keyfolder/id_rsa")); //thats the path to the private key file
$string = "Yeah, this is my SECRET MESSAGE";
$enc = $zrsa->encrypt($string, $zrsa->getPublicKey(),Zend_Crypt_Rsa::BASE64);
echo "Secret Message: {$enc}";
}
[/sourcecode]

In the code above, we are generating output in BASE64 format, because that is readable to everyone 🙂 – after you execute this action in your browser, you can see something like the following (it will differ based on your key)

[sourcecode lang=”shell”]
jYMRM4jQedQgCdN7T9y6gNfLYZ49F+cSMz2tgLPsflQOE2XhVg98yvoQ/
PvUtBYGceEubYLuhYufgQE6VZpsOvvGcXt6WWE97HDGisQXXHhvnvQBzb
QQyF0WphCGH/0y2JviVb5zcQGhFIQ6oazztHonIxtdF4Fgaa0
M++jCymMSSI8vfOMUoL8s00fxVcqvJ7EVbYrFvUUMCH77HtBAYMziQotS
YddiMzb5AqEl8cN0N5Aao7dpOSzzumyuiRRoAA0NGtXnSlqQr5hAfdQ0V
vUKkqQHfd64Cfs+T8U9FmPTZUi7XE8jGgYFD0k4H9CJHl1EoVRNsqr3kt
4CNntQ==
[/sourcecode]

Thats your encrypted string in base64 format. Plain gibberish, eh? 🙂

Now its time to decrypt the ciphered text 🙂

Step 3: Decrypt the cipher
Well, now we have our encrypted string. Lets decrypt it

[sourcecode lang=”php”]
$dec = $zrsa->decrypt($enc, $zrsa->getPrivateKey(),Zend_Crypt_Rsa::BASE64);
echo $dec;
[/sourcecode]

Now it will output the original message “Yeah, this is my SECRET MESSAGE” 🙂

So here is everything together 🙂
[sourcecode lang=”php”]
public function encAction(){
$this->_helper->viewRenderer->setNoRender();
$this->_helper->layout->disableLayout();
$zrsa =new Zend_Crypt_Rsa(array("passPhrase"=>"MySecretWord","pemPath"=>"/path/to/your/keyfolder/id_rsa")); //thats the path to the private key file
$string = "Yeah, this is my SECRET MESSAGE";
$enc = $zrsa->encrypt($string, $zrsa->getPublicKey(),Zend_Crypt_Rsa::BASE64);
echo "Secret Message: {$enc}";
echo "<hr/>";
$dec = $zrsa->decrypt($enc, $zrsa->getPrivateKey(),Zend_Crypt_Rsa::BASE64);
echo $dec;
}
[/sourcecode]

Hope you’ve enjoyed this article. I just wish that the documentation team of Zend Framework would have added this in the manual of Zend Framework for the rest of us 🙂

Shameless Note 🙂 : By the way, if you are looking for a beautiful Admin Panel Theme for your PHP based projects/web-applications, you may want to check out Chameleon Circuit, which is developed by our Themio Team 🙂

SkyLedger iPhone App UI Clone Tryout using Titanium

Last night while browsing Dribbble, I’ve seen a beautifully crafted iPhone UI project done by Josh Helmsley, which was part of his SkyLedger project. It was just fantastic.

SkyLedger

So I tried to clone the same UI using Titanium and finally done something similar 🙂

SkyLedger iPhone App UI Clone in Titanium :P

Just a test project. No interaction, just plain simple UI done using Titanium. You can download this Appcelerator titanium project by clicking on the following link. Let me know if you like it.

Download

Icons by DryIcons (Handy-2)

Startup Trouble: Selling your product!

Once your startup is live and has a developed product, you want to jump into the beautiful world of real money, isn’t it? But then there are chances that you are puzzled with lots of questions like “How can I sell my product from Bangladesh?” or “How can I bring my money back here?”

When we decided that we want to go live with MiproApps subscription plan, there was one more thing that troubled us a lot. We wanted to sell a special type of product, subscription based with automated monthly or yearly recurring charges. So we started looking for one easier solution. Its not like that we were not willing to pay for it, but the problem was that we don’t have paypal available in Bangladesh and you know that it’s a real pain in the ass to use international credit card here.

So, we’ve found “merchant account providers”. These merchant account providers help you to charge your client as well as work like a virtual bank account. You don’t need to setup anything to start with them. Some of them charge a one-time fee (like 2Checkout) but most of them charge a percentage from your sales. After searching for couple of weeks, we found the following merchant account providers who looked reliable. Now I know there are other providers as well, but I am just telling our story here, as we experienced it.

2CheckOut
Plimus
Avangate
FastSpring
ShareIt from DigitalRiver

We tried to go with Avangate. They have nice UI, pro looking support, but unfortunately it didn’t work really good for us because of their hard-to-understand documents, specially for subscription based charging. And one more thing that’s not so cool was their charging at comparatively higher rate per sale. FastSpring has a very nice support with UI as well, and very good documentation. But they didn’t have subscription based charging model that time (They have one now, called Saasy). We bought one account in 2checkout and almost implemented our charging module based on that, but then, surprisingly we’ve found Plimus.

Plimus was extremely easy to setup, with a lower charging rate per sale and with user friendly control panel that worked really well for us. It was a charm from setting up first product to setup coupon code and volume based discount. And guess what, we were able to charge our customers, no matter if he was paying using Paypal or CC or Wire-transfer. Plimus managed everything and we had almost nothing to worry about. It is such a great experience using Plimus and we are still using their service.

Last one, how will you bring your money that you’ve earned by selling your products? Plimus supports wire-transfer or payoneer debit card which was just easy to set up. It takes a few days to get your payoneer card if you apply from plimus and after every month, they will send money to either your bank account or to this payoneer debit card. In case you are using payoneer card, you can withdraw money from any local ATMs with almost no hassle at all.

That’s mainly it for today, will come back with more very soon.

Complete oAuth script for Twitter and LinkedIn using PECL oAuth Extension

After searching for help to connect with LinkedIn via their oAuth protocol using PECL oAuth extension, I’ve found that lots of people are posting in their forum for the code samples. And only very few obscure code examples are available. I’ve found phplinkedin script but that is just too bulky for a simple oAuth dance 🙂

So here are two files to perform 3 step oAuth Dance for both twitter and linkedin. Just set your consumer key and consumer secret key in these scripts (config.php) and in your LinkedIn and Twitter application, set the url of these scripts as authentication callback 🙂 thats it 🙂

check out the source code below or just straight download them from the following url
http://www.box.net/shared/oc0u7ym5y7

config.php: source
[sourcecode lang=”php”]
<?
//config.php
$oauth[‘twitter’][‘consumersecret’]="UtNkcJC5VqmHgSgxMIRl2UcHaJLWINzr1g2q*****";
$oauth[‘twitter’][‘consumerkey’]="LveyUCUf9Ym96AU7*****";
$oauth[‘twitter’][‘requesttokenurl’]="http://twitter.com/oauth/request_token";
$oauth[‘twitter’][‘accesstokenurl’]="http://twitter.com/oauth/access_token";
$oauth[‘twitter’][‘authurl’]="http://twitter.com/oauth/authorize";
$oauth[‘linkedin’][‘consumersecret’]="SX9FS_Ptz7yNA3WtTW0e8z3_XSiROnVSpOEbAVCfKAn7fqFq4kjelVXiNMO*****";
$oauth[‘linkedin’][‘consumerkey’]="qQkxCNYQbuALhWyBZO03V–6dtwUnQHz7KFE4PBpdIL6hy_87SHygEZAJj9*****";
$oauth[‘linkedin’][‘requesttokenurl’]="https://api.linkedin.com/uas/oauth/requestToken";
$oauth[‘linkedin’][‘accesstokenurl’]="https://api.linkedin.com/uas/oauth/accessToken";
$oauth[‘linkedin’][‘authurl’]="https://api.linkedin.com/uas/oauth/authorize";
?>
[/sourcecode]

twitter.php: source
[sourcecode lang=”php”]
<?
//twitter.php
/**
* twitter authentication script based on
* pecl oauth extension
*/
session_start();
include_once("config.php");
/*
unset($_SESSION[‘trequest_token_secret’]);
unset($_SESSION[‘taccess_oauth_token’]);
unset($_SESSION[‘taccess_oauth_token_secret’]);
*/
$oauthc = new OAuth($oauth[‘twitter’][‘consumerkey’],
$oauth[‘twitter’][‘consumersecret’],
OAUTH_SIG_METHOD_HMACSHA1,OAUTH_AUTH_TYPE_URI); //initiate
if(empty($_SESSION[‘trequest_token_secret’])) {
//get the request token and store it
$request_token_info = $oauthc->getRequestToken($oauth[‘twitter’][‘requesttokenurl’]); //get request token
$_SESSION[‘trequest_token_secret’] = $request_token_info[‘oauth_token_secret’];
header("Location: {$oauth[‘twitter’][‘authurl’]}?oauth_token=".$request_token_info[‘oauth_token’]);//forward user to authorize url
}
else if(empty($_SESSION[‘taccess_oauth_token’])) {
//get the access token – dont forget to save it
$request_token_secret = $_SESSION[‘trequest_token_secret’];
$oauthc->setToken($_REQUEST[‘oauth_token’],$request_token_secret);//user allowed the app, so u
$access_token_info = $oauthc->getAccessToken($oauth[‘twitter’][‘accesstokenurl’]);
$_SESSION[‘taccess_oauth_token’]= $access_token_info[‘oauth_token’];
$_SESSION[‘taccess_oauth_token_secret’]= $access_token_info[‘oauth_token_secret’];
}
if(isset($_SESSION[‘taccess_oauth_token’])) {
//now fetch current users profile
$access_token = $_SESSION[‘taccess_oauth_token’];
$access_token_secret =$_SESSION[‘taccess_oauth_token_secret’];
$oauthc->setToken($access_token,$access_token_secret);
$data = $oauthc->fetch(‘http://twitter.com/account/verify_credentials.json’);
$response_info = $oauthc->getLastResponse();
echo "<pre>";
print_r(json_decode($response_info));
echo "</pre>";
}
?>
[/sourcecode]

linkedin.php: source
[sourcecode lang=”php”]
<?
//linkedin.php
/**
* linkedin authentication script based on
* pecl oauth extension
*/
session_start();
include_once("config.php");
/*
unset($_SESSION[‘lrequest_token_secret’]);
unset($_SESSION[‘laccess_oauth_token’]);
unset($_SESSION[‘laccess_oauth_token_secret’]);
*/
$oauthc = new OAuth($oauth[‘linkedin’][‘consumerkey’],
$oauth[‘linkedin’][‘consumersecret’],
OAUTH_SIG_METHOD_HMACSHA1,OAUTH_AUTH_TYPE_AUTHORIZATION); //initiate

$oauthc->setNonce(rand());

if(empty($_SESSION[‘lrequest_token_secret’])) {
//get the request token and store it
$request_token_info = $oauthc->getRequestToken($oauth[‘linkedin’][‘requesttokenurl’]); //get request token
$_SESSION[‘lrequest_token_secret’] = $request_token_info[‘oauth_token_secret’];
header("Location: {$oauth[‘linkedin’][‘authurl’]}?oauth_token=".$request_token_info[‘oauth_token’]);//forward user to authorize url
}
else if(empty($_SESSION[‘laccess_oauth_token’])) {
//get the access token – dont forget to save it
$request_token_secret = $_SESSION[‘lrequest_token_secret’];
$oauthc->setToken($_REQUEST[‘oauth_token’],$request_token_secret);//user allowed the app, so u
$access_token_info = $oauthc->getAccessToken($oauth[‘linkedin’][‘accesstokenurl’]);
$_SESSION[‘laccess_oauth_token’]= $access_token_info[‘oauth_token’];
$_SESSION[‘laccess_oauth_token_secret’]= $access_token_info[‘oauth_token_secret’];
$_SESSION[‘loauth_verifier’] = $_REQUEST[‘oauth_verifier’];
}
if(isset($_SESSION[‘laccess_oauth_token’])) {
//now fetch current user’s profile
echo "<pre>";
$access_token = $_SESSION[‘laccess_oauth_token’];
$access_token_secret =$_SESSION[‘laccess_oauth_token_secret’];
$oauth_verifier = $_SESSION[‘loauth_verifier’];
$oauthc->setToken($access_token,$access_token_secret);
$data = $oauthc->fetch(‘http://api.linkedin.com/v1/people/~’);
$response_info = $oauthc->getLastResponse();
print_r(htmlspecialchars($response_info));
echo "</pre>";
}
?>
[/sourcecode]

Download these files from http://www.box.net/shared/oc0u7ym5y7 – Happy dancing time, in oAuth way 😉