
Tag: tips

বোয়ার নিয়ে কথাবার্তা

bower

বোয়ার (Bower) হল ফ্রন্ট এন্ড ডেভেলপমেন্টের সময় যেসব জাভাস্ক্রিপ্ট ফাইল বা সিএসএস ফাইল লাগে সেগুলো ম্যানেজ করার জন্য টুইটার টিমের তৈরী করা একটা প্যাকেজ ম্যানেজার টুল। বোয়ার দিয়ে খুব সহজেই অ্যাপ্লিকেশনের জন্য প্রয়োজনীয় জেএস বা সিএসএস ফাইল অ্যাড/রিমুভ করা যায়, আপগ্রেড করা যায়। এই কাজের জন্য রয়েছে বোয়ারের বিশাল প্যাকেজ রিপোজিটরি যেখানে আপনি স্ক্রিপ্ট সার্চ করতে পারবেন খুব সহজেই। এই আর্টিকেলে আমরা দেখব কিভাবে বোয়ার ব্যবহার করতে হয় 🙂

বোয়ার ইনস্টল করা
বোয়ার ইনস্টল করার জন্য আমাদের কম্পিউটারে নোডজেএস এবং এনপিএম টুল ইনস্টল করা থাকতে হবে। নোড এবং এনপিএম ইনস্টল করার জন্য আপনারা http://nodejs.org/ থেকে ইনস্টলার টি ডাউনলোড করে চালান, একইসাথে নোড এবং এনপিএম ইনস্টল হয়ে যাবে

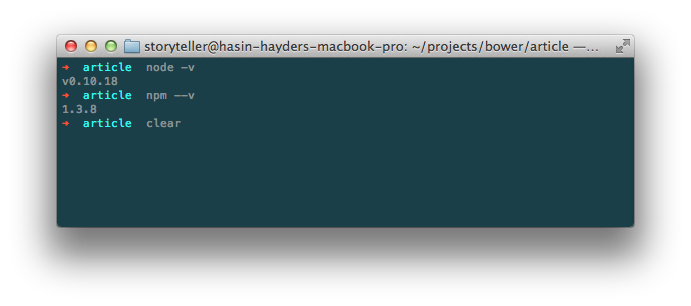
নোড এবং এনপিএম ঠিক মত ইনস্টল হয়েছে কিনা সেটা বোঝার জন্য আপনার কমান্ড লাইন/টার্মিনাল ওপেন করে কমান্ড দিন node -v এবং npm –v । একটু খেয়াল রাখবেন যে একটিতে -v এবং আরেকটি কমান্ডে –v ব্যবহার করা হয়েছে। । সবকিছু ঠিকঠাক থাকলে আপনারা টার্মিনালে নোড এবং এনপিএমের ভার্সন নাম্বার দেখতে পারবেন। আর কোন এরর পেলে আবার নোড অথবা এনপিএম ইনস্টল করুন অথবা ওদের সাইটে গিয়ে ট্রাবলশুটিং সেকশন দেখতে পারেন
node-npm

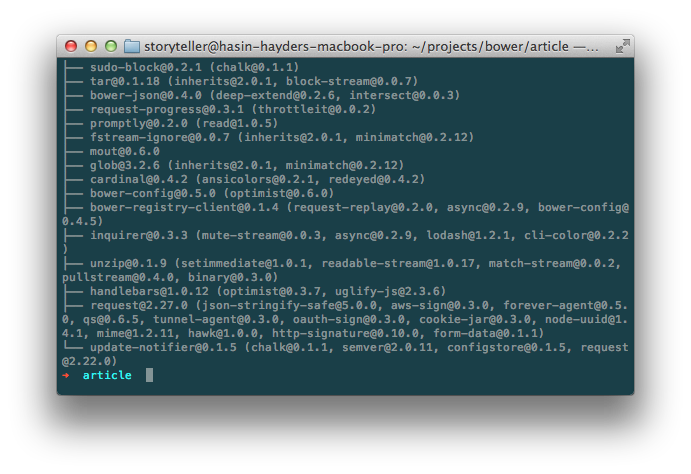
এবার বোয়ার ইনস্টল করার পালা, আর সেটা করার জন্য আপনার টার্মিনালে কমান্ড দিন npm install -g bower। কিছুক্ষনের মধ্যেই দেখতে পাবেন কনসোলে লেখা উঠেছে যে বোয়ার ইনস্টলেশন সাকসেসফুল হয়েছে। সহজ না?
bower-install

এবার চলুন দেখি কিভাবে আমরা বোয়ার ব্যবহার করব

বোয়ার ব্যবহার করা
প্রথমে টার্মিনাল ওপেন করে আপনার প্রজেক্ট ডিরেক্টরীতে প্রবেশ করুন, অথবা নতুন একটি ফোল্ডার তৈরী করে সেখানে প্রবেশ করুন। আমরা ধরে নিব আমাদের প্রজেক্টের জন্য নিচের তিনটি ফাইল লাগবে

  • জেকোয়েরী
  • ম্যাগনিফিক পপআপ
  • বুটস্ট্র‍্যাপ সিএসএস

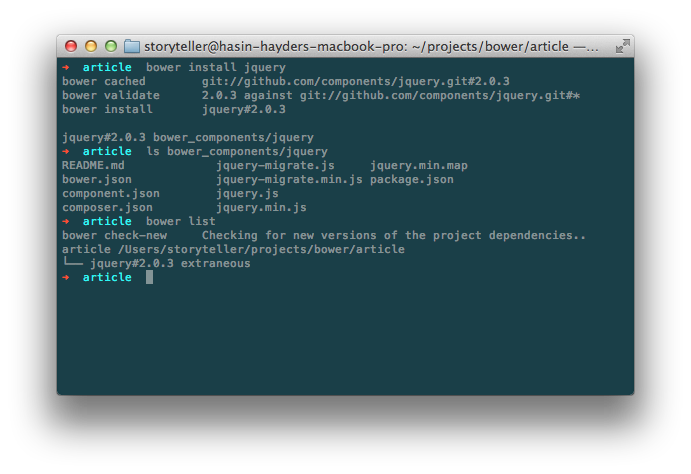
আমরা টার্মিনালে এসে প্রথমে জেকোয়েরী ইনস্টল করার জন্য কমান্ড দিব bower install jquery। কিছুক্ষনের মাঝেই বোয়ার আপনাকে জানিয়ে দেবে যে জেকোয়েরী ইনস্টল করা সফল হয়েছে। আপনি আপনার প্রজেক্ট ডিরেক্টরীতে দেখবেন bower_components নামে নতুন একটি ফোল্ডার তৈরী হয়েছে, যার মাঝে জেকোয়েরী নামের একটা ফোল্ডারে jquery.js রয়েছে।

এছাড়াও আপনি bower list কমান্ড দিলে দেখবেন বোয়ার খুব সুন্দর করে ইনস্টল করা স্ক্রিপ্ট এবং তাদের ভার্সন নম্বর দেখিয়ে দেবে।
bower-jquery

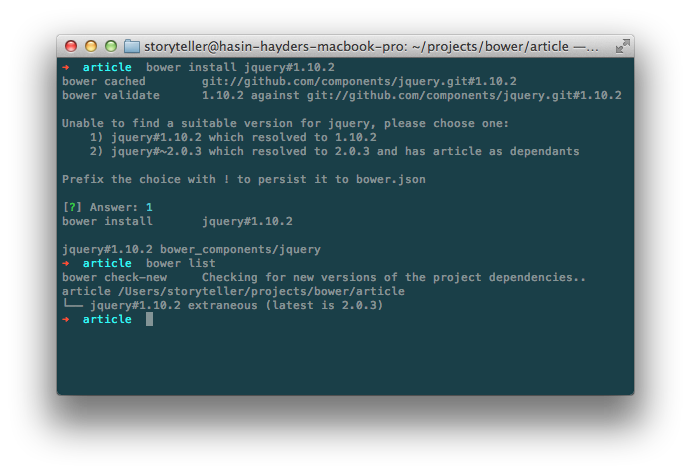
খেয়াল করলে দেখবেন যে বোয়ার ডিফল্ট ভাবে প্যাকেজের বর্তমান ভার্সন ইনস্টল করেছে। কিন্তু আপনার যদি অন্য কোন ভার্সন দরকার হয় তাহলে কি করবেন? ধরুন আপনের দরকার জেকোয়েরীর ১.১০.২ ভার্সন। বোয়ারে যেকোন প্যাকেজ ইনস্টল করে দেয়ার সময় তার ভার্সন নম্বরও উল্লেখ করে দেয়া যায়। যেমন এই ক্ষেত্রে আমরা টার্মিনালে কমান্ড দেব bower install jquery#1.10.2, তাহলে বোয়ার তার ইন্টারঅ্যাকটিভ প্রম্পটের মাধ্যমে গাইড করবে ১.১০.২ ভার্সন ইনস্টল করে নেয়ার জন্য। নিচের স্ক্রিনশটটি দেখলে এটা আরও পরিষ্কার হতে পারে
bower-jquery-1.10.2

বোয়ারে প্যাকেজ সার্চ করা
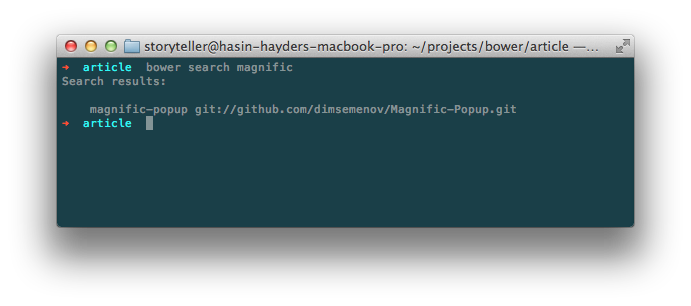
কোন প্যাকেজ বা স্ক্রিপ্ট বোয়ারের রিপোজিটরীতে আছে কিনা সেটা জানতে হলে bower search কমান্ড দিলেই বোয়ার সেই প্যাকেজের বিষয়ে বিস্তারিত তথ্য দেখাবে। যেমন আমরা যদি magnigic popup জাভাস্ক্রিপ্ট প্যাকেজ ইনস্টল করার আগে চেক করে নিতে চাই যে এই নামে আসলেই কোন প্যাকেজ আছে কিনা তাহলে আমরা টার্মিনালে কমান্ড দিব bower search magnific
bower-magnific

বোয়ার দেখাচ্ছে যে magnific-popup নামে একটা প্যাকেজ আছে। সেটা ইনস্টল করতে হলে আমরা আগের মতই কমান্ড দিব bower install magnific-popup। ঠিক মত ইনস্টল হয়েছে কিনা সেটা চেক করার জন্য আমরা bower_components ফোল্ডারে দেখতে পারি অথবা bower list কমান্ড দিয়ে দেখতে পারি ।

প্যাকেজ আনইনস্টল করা
বোয়ারের মাধ্যমে কোন প্যাকেজ আনইনস্টল করা খুবই সহজ। শুধু install এর বদলে uninstall কমান্ড দিন, ব্যাস হয়ে গেল।

প্যাকেজ লিস্ট সংরক্ষন করা
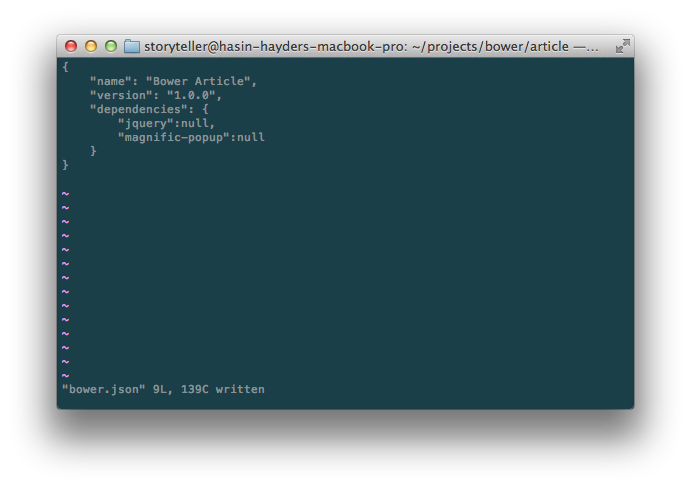
এইযে আমরা এইসব প্যাকেজ ইনস্টল করলাম, এগুলো আমরা একটা লিস্ট হিসেবে সংরক্ষন করতে পারি যাতে পরবর্তীতে আপডেট করতে হলে বা ইনস্টল করতে হলে এক এক করে করতে না হয়। এজন্য অ্যাপ্লিকেশনের কারেন্ট ডিরেক্টরীতে (যেখান থেকে আমরা bower কমান্ড চালাব) একটি ফাইল তৈরী করি bower.json নামে। যেকোন টেক্সট এডিটর দিয়ে এই ফাইল এডিট করা যাবে (তবে ওয়ার্ড প্রসেসর দিয়ে নয়)। যেমন আমাদের আজকের প্রজেক্টের জন্য আমরা নিচের মত করে bower.json ফাইল লিখব, যেখানে dependencies সেকশনে আমাদের যাবতীয় প্যাকেজের লিস্ট লিখে রাখা হবে
bower-json

বোঝার সুবিধার্থে আমি এখানে আবার লিখে দিলাম
[sourcecode language=”javascript”]
{
"name": "Bower Article",
"version": "1.0.0",
"dependencies": {
"jquery":null,
"magnific-popup":null
}
}
[/sourcecode]

এরপর থেকে আমরা অ্যাপ্লিকেশন ডিরেক্টরীতে এই bower.json ফাইল কপি করে কমান্ড দিব bower install। ব্যাস তাহলেই বোয়ার এই bower.json ফাইল থেকে ডিপেন্ডেন্সী লিস্ট পরে এক এক করে সেগুলো ইনস্টল করে ফেলবে

আমরা যদি কোন প্যাকেজের কোন পার্টিকুলার ভার্সন ইনস্টল করতে চাই তাহলে null এর বদলে সেই ভার্সন নম্বর লিখে দিব, আর লেটেস্ট ভার্সন চাইলে null লিখব। যেমন যদি আমরা জেকোয়েরীর ১.১০.১ ভার্সন চাই তাহলে আমাদের bower.json ফাইল হবে নিচের মত

[sourcecode language=”javascript”]
{
"name": "Bower Article",
"version": "1.0.0",
"dependencies": {
"jquery":"1.10.1",
"magnific-popup":null
}
}
[/sourcecode]
এরপর আমরা অ্যাপ্লিকেশন ডিরেক্টরীতে কমান্ড দিব bower install, ব্যাস!

প্যাকেজ লিস্টে নতুন প্যাকেজ বা ডিপেন্ডেন্সী যোগ করা
আমরা তো ইতোমধ্যেই bower.json ফাইলে দুইটি প্যাকেজ যোগ করেছি। এখন আমরা চাই নতুন একটি প্যাকেজ bootstrap ইনস্টল করতে। সেক্ষেত্রে আমরা দুই ভাবে করতে পারি

১. আমরা ম্যানুয়ালী bower.json ফাইল এডিট করে bootstrap কে একটা নতুন ডিপেন্ডেন্সী হিসেবে যোগ করে, সেই bower.json ফাইল সেভ করে টার্মিনালে কমান্ড দিতে পারি bower install। আমরা দেখব যে বোয়ার স্বয়ংক্রীয় ভাবে bootstrap ইনস্টল করে ফেলছে

অথবা

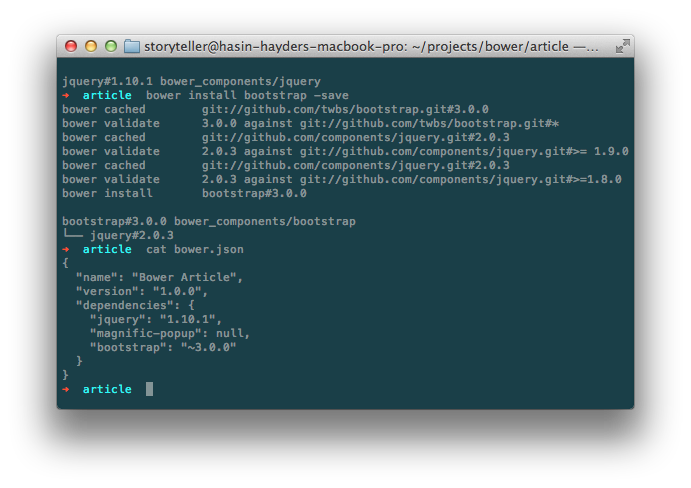
২. আমরা bower.json ফাইল ম্যানুয়ালী এডিট না করে বরং টার্মিনালে সরাসরি কমান্ড দিতে পারি bower install bootstrap -save । খেয়াল করুন এখানে একটা অতিরিক্ত প্যারামিটার/স্যুইচ যোগ করা হয়েছে -save নামে। এর ফলে বোয়ার দুইটি কাজ করবে। প্রথমত বোয়ার bootstrap ইনস্টল করবে, দ্বিতীয়ত বোয়ার নিজেই bower.json ফাইল এডিট করে bootstrap কে ডিপেন্ডেন্সী সেক্শনে যোগ করে ফেলবে। আমরা bower install bootstrap -save এই কমান্ড দেয়ার পর bower.json ফাইল চেক করলে দেখব এটা নিচের মত কনটেন্ট দেখাচ্ছে 🙂
bower-auto-update

বোয়ার কম্পোনেন্ট নিজের পছন্দমত ডিরেক্টরীতে ইনস্টল করা
আমরা এতক্ষন দেখেছি যে বোয়ার ডিফল্টভাবে bower_components নামের ডিরেক্টরীতে সব স্ক্রিপ্ট ইনস্টল করছে। কিন্তু আমরা যদি চাই যে আমাদের সব ইনস্টল করা স্ক্রিপ্ট গুলো bower_components এর বদলে “scripts/vendor” ডিরেক্টরীতে ইনস্টল হবে, তাহলে অ্যাপ্লিকেশন ডিরেক্টরীতে নিচের মত করে .bowerrc ফাইল তৈরী করুন (খেয়াল রাখবেন নামের শুরুতে একটি . রয়েছে)। সেই .bowerrc ফাইলে নিচের মত করে নিজের পছন্দের ডিরেক্টরী উল্লেখ করে দিন
[sourcecode language=”javascript”]
{
"directory":"scripts/vendor/"
}
[/sourcecode]
এরপর আমরা অ্যাপ্লিকেশন ডিরেক্টরীতে কমান্ড দিব bower install, ব্যাস! বোয়ার নিজেই scripts/vendor ফোল্ডার তৈরী (আগে থেকে তৈরী করা না থাকলে) করে তার ভেতরে সব স্ক্রিপ্ট ইনস্টল করে ফেলবে

উপসংহার
অ্যাপ্লিকেশনে স্মার্ট ভাবে প্যাকেজ ম্যানেজ করতে বোয়ারের জুড়ি নেই। সময় বাঁচানোর জন্য এইসব টুল তৈরী হচ্ছে দিন কে দিন, এবং স্মার্ট ডেভেলপাররা সেগুলো ব্যবহার করে নিজেদের সময় যেমন বাঁচাচ্ছে পাশাপাশি তাদের প্রজেক্ট ম্যানেজমেন্ট করছে অত্যন্ত সহজভাবে। আগে বোয়ার ব্যবহার করে না থাকলে আজকে থেকেই শুরু করে দিন 🙂

এর পরের আর্টিকেলে আমরা দেখব কিভাবে আমরা রিকোয়ারজেএস (ReuireJS) ব্যবহার করে আমাদের অ্যাপ্লিকেশনে স্বয়ংক্রীয়ভাবে আমাদের জাভাস্ক্রিপ্ট ফাইল লোড করতে পারি, এবং সেখনেও বোয়ার আমাদের কিভাবে সাহায্য করে।

এই সিরিজের সব শেষের আর্টিকেলে আমরা দেখব টাস্ক ম্যানেজার গ্রান্টের (Grunt) ব্যবহার যার মাধ্যমে আমরা আমাদের অ্যাপ্লিকেশনের যাবতীয় কাজ অটোমেট করে আরও স্মার্টভাবে ডেভেলপ করতে পারব।

quick wordpress tip: how to get all tags with the number of posts

This is very useful in certain situations, where you want to draw your own tag cloud or show the number of posts beside each tags in your wordpress blog, i.e (php [10], javascript [3]). I was searching for the solution while ago and found wp_tag_clouds but that doesn’t return the number of posts for each of these tags. Shortly after that, found get_terms function which was a great relief actually. Because you can fetch all types of taxonomies with useful data. And the following code snippet solved my problem. Don’t forget to check the reference in codex.

[sourcecode lang=”php”]
$tags = get_terms( array("post_tag"), array("orderby"=>"count","order"=>"DESC"));
[/sourcecode]

This function will output something like the following
[sourcecode lang=”php”]
Array
(
[0] => stdClass Object
(
[term_id] => 11
[name] => php
[slug] => php
[term_group] => 0
[term_taxonomy_id] => 11
[taxonomy] => post_tag
[description] =>
[parent] => 0
[count] => 2
)
[1] => stdClass Object
(
[term_id] => 10
[name] => bingo
[slug] => bingo
[term_group] => 0
[term_taxonomy_id] => 10
[taxonomy] => post_tag
[description] =>
[parent] => 0
[count] => 1
)
[2] => stdClass Object
(
[term_id] => 12
[name] => javascript
[slug] => javascript
[term_group] => 0
[term_taxonomy_id] => 12
[taxonomy] => post_tag
[description] =>
[parent] => 0
[count] => 1
)
)
[/sourcecode]

Shameless Plug

We develop beautiful Admin Panel templates for the web application developers. Our recent product is “Bolt” which is responsive and built on top of Twitter’s bootstrap. Give it a try and let us know how do you like it.

Bolt Responsive Admin Panel Template for Developers

how to add custom meta boxes in wordpress

Custom meta boxes are very useful for collecting arbitrary information from the post authors, and then take decisions based on those information. For example, if you have a custom post type as “stores” and you want to collect “latitude” and “longitude” for each “store” type post, meta boxes are the way to do it conveniently. So how you can create a meta box and collect meta information from the users? The whole workflow is divided into three parts

1. Create the meta box design/markup
2. Attach them with the post/custom-post
3. Save the user input (and reuse it when required)

Creating the metabox markup: Inside your theme folder, lets create a new folder named “metaboxes” to organize all the metaboxes in same place. So once the folder is created, create a new file name coordinates.php inside the metabox folder. So the final path to the coordinates.php is your.theme.folder/metaboxes/coordinates.php. This file contains the simple markup to accept latitude and longitude from the users for our custom post type “stores”. Here comes the markup for that file

[sourcecode lang=”html”]
<fieldset id="coordinates">
<table width="100%">
<tr>
<td>
Latitude:
</td>
<td>
<input style="width:140px;" type="text" name="store_latitude" id="store_latitude" />
</td>
<tr>
<td>
Longitude:
</td>
<td>
<input style="width:140px;" type="text" name="store_longitude" id="store_longitude" />
</td>
</tr>
</table>
</fieldset>
[/sourcecode]

It’s just a simple form – no big deal, eh? At this moment this form can only take user input. But to retain the previously entered value we need to work on it and add some extra lines. I will come back later to this file.

Registering the custom post: There is a nifty tool out there which can help you to create the essential code to register a custom post type, unless you want to write all of them by yourself (I prefer writing my own, always). Create a new file named “custom-post-stores.php” inside your theme folder and include this file in the functions.php of your theme. Here is the code of the custom-post-stores.php

[sourcecode lang=”php”]
<?php
add_action(‘init’, ‘createPostType’);
function createPostType(){
register_post_type(‘stores’,
array(
‘labels’ => array(
‘name’ => __(‘Stores’),
‘singular_name’ => __(‘Store’),
‘add_new’ => __("Add New Store"),
‘add_new_item’ => __("Add New Store"),
),
‘public’ => true,
‘has_archive’ => true,
‘rewrite’ => array(‘slug’ => ‘stores’),
‘supports’ => array("title", "editor", "thumbnail")
)
);
}
[/sourcecode]

I am not going to explain what all of these parameters do in the register_post_type function, but of course, please, have a look at the beautiful reference in codex.

The code above will register a new custom post “stores” and once you logged into the wordpress admin panel, you will notice a new “Stores” menu visible on the left side. From there you can add new stores type posts.

Attaching metaboxes to the custom post: Lets attach the previously created metabox with this new “stores” type posts. In the same “custom-post-stores.php” append the following codeblock

[sourcecode lang=”php”]
/*this function will include the metabox in current posts scope*/
function customPostGeoinfo()
{
global $post;
include_once("metaboxes/coordinates.php");
}

/*this function will save the user input from the meta box*/
function customPostSave($postID)
{
// called after a post or page is saved
if ($parent_id = wp_is_post_revision($postID)) {
$postID = $parent_id;
}

$items = array("store_latitude","store_longitude"); //form elements of the meta box

foreach ($items as $item) {
if ($_POST[$item]) {
updateCustomMeta($postID, $_POST[$item], $item);
}
}

}

function updateCustomMeta($postID, $newvalue, $field_name)
{
// To create new meta
if (!get_post_meta($postID, $field_name)) {
add_post_meta($postID, $field_name, $newvalue);
} else {
// or to update existing meta
update_post_meta($postID, $field_name, $newvalue);
}
}

/* now make them working via wordpress action hooks */

function myPostOptionsBox()
{
add_meta_box(‘geoinformation’, ‘Geo Info’, ‘customPostGeoinfo’, ‘stores’, ‘side’, ‘high’);
}

add_action(‘admin_menu’, ‘myPostOptionsBox’);
add_action(‘save_post’, ‘customPostSave’);
[/sourcecode]

Tada, we are done. But only one thing left and that is revising our metabox to retain the old user value. So lets rewrite the metaboxes/coordinates.php with the following code

[sourcecode lang=”html”]
<fieldset id="coordinates">
<table width="100%">
<tr>
<td>
Latitude:
</td>
<td>
<input style="width:140px;" type="text" name="store_latitude" id="store_latitude" value="<?php echo get_post_meta($post->ID, ‘store_latitude’, true); ?>"/>
</td>
<tr>
<td>
Longitude:
</td>
<td>
<input style="width:140px;" type="text" name="store_longitude" id="store_longitude" value="<?php echo get_post_meta($post->ID, ‘store_longitude’, true); ?>"/>
</td>
</tr>
</table>
</fieldset>
[/sourcecode]

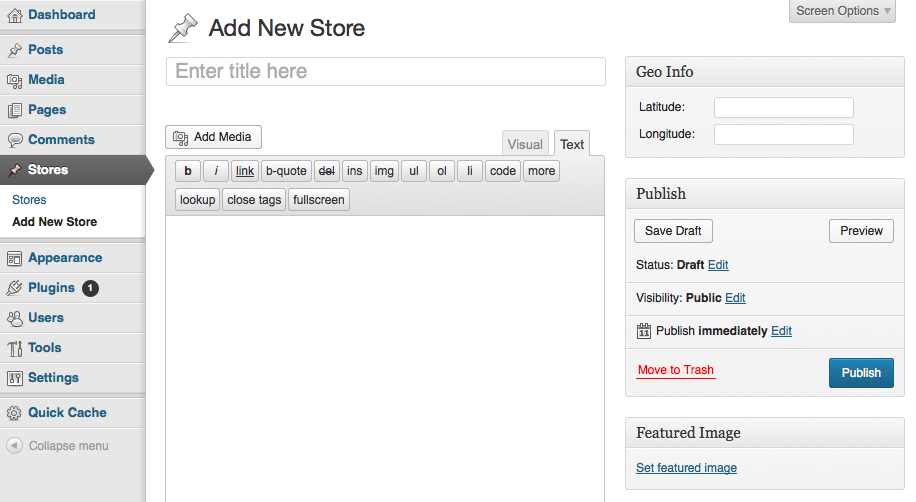
That’s it. The out put will look like the following one. Please notice the “Geo Info” metabox on the top right corner and “Stores” menu on the left menu.

Custom post with meta box

Shameless Plug: We develop beautiful themes and admin panel templates for your web applications. Why don’t have a look at our portfolio in themeforest and purchase a few to support us on the long run.

Force wordpress sub categories to use the same template of the parent category

WordPress is a beautiful cms, from top to bottom, for both the developers or authors. It’s action and filter hooks made the developers life a lot easier who develop custom solutions on top of wordpress. Today I went throuh a problem where I had to define category template for a parent category type, and then had to make sure that all the child categories under that parent must inherit the same template used by the parent category.

Defining template for a particular category is easy. All you have to do is create a file named as “category-.php”. So if your caregory slug is “stores” then the template name will be “category-stores.php” and as soon some viewers come to http://your.wp.app.url/category/stores that particular template will be used to render the request.

Now the problematic part is I need a few subcategories under the “stores” category which must inherit that same template “category-stores.php”, because the look-n-feel and content are mostly similar. And also there is no default template naming convention for the sub categories. So I had to write an action hook which hooks the “template_redirect” action and then renders the same template used by parent category. Here is the code I used inside functions.php

[sourcecode lang=”php”]
add_action(‘template_redirect’, ‘inheritParentTemplate’);

function inheritParentTemplate() {
if (is_category()) {
$catid = get_query_var(‘cat’); //current category id
$category = get_category($catid);
$parent = $category->category_parent; //immediate parent
if ($parent){
$parentCategory = get_category($parent);
if("stores"==$parentCategory->name){
if ( file_exists(TEMPLATEPATH . ‘/category-‘ . $parentCategory->slug . ‘.php’) ) {
include (TEMPLATEPATH . ‘/category-‘ . $parentCategory->slug . ‘.php’);
}
return true;
}
}
}
}
[/sourcecode]

Thats it. From now on, every child category will be rendered using the same template “category-stores.php“.

Shameless Plug

We develop beautiful Admin Panel templates for the web application developers. Our recent product is “Bolt” which is responsive and built on top of Twitter’s bootstrap. Give it a try and let us know how do you like it.

Bolt Responsive Admin Panel Template for Developers