I had a server which has both IPv4 and IPv6 and they were working perfectly fine. I had installed Vesta CP which is an amazing control panel application and it was working just great. But there was only one problem with Exim4. It was not … Continue reading How to disable IPv6 for Exim4 that comes with Vesta Panel
Tag: linux
কিভাবে জিও-ডিএনএস ব্যবহার করে ওয়েব কনটেন্ট দ্রুত সার্ভ করবেন
ওয়েবসাইটের কনটেন্ট দ্রুত ভিজিটর দের কাছে সার্ভ করার জন্য বা লোকালাইজড কনটেন্ট সহজে দেখানোর জন্য জিও-ডিএনএস হতে পারে একটা চমৎকার পদ্ধতি। জিও ডিনএস ব্যবহারের মাধ্যমে আপনি ভিজিটরের লোকেশনের উপর ভিত্তি করে ওয়েবসাইট ভিজিটরের কাছাকাছি এলাকায় অবস্থিত কোন সার্ভার থেকে লোড করাতে পারেন। ধরুন আপনি আপনার সার্ভার হোস্ট করেছেন ইউএসএ তে। এখন ইউএস এর ভিজিটর রা সাইট অনেক দ্রুত লোড হতে দেখবে কারন সার্ভার তাদের এলাকায় অবস্থিত। কিন্তু এশিয়া থেকে যদি কেউ আপনার সাইট ভিজিট করে তারা কিন্তু আপনার সাইট দ্রুত দেখতে পাবে না, কারন ইউএস থেকে এশিয়ার মাঝে রয়েছে বিশাল ল্যাটেন্সি। জিওডিএনএস ব্যবহার করে আপনি দুইটি সার্ভার হোস্ট করতে পারেন ইউএস এবং এসিয়ান ভিজিটর দের জন্য। এটা করলে ইউএস থেকে ভিজিট করার সময় সাইট লোড হবে ইউএস সার্ভার থেকে, এশিয়া থেকে ভিজিট করার সময় সাইট লোড হবে এশিয়ান সার্ভার থেকে। ফলে যেখান থেকেই ভিজিট করা হোক না কেন, আপনার সাইটের লোডিং স্পিডের ব্যাপারে ভিজিটর রা আগের চেয়ে অনেক ভালো ফিল করবে। এছাড়াও আপনি লোকালাইজেশনের কাজেও এটা ব্যবহার করতে পারেন, যেমন ইউএস ভিজিটর দের কাছে সাইটের ইংরেজী ভার্সন টা দেখালেন আর বাংলাদেশী ইউজার দের কাছে সাইটের বাংলা ভার্সন দেখালেন 🙂
আজকের এই আর্টিকেলে আমি আলোচনা করব যে কিভাবে এই জিওডিএনএস সিস্টেম ব্যবহার করতে হয়। আশাকরি এই আর্টিকেল পরার পর অনেকের কাছেই বিষয়টি ক্লিয়ার হয়ে যাবে। পাশাপাশি আপনারা বুঝতে পারবেন সিডিএন বা কনটেন্ট ডেলিভারী নেটওয়ার্ক গুলো কিভাবে কাজ করে।
যাই হোক, জিওডিএনএস এর সুবিধা নিতে হলে আপনার ডোমেইন অবশ্যই জিওডিএনএস সুবিধা আছে এমন ডিএনএস সার্ভারে হোস্ট করতে হবে। জিওডিএনএস এর জন্য রেজ-ফোর বা Rage4 বেশ ভালো একটি ডিএনএস সার্ভিস। আপনাকে প্রথমেই http://rage4.com এ গিয়ে রেজিস্টার করে নিতে হবে। মাসে প্রতিটি ডোমেইনের জন্য ২৫০,০০০ ইমপ্রেসন পুরো ফ্রি। সুতরাং এটা ব্যবহার করতে হলে আপনাকে শুরুতেই কোন কিছু পে করতে হচ্ছে না। রেজিস্টার করার পরে আপনার ডোমেইনের নেম সার্ভার পরিবর্তন করে ফেলুন Rage4 এর নেমসার্ভার দিয়ে। রেজ-ফোরের নেমসার্ভার দুটো হল
- ns1.r4ns.com
- ns2.r4ns.com
ডোমেইনের নেম সার্ভার পরিবর্তন করলে সেটা রিজলভ হতে বেশ কিছুক্ষন সময় নিতে পারে। সুতরাং আপনি মাঝে মাঝে whois কমান্ড দিয়ে চেক করে নিতে পারেন যে আপনার ডোমেইন এর নেমসার্ভারের পরিবর্তন টা রিজলভড হয়েছে কিনা। রিজলভ হয়ে গেলে এবার আমাদের জিওডিএনএস তৈরী করার পালা। আমি ধরে নিলাম যে আপনার ডোমাইন এর নাম abcd.com। এবার Rage4.com এ এসে লগইন করে আপনার ড্যাশবোর্ডে আসুন এবং রেগুলার ডোমেইন সেকশন থেকে আপনার ডোমেইন টি যোগ করে নিন।
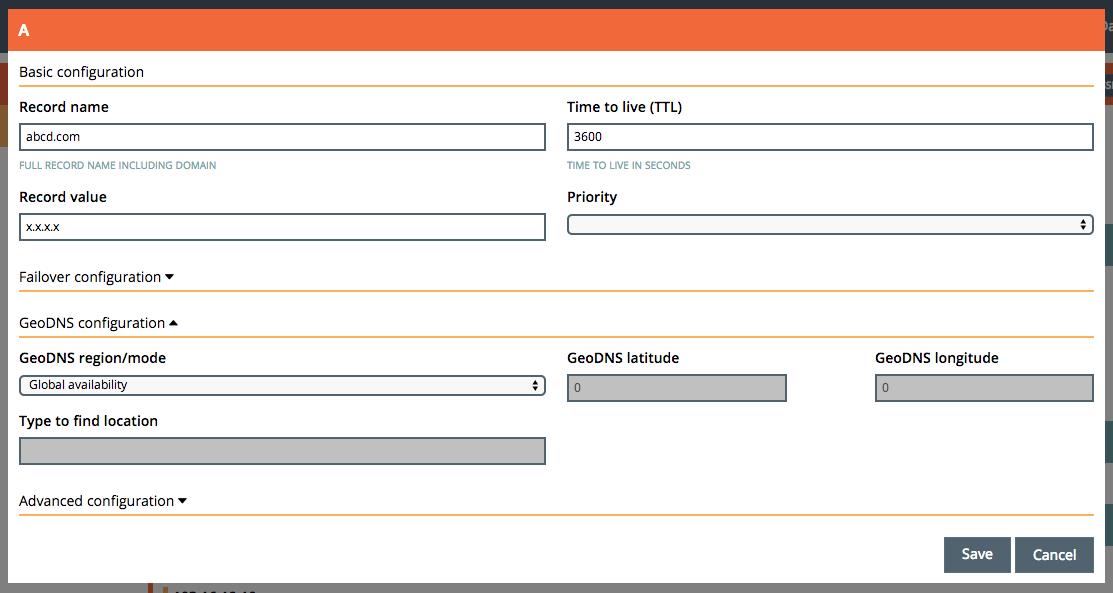
ডোমেইন যোগ করা হয়ে গেলে আপনার ড্যাশবোর্ডে আপনার ডোমেইনের নামের পাশে ম্যানেজ বাটনে ক্লিক করে আপনার ডোমেইন এর ডিএনএস প্যানেলে আসুন। এবার নিচে দেখতে পাবেন বেশ কয়েকটা সেকশন রয়েছে যেমন A Records, CNAME Records, MX Records ইত্যাদি। জিও-ডিএনএস এর জন্য আমাদের প্রয়োজন A রেকর্ড তৈরী করা। সুতরাং A Records সেকশনে NEW RECORD এ ক্লিক করুন। নিচের মত একটা স্ক্রিন ওপেন হবে।
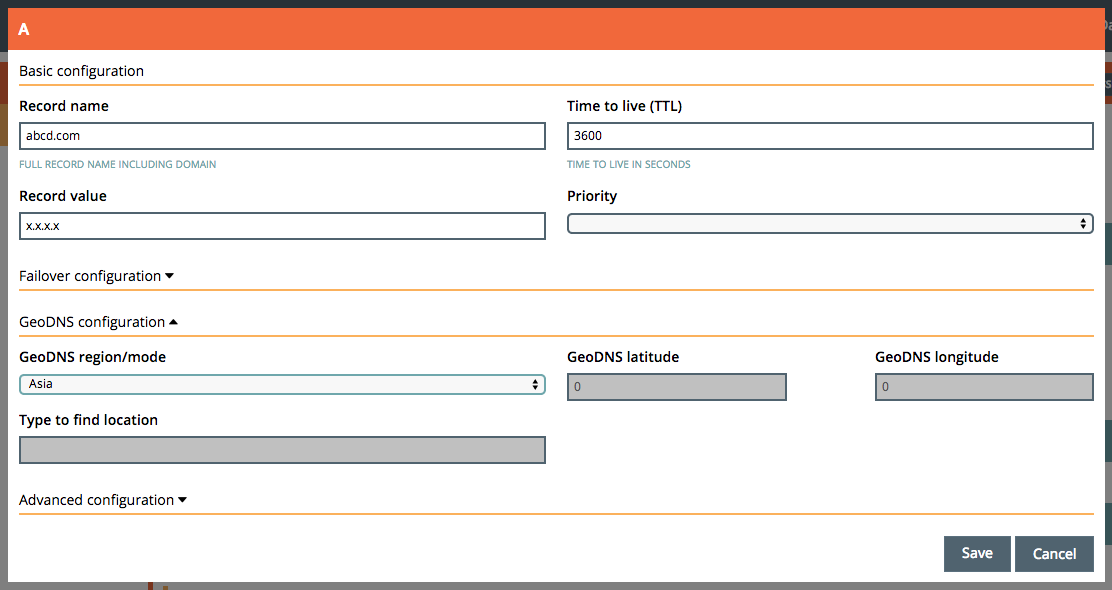
Record Name ফিল্ডে আপনি চাইলে আপনার ইচ্ছামত সাবডোমেইনের নাম দিতে পারেন, কিংবা মূল ডোমেইনের জন্য যা আছে, অর্থাৎ ডোমেইনের নাম যা আছে সেটাই রেখে দিতে পারেন। মনে করি যে আমরা এই রেকর্ডটা আমাদের এশিয়ান সার্ভারের জন্য তৈরী করব যার আইপি অ্যাড্রেস হল x.x.x.x। এবার Record Value ফিল্ডে সেই আইপি অ্যাড্রেসটি দিন। নিচের জিওডিএনএস সেকশনে GeoDNS Region/Mode ড্রপডাউন থেকে Asia সিলেক্ট করে দিন।
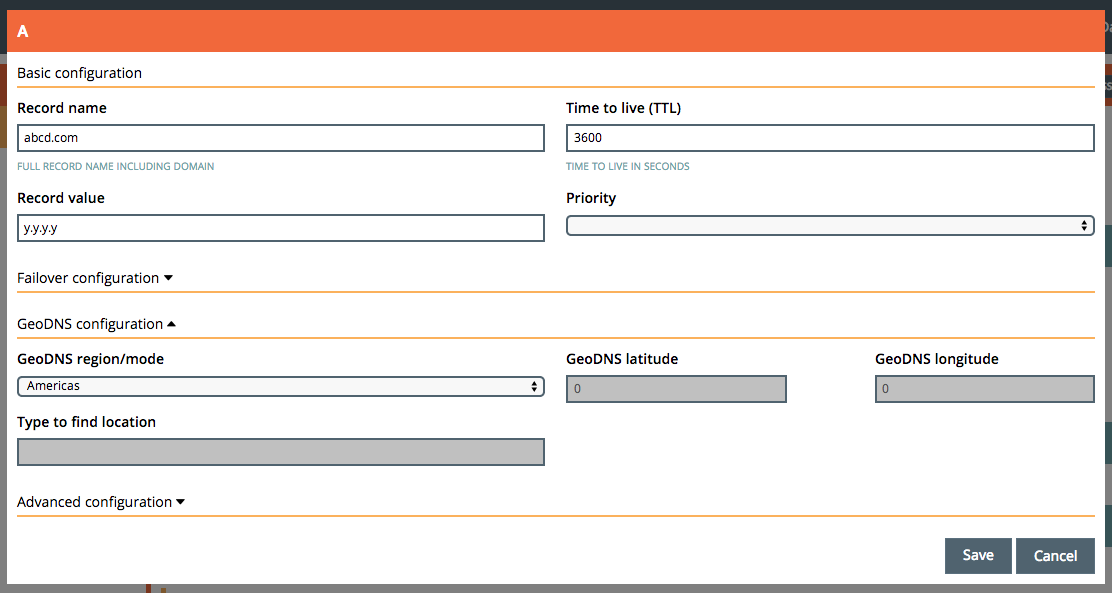
এবার আপনার ডিএনএস প্যানেলে দেখবেন নিচের মত করে A Record টি যোগ হয়ে গিয়েছে। এবার নতুন A Record না তৈরী করে, আপনার আগে তৈরী করা রেকর্ডটির পাশে ADD বাটনে ক্লিক করুন। এবার ঠিক আগের মতই আরেকটি রেকর্ড যোগ করুন, শুধু রেকর্ড ভ্যালুর জায়গায় আপনার ইউএস সার্ভারের আইপি দিন এবং GeoDNS Region/mode ড্রপডাউন থেকে Americas সিলেক্ট করুন নিচের ছবির মত
ব্যাস, আমাদের জিও-ডিএনএস কনফিগার করার কাজ শেষ। এখন থেকে ইউএস ভিজিটর রা abcd.com ভিজিট করলে আপনার সাইট সার্ভ হবে y.y.y.y আইপি অ্যাড্রেস ওয়ালা সার্ভার থেকে, আর এশিয়ান ভিজিটর দের জন্য x.x.x.x আইপি অ্যাড্রেস ওয়ালা সার্ভার থেকে 🙂 পুরো বিষয়টা কিন্তু একেবারেই কঠিন নয়, বরং অনেক অনেক সহজ – তাই না?
যাদের মনে কৌতুহল যে রেজ-ফোর কিভাবে এই কাজ টা করে তাদের জন্য বলছি, Rage4.com তাদের এই ডিএনএস সার্ভারের জন্য PowerDNS নামে একটা ওপেন সোর্স অ্যাপ্লিকেশন এর মডিফায়েড ভার্সন ব্যবহার করে।
আশাকরি আর্টিকেল টা আপনার ভালো লেগেছে। তাও কমেন্ট করে জানালে খুশি হব। পাশাপাশি কোন প্রশ্ন থাকলে আমাকে টুইটারে জিজ্ঞেস করতে পারেন। আমার টুইটার আইডি হল @hasin
ধন্যবাদ সবাইকে
ভ্যাগর্যান্ট দিয়ে নিজের ইচ্ছামত ভার্চুয়াল সার্ভার কনফিগার ও ব্যবহার করা
আমরা যারা বিভিন্ন ডেভেলপমেন্ট এনভায়রনমেন্ট নিয়ে কাজ করি তাদের অনেক সময়েই এমন টুল ইনস্টল করা লাগে যেটা একটার সাথে আরেকটা কনফ্লিক্ট করে। পিএইচপিএর জন্য টিউন করা একটা মেশিনে আবার রুবি বা পাইথন সেটআপ করে ওয়েবসার্ভার কনফিগার করতে গেলে অনেক সময় এটা কাজ করা বন্ধ করে দিতে পারে বা ওটার কোন একটা লাইব্রেরীর সাথে এর কোন লাইব্রেরী ঝামেলা করতে পারে। আবার দুই তিন ভার্সন একসাথে চালাতে গেলেও মুশকিল হয়। অথবা হয়তো চাইছেন দুই বা তিনটা ভার্চুয়াল মেশিন তৈরী করে মাইএসকিউএল এর রেপ্লিকেশন/শার্ডিং প্র্য্যাকটিস করতে। এইসব সমস্যা খুব সহজেই সমাধান করা যায় ভার্চুয়াল বক্স এবং ভ্যাগর্য্যান্ট ইনস্টল করে। ভ্যাগর্যান্ট মূলত ভার্চুয়াল বক্স এর একটা র্য্যাপার টুল হিসেবে কাজ করে ভার্চুয়াল ডেভেলপমেন্ট এনভায়রনমেন্ট তৈরী করার জন্য। এর মাধ্যমে আমরা একদম ঝামেলা ছাড়াই আমাদের পছন্দের অপারেটিং সিস্টেম (মূলত লিনাক্স বেজড) ব্যবহার করে ভার্চুয়াল সার্ভার বানাতে পারি, সেগুলোতে সফটওয়্যার প্যাকেজ ইনস্টল করতে পারি। এভাবে আমরা আমাদের প্রয়োজনমত একাদিক ভার্চুয়াল এনভায়রনমেন্ট তৈরী করে রাখতে পারি এবং যখন যেটাতে প্রয়োজন সেটাতে লগইন করে কাজ করতে পারি, কাজ না থাকলে শাটডাউনও করে রাখতে পারি। পুরো বিষয়টিই অনেকটা ভিপিএস সার্ভার হোস্ট করার মত 🙂
আজকে এই আর্টিকেলে আমরা দেখবো কিভাবে আমরা ভ্যাগর্যান্ট এবং ভার্চুয়াল বক্স নিয়ে কাজ করতে পারি। এর জন্য আমাদের যা যা লাগবে তা হল
১. ভার্চুয়াল বক্স – যেটা আমরা ডাউনলোড করে নিতে পারি https://www.virtualbox.org/wiki/Downloads এখান থেকে
২. ভ্যাগর্যান্ট – যা ডাউনলোড করা যাবে http://www.vagrantup.com/downloads.html থেকে
৩. একটা লিনাক্স অপারেটিং সিস্টেম টেমপ্লেট
আপনি http://vagrantbox.es এখানে গেলে অনেক টেমপ্লেট দেখতে পাবেন। নামানোর সময় অবশ্যই খেয়াল রাখবেন ঠিক টেমপ্লেটটি যেন বাছাই করেন। ভার্চুয়ালাইজেশন টুল হিসেবে যেটার পাশে VirtualBox লেখা আছে সেগুলো থেকে নামাবেন। আপনার সুবিধার জন্য আমি প্রচলিত কয়েকটি টেমপ্লেটের ডাউনলোড লিংক দিয়ে দিলাম
- ডেবিয়ান ৭.২ হুইজি ৬৪ বিট – https://dl.dropboxusercontent.com/u/197673519/debian-7.2.0.box
- ডেবিয়ান ৭.৩ হুইজি ৩২ বিট – https://dl.dropboxusercontent.com/s/60pv9an852jx9y0/Debian-7.3.0-i386b.box?dl=1
- উবুন্তু ১৪.০৪ ৬৪ বিট – https://cloud-images.ubuntu.com/vagrant/trusty/current/trusty-server-cloudimg-amd64-vagrant-disk1.box
- উবুন্তু ১৪.০৪ ৩২ বিট – https://cloud-images.ubuntu.com/vagrant/trusty/current/trusty-server-cloudimg-i386-vagrant-disk1.box
আমি নিজে ডেবিয়ান ৭.২ এর ৬৪ বিট টেমপ্লেট টি ব্যবহার করি। এই আর্টিকেলেও আমি সেটাই ব্যবহার করে উদাহরণগুলো দেখাবো। তবে পুরো বিষয়টি একই রকম, যেই টেমপ্লেটই ব্যবহার করে থাকেন না কেন 🙂
আপনি যদি প্রথম লিংকটি থেকে ডেবিয়ান ৭.২ টেমপ্লেটটি নামিয়ে থাকেন তাহলে দেখবেন যে debian-7.2.0.box নামে একটা ফাইল সেভ হয়েছে। এটার সাইজ তেমন বেশী না, মাত্র ৩১০ মেগাবাইট। এবার আপনি প্রথমে ভার্চুয়ালবক্স ইনস্টল করুন এবং তারপর ভ্যাগর্য্যান্ট ইনস্টল করুন। ইনস্টলেশন টা একদম স্ট্রেইট ফরোয়ার্ড – শুধু নেক্সট নেক্সট ক্লিক করে গেলেই হয়ে যায়। ইনস্টলেশন হয়ে গেলে এবার আমাদের ডাউনলোড করা ডেবিয়ান টেমপ্লেটটি ভ্যাগর্যান্টে ইমপোর্ট করতে হবে। এজন্য আপনার টার্মিনাল ওপেন করুন এবং নিচের মত করে কমান্ড দিন
[sourcecode language=”shell”]
vagrant box add wheezy64 debian-7.2.0.box
[/sourcecode]
এখানে নাম হিসেবে আমি দিয়েছি wheezy64, আপনি আপনার যা ইচ্ছা দিতে পারেন। তবে আমি সাজেস্ট করব প্রাসঙ্গিক নাম দেয়ার। এবার আমরা ভার্চুয়াল সার্ভার তৈরী করব আর সেজন্য কোথাও একটা নতুন ফোল্ডার তৈরী করুন। ধরে নিলাম আপনি ফোল্ডার তৈরি করেছেন যার পাথ হল /path/to/my/folder
এবার আপনার টার্মিনাল ওপেন করে নিচের কমান্ড গুলো দিন
[sourcecode language=”shell”]
cd /path/to/my/folder
vagrant init wheezy64
[/sourcecode]
এবার নিচের কমান্ড দিন
[sourcecode language=”shell”]
vagrant up
[/sourcecode]
কিছুক্ষনের মাঝেই আপনার ভার্চুয়াল সার্ভার রেডী হয়ে যাবে 🙂
ব্যাস, আপনার সার্ভার রেডী। চলুন এখন লগইন করে দেখা যাক এই সার্ভারে। এজন্য এই ফোল্ডারে থাকা অবস্থায়ই নিচের কমান্ড টি দিন
[sourcecode language=”shell”]
vagrant ssh
[/sourcecode]
আপনি আপনার সার্ভারে লগইন হয়ে গেছেন। মজা না? একদম নিমেষেই নিজের একটা আইসোলেটেড সার্ভার। চলুন দেখি এতে রিসোর্সের অ্যালোকেশন কেমন
উপরের ছবিটা থেকে আমরা দেখতে পারছি যে আমাদের এই সার্ভারে ২৫৬ মেগাবাইট র্য্যাম এবং হার্ডডিস্কে ১০ গিগাবাইট স্পেস অ্যালোকেটেড হয়েছে। আপনি এখন এখানে apt-get দিয়ে নিজের ইচ্ছামত প্রয়োজনীয় প্যাকেজ ইনস্টল করে নিতে পারেন। এছাড়াও আমরা চাইলেই এসব রিসোর্স অ্যালোকেশন বাড়াতে পারি। হার্ডডিস্কের স্পেস বাড়ানোর দরকার নাই কারন এটা প্রয়োজনের উপর ভিত্তি করে নিজে থেকে এক্সপ্যান্ড করবে। চলুন আমরা দেখি কিভাবে মেমোরী বাড়াবো এবং কিভাবে আমাদের এই সার্ভারে একটা স্ট্যাটিক আইপি অ্যাড্রেস অ্যাসাইন করবো। এজন্য আগে আমাদের দরকার এই মেশিন থেকে লগআউট করে আমরা যেই ফোল্ডারে ছিলাম সেখানে যাওয়া।
ভ্যাগর্য্যান্ট এর যেকোন ভার্চুয়াল এনভায়রনমেন্ট থেকে লগ আউট করতে লিখবেন exit, আর ভার্চুয়াল মেশিন কে স্লিপ মোডে নিতে লগ আউট করার পর লিখবেন vagrant suspend, আর শাটডাউন করাতে চাইলে লগ আউট করার পর লিখবেন vagrant halt ।
আমরা আপাতত লগ আউট করি exit লিখে
এবার এই ফোল্ডারে আপনি দেখবেন Vagrantfile নামে একটা ফাইল রয়েছে। এই ফাইলটি ওপেন করে “IP” দিয়ে সার্চ করুন, দেখবেন নিচের মত একটা লাইন কমেন্ট করা আছে # দিয়ে। এই লাইনটি আন কমেন্ট করুন # মুছে দিয়ে। উল্লেখ্য যে এখানে আপনার পছন্দ মত যেকোন প্রাইভেট আইপি দিতে পারেন
config.vm.network “private_network”, ip: “192.168.33.10”
ফাইলটি সেভ করে টার্মিনালে কমান্ড দিন vagrant reload এবং পিং করে দেখুন যে মেশিনে আপনার অ্যাসাইন করা আইপি অ্যাড্রেসটি রিজলভ হয়েছে কিনা। আমার মেশিনে আমি আইপি অ্যাড্রেস দিয়েছিলাম ১৯২.১৬৮.৩৩.১১ – বাই দ্য ওয়ে, আপনি আইপি অ্যাড্রেস অ্যাসাইন করার পর আপনার ভার্চুয়াল মেশিনে লগইন করে অ্যাপাচি/এনজিনএক্স সেটআপ করার পরে আপনার ব্রাউজারের অ্যাড্রেস বারে সেই আইপি অ্যাড্রেস দিলেই দেখবেন আপনার ভার্চুয়াল মেশিনের অ্যাপাচি/এনজিনএক্সের ডিফল্ট স্ক্রিন। কত সহজ পুরো বিষয়টিই, তাই না?
ঠিক একই ভাবে মেমোরী অ্যালোকেশন বাড়াতে চাইলে Vagrantfile এ নিচের লাইন টি খুঁজে বের করুন আর আনকমেন্ট করে ১০২৪ এর জায়গায় নিজের পছন্দ মত ভ্যালু বসিয়ে vagrant reload করুন
vb.customize [“modifyvm”, :id, “–memory”, “1024”]
এভাবে আপনি আবার নতুন ফোল্ডার তৈরী করে সেটাতে পুরো প্রসেস রিপিট করে যত ইচ্ছা তত আইসোলেটেড ভার্চুয়াল সার্ভার মেশিন বানাতে পারবেন এবং নিজের মত কনফিগার করে আপনার প্রয়োজনীয় ডেভেলপমেন্ট টুলস সেটআপ করে রাখতে পারবেন। কোনটা কোনটার সাথে কনফ্লিক্ট করবে না, উপরন্তু আপনি আপনার পছন্দ মত অপারেটিং সিস্টেম টেমপ্লেট ও বাছাই করে সেগুলো চালাতে পারবেন 🙂
আপনার প্রয়োজন শেষ হয়ে গেলে যেকোন ভার্চুয়াল সার্ভারকে ডেস্ট্রয় করে দিতে পারেন। সেক্ষেত্রে সার্ভারটি আপনার মেশিন থেকে ডিলেট হয়ে যাবে। আপনি যদি এই সার্ভারে কোন প্রয়োজনীয় ফাইল তৈরী করে থাকেন, তাহলে ডেস্ট্রয় করার আগে তার ব্যাকআপ নিতে ভুলবেন না
[sourcecode language=”shell”]
vagrant destroy
[/sourcecode]
আশাকরি ভ্যাগর্যান্ট নিয়ে এই আর্টিকেলটি আপনাদের ভালো লেগেছে। তারপরেও কমেন্টে জানালে খুশি হব। আর কোন প্রশ্ন থাকলে আমাকে টুইটারে জিজ্ঞেস করতে পারেন যেকোন সময়, আমার টুইটার আইডি হল @hasin 🙂
ধন্যবাদ সবাইকে
Remote deploy your project using git's server side hooks
Git hooks are very useful to perform tasks during different states of the codebase. Sometime you can cancel your commit if jshint throws some error on your javascript files, or you can deploy your current working directory somewhere in the server. In this article we will be discussing how to deploy code using git’s server side hooks.
Step 1: Add a git repository somewhere in your server
Create a blank git repository somewhere in your server. For example, see the following code
[sourcecode language=”shell”]
cd /path/to/your/folder
git –bare init myrepo.git
[/sourcecode]
You will see that a new directory named myrepo.git has been created. Inside that folder you will find a few other folders named “hooks”, “branches” and so on. However, sometime, this command may give you unexpected result by creating those child folders outside the myrepo.git. In that case the following commands are helpful
[sourcecode language=”shell”]
cd /path/to/your/folder
mkdir myrepo.git
cd myrepo.git
git –bare init
[/sourcecode]
Now everything will be inside this myrepo.git folder. Lets move to the next step.
Step 2: Add this newly created git repo as a remote to your current project
This part is easy, just follow these commands from inside your current project. We are going to add the repository we created in step 1 as a remote named “server”
[sourcecode language=”shell”]
cd /your/current/project/directory
git remote add server ssh://user@serveraddress/path/to/your/folder/myrepo.git
[/sourcecode]
Once added, you can push to this git repo like you did with origin, like
[sourcecode language=”shell”]
git commit -am "Some Commit Message"
git push server master
# (or simply git push server)
[/sourcecode]
You may want to add your local machine’s public key in the ~/.ssh/authorized_keys file so that you won’t have to input username and password every time you push your code.
Step 3: Add the git hook
To deploy your code after a push, we need to deal with post-receive hook. Log into your remote server and go to the repository that we had created in step 1 (i.e /path/to/your/folder/myrepo.git). Now go to the hooks directory and create a file named post-receive. If you want to deploy your code to a directory accessible by web server, for example /usr/share/nginx/www/myproject then the code of post-receive will be like this
[sourcecode language=”shell”]
#!/bin/bash
export GIT_WORK_TREE=/usr/share/nginx/www/myproject
git checkout -f
[/sourcecode]
The code above will checkout current HEAD of master branch inside the directory specified by GIT_WORK_TREE. But sometime, you may have another project which is cloned from your git repo. In those directories, instead of checking out, we will do a git pull. So our post-receive file’s code will be like this
[sourcecode language=”shell”]
#!/bin/bash
cd /usr/share/nginx/www/myproject
unset GIT_DIR
git pull
[/sourcecode]
remember to unset GIT_DIR which is very important for a git pull from post-receive hook.
Step 4: Give the executable permission to this post-receive hook
In this last step, just give executable permission to this post-receive file and you’re done
[sourcecode language=”shell”]
chmod +x /path/to/your/folder/myrepo.git/hooks/post-receive
[/sourcecode]
That’s mainly it 🙂 Now whenever you push your code from local machine to this remote git repository, your code will be deployed instantly.
I hope you’ve enjoyed this article and I would love to hear your comments.
With 1.1GB/s IO, Ramnode is possibly one of the best VPS providers out there
When you search for low end boxes, you may think that services are not up to the mark with these providers. Guess what, You are WRONG, so WRONG indeed. There are a few providers who gives you a top class services, despite their price point.
I have been using Ramnode for almost 6 months by now, had used Rackspace and Amazon EC2 before and I am not a big fan of them except the instant resource modification feature. When I purchased my first box from Ramnode, I was just thinking let’s give a try. And once I started, I totally loved their services. From 1Gbit network to an amazing RAID10 setup that gives you upto 1.3 GB/s in SSD and 800MB/s in SSD Cached VPSes. Here is the result of dd test in one of my SSD boxes.
[sourcecode language=”shell”]
d if=/dev/zero of=iotest bs=64k count=16k conv=fdatasync && rm -rf iotest
16384+0 records in
16384+0 records out
1073741824 bytes (1.1 GB) copied, 1.01694 s, 1.1 GB/s
[/sourcecode]
and here is the result from one of my SSD cached boxes
[sourcecode language=”shell”]
dd if=/dev/zero of=iotest bs=64k count=16k conv=fdatasync && rm -rf iotest
16384+0 records in
16384+0 records out
1073741824 bytes (1.1 GB) copied, 1.37957 s, 778 MB/s
[/sourcecode]
Ramnode has been a great provider to many people out there for last 2 years, and several time won the quarterly poll arranged by LEB community. Give it a shot anytime without worrying much, you won’t be disappointed. And beside enjoying such a great servcie, enjoy an additional discount of 38% by using the coupon code WOWNUM1 for any of their plans.
Automated Rsync – without compromising security
Rsync is one of the most popular tools to synchronize data between two computers, and used mostly in taking backups using this sync feature. It’s easy to use and only uploads the changed files when a sync is necessary, so it’s effective in saving bandwidth and time too. To run rsync, you need root or a properly privileged user which can access that specific path in the remote machine. And to setup this privilege, you can either use a should-never-be-used root account or an user chrooted using a jail shell. But if, by any chance, current machine is compromised then remote machine is compromised too. Because anyone can connect to your remote machine using those credentials from the current machine. To avoid plain text credentials (or the credentials written in a shell script), people usually use ssh keys to establish a connection between two machines. Still, your remote machine is unsecured if anything goes wrong in the current machine from where you’re taking the backup.
So a fullproof solution is to use ssh keys and properly chroot the remote user so that it can only access the backup files and nothing else. However, setting up a jailed shell is a not-for-everyone type task and takes time and experience to accomplish properly. So here is a quick work around that you can implement in your remote machine to prevent the connecting user from doing anything malicious but only tasks those are needed to perform the rsync backup. Let’s see how we can do that
Before continuing, let’s name our two machines. The one which should be backed up, lets name that Workstation. And the one which is storing the backups is BackupServer. Also for now, let’s assume that you are backing up complete “/var/www” folder in the WorkStation.
Step 1: Create SSH key in the BackupServer
Log into the BackupServer and run the following command in ssh terminal. But remember, if you already have a key in ~/.ssh/id_rsa.pub then IGNORE IGNORE IGNORE this step.
[sourcecode language=”shell”]
ssh-keygen -t rsa
[/sourcecode]
It will prompt for a passphrase, REMEMBER to just hit the enter without typing anything.
Step 2: Display and Copy the SSH key from BackupServer
Run the following command to display the ssh public key in the terminal, and then copy it.
(more…)
My $4/year continuous deployment server using webhook and rsync
Anthony Smith is running an interesting project called Low End Spirit where he sells low end servers for $4/year and these servers comes with 128Mb ram and one core of Xeon X3440 cpu @2.53GHz and 500GB bandwidth. And most interesting thing is that they comes with 5 IPv6 addresses in multiple locations. LowEndSpirit is pretty famous for their amazing service.
So I purchased one of these servers a week ago, and converted into a simple continuous integration server and trust me, it’s running just amazing. Here is what I did 🙂
1. I pointed one of my domains to this LowEndSpirit server (Lets call it LES Server) using cloudflare’s free IPv6 to IPv4 proxy, http://forum.lowendspirit.com/viewtopic.php?id=441
2. Once the domain is working, I created one php file in my LES server. This php file is working as the webhook endpoint. Lets assume that this file url is http://example.com/webhook.php so that we can refer to it in the rest of this article. The only thing this webhook.php file is doing is creating a file in the /tmp directory, for example /tmp/hook.txt
3. I created a ssh key using “ssh-keygen -t rsa” command in my LES server, and copied the content of the public key (~/.ssh/id_rsa.pub) generated by this command. Don’t use a passphrase when you create this key. Now I went to bitbucket/github and added this public key as deploy key (Here’s how to set it up in Bitbucket and in Github). This makes sure the readonly access of this key, that is very important from the security pov that you use a deployment key. Now in my LES server I checked out my repository. Lets consider that I checked out at /path/to/my/repo
I have also add the URL of this webhook php file to the bitbucket/github’s hook/webhook section. This makes sure that whenever I push code, bitbucket/github will make and HTTP POST call to this webhook php.
4. Now copy the content of your public key (~/.ssh/id_rsa.pub) in your LES server, and add it in your Remote Project server’s authorized keys file (~/.ssh/authorized_keys). If you are concerned about security then you may also chroot, but that’s not essential. Once this LES server’s public key is added in your Remote Server’s authorized key section, the connection will be smooth.
5. I wrote a simple bash script which checks if there is any file named hook.txt in /tmp directory in my LES server. If it is found then it ‘git pull’ the repository and perform an rsync which updates my project code folder in the remote server, and then remove this /tmp/hook.txt . I saved this shell script to /path/to/shell/script.sh . Here is the content of the bash script. Don’t forget to give it executable permission by “chmod +x /path/to/shell/script.sh” command
[sourcecode language=”shell”]
#!/bin/bash
if [ -f "/tmp/hook.txt" ]; then
rm -f /tmp/hook.txt
cd /path/to/my/repo
git pull
rsync -rltuvh /path/to/my/repo/ [email protected]:/remote/path/of/the/repo/
echo "Done"
fi
[/sourcecode]
6. Now the final step is registering a cronjob. You can register a cronjob by invoking “crontab -e” command in your terminal window. So I went ahead and registered this cron job in my LES server.
[sourcecode language=”shell”]
*/5 * * * * /path/to/shell/script.sh > /tmp/cron.log
[/sourcecode]
It runs every five minutes and if the /tmp/hook.txt is found it update the local repository by “git pull” and rsync only the updated files. My project folder in remote server is instantly updated 🙂
The server and service is running just great. Honestly, that’s a huge service running by a $4/year server 🙂
By the way this is more of a Continuous Deployment in true sense, just fyi!
Installing gearmand, libgearman and pecl gearman extension for php from source in Debian 6 & 7
I had a pretty rough evening today. No, not because the waiter forgot to add sugar in my tea, but because it was so boring to go through the trial and errors of installing gearman daemon and pecl gearman extension for php.
First I tried with the pretty-obvious-awe-fucking-some way.
[sourcecode language=”shell”]
apt-get update
apt-get install gearman
pecl install gearman
[/sourcecode]
In above steps, “apt-get install gearman” ran smoothly. But then “pecl install gearman” failed saying that it doesn’t have libgearman. Eh? so I installed libgearman4 (in Debian Squeezy. It was libgearman6 in Wheezy) and libgearman-dev. But pecl failed again to compile the extension saying that libgearman is missing. Strange! So I googled about this issue and found that it could be a link error where a symbolic link might be required of “/usr/include/libgearman” as “/usr/include/libgearman-1.0″. Still no luck.
So I decided to compile gearmand from the source. And libgearman is also included with that, so it will fix two errors at once. I downloaded the latest gearman package from launchpad and tried to compile it
[sourcecode language=”shell”]
wget https://launchpad.net/gearmand/1.2/1.1.11/+download/gearmand-1.1.11.tar.gz
tar -zxvf gearmand-1.1.11.tar.gz
cd gearmand-1.1.11
./configure
[/sourcecode]
Failure 1:
At this step, configure stopped showing the following error
[sourcecode language=”shell”]
configure: error: cannot find Boost headers version >= 1.39.0
[/sourcecode]
To fix this, I had to install “libboost-all-dev” by following command
[sourcecode language=”shell”]
apt-get install libboost-all-dev
[/sourcecode]
And I tried to compile gearman and it failed again
Failure 2:
At this step, configure stopped showing that it cannot find gperf. That’s fine – I have installed gperf and tried to configure gearman again
[sourcecode language=”shell”]
apt-get install gperf
[/sourcecode]
Failure 3:
Now it failed again, showing that libevent is missing. Hmm! Had to fix it anyway
[sourcecode language=”shell”]
apt-get install libevent-dev
[/sourcecode]
Failure 4:
Heck! Another failure. Now it’s showing that it can’t find libuuid. This part was a little tricky to solve, but finally fixed with the following package
[sourcecode language=”shell”]
apt-get install uuid-dev
[/sourcecode]
Let’s configure again. And sweet that the configure script ran smoothly. Let’s compile using make
Failure 5:
Grrr! At this point the make script failed with a bunch of text, where the following lines were at the top
[sourcecode language=”shell”]
libgearman/backtrace.cc: In function ‘void custom_backtrace()’:
libgearman/backtrace.cc:64:6: sorry, unimplemented: Graphite loop optimizations can only be used if the libcloog-ppl0 package is installed
[/sourcecode]
So it cannot find a library named libcloog-ppl. Let’s fix this problem by
[sourcecode language=”shell”]
apt-get install libcloog-ppl-dev
[/sourcecode]
Now I’ve tried to run the make script, and it was good. So i also ran make install to complete the installation.
[sourcecode language=”shell”]
make
make install
[/sourcecode]
Now gearmand and libgearman both are installed. So I tried to install pecl-gearman with the following extension and voila! it worked. No more missing libgearman anymore.
[sourcecode language=”shell”]
pecl install gearman
[/sourcecode]
Now all I had to do is add the line “extension=gearman.so” in my php.ini .
The process was tedious and boring and took me more time than writing this article. If you have seen “Despicable Me 2” when Lucy and Gru went to ElMacho’s restaurant and were attacked by that crazy chicken and finally Lucy exclaimed “What’s wrong with that chicken!”
I really wanted to say “What’s wrong with this chicken” after gearman was installed at last.
Enjoy!
Running Symfony 2 Applications in OpenShift
Openshift is a fantastic Polyglot PaaS from Redhat, and you can do a lot of things with these containers. The good news is that with free accounts, OpenShift gives three gears for free, forever. Today, in this article I will show you how to install and run your Symfony applications in OpenShift.
After you have created your free account in OpenShift, go to the applications page and create a new “Zend Server 5.6” application. You can choose “PHP 5.3” containers as well, but there are many benefits of choosing ZendServer.
Before we dive into the details, please MAKE SURE that you have added your public key in your openshift settings section. This is very important that you do this.
So after creating the new ZendServer 5.6 application and adding our public key in our OpenShift account, this is time to check out from our application’s git repository. OpenShift gives you a private git repository for every application and you can find the url in the right side of your application details.
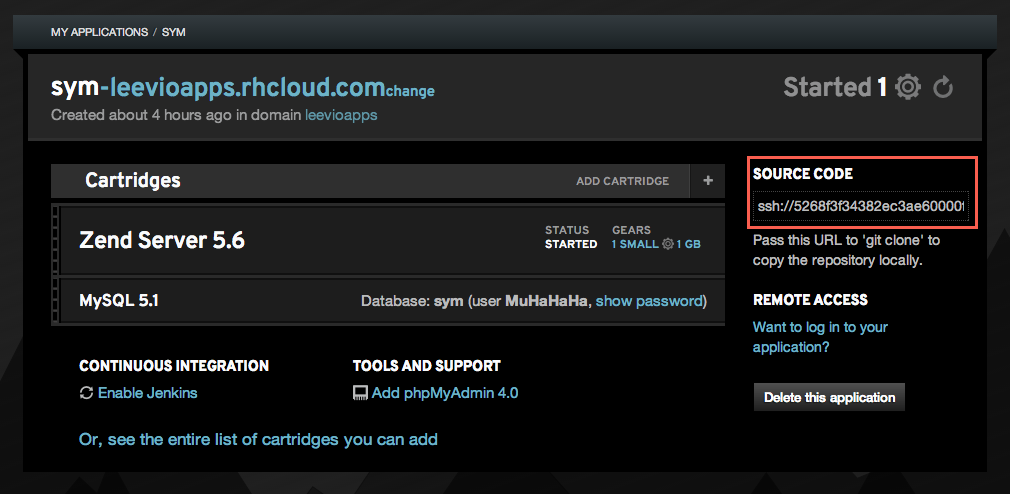
Now, follow these steps to check out this git repository and create a blank symfony application inside it’s php directory. You should have composer installed in your machine before this step.
[sourcecode language=”shell”]
git clone ssh://[email protected]/~/git/sym.git/
cd sym/php
rm -fr *.php
composer create-project symfony/framework-standard-edition ./
[/sourcecode]
After it runs, you have a blank symfony project installed inside this php directory. Now you need to add these files and commit in the git repository
[sourcecode language=”shell”]
git add -A
git commit -am "Blank Symfony Project"
git push
[/sourcecode]
OpenShift has an auto deployment feature which will deploy your application code after you push it in the git repo. It makes the deployment a lot easier for everyone.
Now you can visit your openshift container’s url but hey, why there is a blank screen? To find the answer of this question you need to open the .gitignore file. By default it’s content is like this
[sourcecode language=”shell”]
/web/bundles/
/app/bootstrap.php.cache
/app/config/parameters.yml
/app/cache/*
/app/logs/*
/vendor/
!app/cache/.gitkeep
!app/logs/.gitkeep
/build/
/bin/
/composer.phar
[/sourcecode]
Notice those lines “/app/config/parameters.yml” and “/vendor/”? These lines mean that parameters.yml file and everything in the vendor folder will be excluded from your commit. For now, just remove the line where it says about parameters.yml and keep the vendor line as is. So your final .gitignore file will look like this
[sourcecode language=”shell”]
/web/bundles/
/app/bootstrap.php.cache
/app/cache/*
/app/logs/*
/vendor/
!app/cache/.gitkeep
!app/logs/.gitkeep
/build/
/bin/
/composer.phar
[/sourcecode]
Now come to the root of your openshift repo and give this commands in the terminal
[sourcecode language=”shell”]
git add -A
git commit -am "Parameters.yml"
git push
[/sourcecode]
Now we need to setup the database details. To get those credentials, you need to log into your openshift gear. You can find the ssh login details in the right side of your app settings. In the following screenshot, you can get the mysql details (username and password) and ssh login details from the right side “Remote Access” section. Just click on the “Show Password” and “Want to login” links.
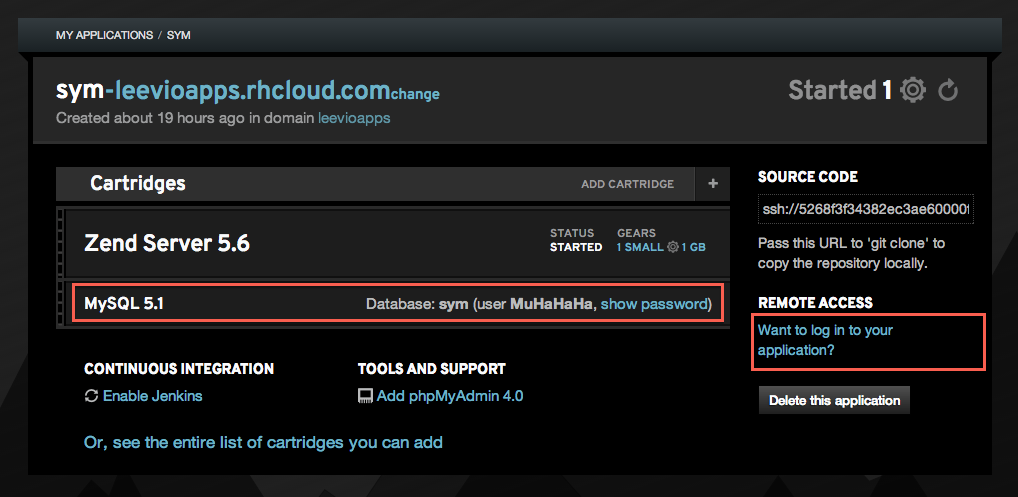
After you get the Remote Access , log into your openshift gear from your terminal. Once you are logged in, type the following commands in the terminal.
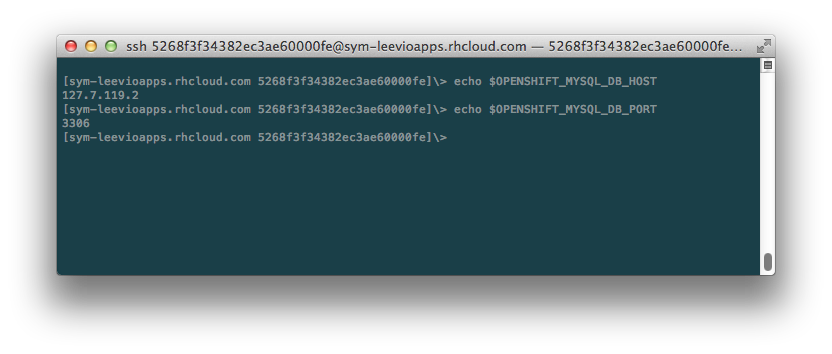
Copy the values of mysql db host and port. Now we have all the data for our symfony app. Open your parameters.yml file and put all the essential data. For my one, it looks like this
[sourcecode language=”shell”]
parameters:
database_driver: pdo_mysql
database_host: 127.7.119.2
database_port: 3306
database_name: symfony
database_user: MuHaHaHa
database_password: "4s89-vh55G6q"
mailer_transport: smtp
mailer_host: 127.0.0.1
mailer_user: null
mailer_password: null
locale: en
secret: WhateverYouLikeTo
[/sourcecode]
Now commit this file and push
[sourcecode language=”shell”]
git commit -am "Parameters"
git push
[/sourcecode]
At this point, we need to write a deploy hook which will do the following things everytime you push your code.
- It checks if composer is installed in our openshift gear. If not, it installs it
- It then go to $OPENSHIFT_REOP_DIR/php folder and run composer install command
- Then it gives write permission to app/cache and app/logs folder
Open your openshift repo, go to the .openshift folder, then go to the action_hooks folder and create a new file named deploy. Inside that file, put the following content
[sourcecode language=”shell”]
#!/bin/bash
# .openshift/action_hooks/deploy
export COMPOSER_HOME="$OPENSHIFT_DATA_DIR/.composer"
if [ ! -f "$OPENSHIFT_DATA_DIR/composer.phar" ]; then
curl -s https://getcomposer.org/installer | /usr/local/zend/bin/php — –install-dir=$OPENSHIFT_DATA_DIR
else
/usr/local/zend/bin/php $OPENSHIFT_DATA_DIR/composer.phar self-update
fi
unset GIT_DIR
cd $OPENSHIFT_REPO_DIR/php
/usr/local/zend/bin/php $OPENSHIFT_DATA_DIR/composer.phar install
chmod -R 0777 $OPENSHIFT_REPO_DIR/php/app/cache
chmod -R 0777 $OPENSHIFT_REPO_DIR/php/app/logs
[/sourcecode]
As a sidenote, if you are using regular PHP 5.3 containers instead of ZendServer 5.6, then replace “/usr/local/zend/bin/php” with “/usr/bin/php” in the deploy script above.
Save this file and give it executable permission by following command from your terminal
[sourcecode language=”shell”]
chmod +x deploy
[/sourcecode]
Now come to the root of your openshift repo and commit this deploy file. OpenShift supports different git hooks and you can check out https://www.openshift.com/developers/deploying-and-building-applications to know more about those.
[sourcecode language=”shell”]
git add -A
git commit -am "Deploy Hook"
git push
[/sourcecode]
You will notice some magical things happening at this point. After you push, you will notice in your terminal that composer is being installed in your openshift gear, and then it runs the composer install in appropriate directory.
Now visit your optnshift url (url/web/app_dev.php). Strange! now it is showing a strange error that we don’t have access to this app_dev.php. To fix this, open our app_dev.php (openshift repo/php/web/app_dev.php) and comment out line #12 to #18, I mean comment the following lines in your app_dev.php.
[sourcecode language=”php”]
//php/web/app_dev.php
if (isset($_SERVER[‘HTTP_CLIENT_IP’])
|| isset($_SERVER[‘HTTP_X_FORWARDED_FOR’])
|| !in_array(@$_SERVER[‘REMOTE_ADDR’], array(‘127.0.0.1’, ‘fe80::1’, ‘::1’))
) {
header(‘HTTP/1.0 403 Forbidden’);
exit(‘You are not allowed to access this file. Check ‘.basename(__FILE__).’ for more information.’);
}
[/sourcecode]
Sweet, now visit your openshift gear’s url (url/web/app_dev.php) and you can see that symfony is running smoothly :). But wait a minute – the URL contains the “web” part which looks ugly. All openshift PHP gear’s document root is set to $OPENSHIFT_REPO_DIR/php folder, which is in this case the root of our symfony application. But we don’t want this “web” in the URL. To do that, just create a .htaccess file in the “php” directory in our local openshift repo and put the following content
[sourcecode language=”shell”]
#php/.htaccess
RewriteEngine on
RewriteCond %{HTTP_HOST} ^your-openshift-domain$ [NC,OR]
RewriteCond %{REQUEST_URI} !web/
RewriteRule (.*) /web/$1 [L]
[/sourcecode]
And we are done, visit your openshift URL (url/app_dev.php) and it will working like a charm. So what if we want to set this app_dev.php as the default endpoint for our application? which means that we don’t even need to put “app-dev.php” in our url. To do that, open the .htaccess file from your “web” folder and replace all instance or “app.php” and “app\.php” to “app_dev.php” and “app_dev\.php” respectively. Then save your repo and make a git push and you are done! Tada!!!!
Hope you’ve enjoyed this long article. 🙂
Followup: I have automated the whole process and created a boilerplate Symfony 2.3.0 repository. Now you can get up and running in just one minute. Check out http://hasin.me/2013/10/27/install-and-run-symfony-2-3-0-in-openshift-instances-in-just-one-minute-with-this-boilerplate-repository/
Shameless Plug
Did you check our latest Onepage parallax portfolio template in Themeforest?

problems uploading large files in php5-fpm and nginx – and solution to that
Today I had encountered a strange error while importing a 10MB XML file in a low end vps, where nginx was configured with php5-fpm and was working pretty nicely. But then, whenever I tried to import that file, after 25% upload the connection drops and page goes blank. It was strange and drove me nuts for some time. I definitely re checked my php.ini settings and everything was fine there, upload_max_filesize was set to 20M and post_max_size was set to 32M. So it was good and definitely not causing any problem. Then I was thinking that something was wrong with nginx config, specially because the connection was dropped in the middle. And guess what, I was actually right 🙂
So I edited the nginx.conf file and added the following values. I actually tried with just “client_max_body_size” but it was not the cause alone. So client_body_timeout fixed it together 🙂
[sourcecode language=”shell”]
client_max_body_size 100m;
client_body_timeout 600s;
[/sourcecode]
After restarting nginx, everything went just perfectly 🙂