Tag: API

Creating a slack bot using PHP to monitor your envato sales

Slack is awesome. Slack is the de-facto of modern team communication and I am pretty sure that this is not the first time you’re hearing something like this about slack. But if you’re really never used slack, oh boy, I feel pity for you 🙂

Anyway, in this article we’re going to make a slack bot that will monitor the sales in our envato account and notify from time to time as soon as someone purchased an item. Pretty useful, eh?

Bootstrapping

Considering you have a slack account, log into it and open a new channel, for example “#sales”. Now go to http://your_slack_url.slack.com/services/new or just click on “Configure Integrations” from your slack app.

(more…)

Playing with Parse.com API

Screen Shot 2013-10-23 at 9.29.51 PM

I’ve started using Parse.com API not more than a week ago, and I already fall in love with it. The first thing that hit me was “whoa, no extra work for storing objects in my database” and that’s really it. Saving data was never easier. Parse.com’s javascript API, the documentation is very good and it will help you to start your project in no time. Beside diving into the details, let me highlight another cool feature of Parse.com API. It’s the user management. Sign up someone, or let someone sign in, validate their email? Everything is there!

’nuff said, how to start?
Go to https://parse.com/apps, register a new application and copy the application key and javascript key.

Now open your html file, add the Parse.com’s js library
[sourcecode language=”html”]
<script type="text/javascript" src="http://www.parsecdn.com/js/parse-1.2.12.min.js"></script>
[/sourcecode]

and now initialize your Parse.com application
[sourcecode language=”javascript”]
Parse.initialize("Application ID", "Javascript Key");
[/sourcecode]

That’s it. Now you are ready to play with the rest of this article.

Sign me up, pronto!
One of the most tedious, boring work while developing an application is to deal with registration, email validation, ACL and taking care of the signing in process. With Parse.com API this is pretty straight forward. To sign up a new new user, all you gotta do is the following one!

[sourcecode language=”javascript”]
var user = new Parse.User();
user.set("username", "ElMacho");
user.set("password", "chicken");
user.set("email", "[email protected]");

user.signUp(null, {
success: function(user) {
// Everything’s done!
console.log(user.id);
},
error: function(user, error) {
alert("Error: " + error.code + " " + error.message);
}
});
[/sourcecode]

Your user is signed up! If you need to validate user’s email then log into your Parse.com dashboard and from your application’s settings section turn on the email validation. It’s simple.

Alright, let me in!
Alright, your users have signed up .Now let them get in. It’s simple to write a sign in script with Parse API

[sourcecode language=”javascript”]
Parse.User.logIn("ElMacho", "chicken", {
success: function(user) {
console.log(user.get("email"));
},
error: function(user, error) {
console.log("you shall not pass!");
}
});
[/sourcecode]

But hey, does an user have to login everytime? No, not at all. The logged in user’s state is saved in browser. So before attempting to sign in him/her again, you can check if he is already logged-in.

[sourcecode language=”javascript”]
var loggedInUser = Parse.User.current();
if(!loggedInUser){
//off you go, perform a log in
} else {
console.log(loggedInUser.get("email"));
}
[/sourcecode]

easy, eh?

Interesting, how can I deal with data?
Okay, enough with signing up and signing in. Lets save some data. Say, for example, we want to store user’s favorite books in Parse.com’s datastore. We will also retrieve the list later.

To save some data in Parse.com, we need to write code like this
[sourcecode language=”javascript”]
var user = Parse.User.current();
var Book = Parse.Object.extend("favoritebooks");
var b1 = new Book({"name":"King Solomon’s Mine","user":user});
b1.save();

var b2 = new Book({"name":"Return of She","user":user});
b2.save();
[/sourcecode]

While saving an object you can also take care of the error or success state.

[sourcecode language=”javascript”]
var b1 = new Book({"name":"King Solomon’s Mine","user":user});
b1.save(null, {
success:function(b){
console.log("successfully saved")
},
error:function(b,error){
console.log(error.message);
}
});

[/sourcecode]

You can save as many Books/data as you want, and link them up with the current user. Linking like this is useful for retrieving them in future. As we have a few saved records, lets pull them and see if they are really saved.

[sourcecode language=”javascript”]
var Book = Parse.Object.extend("favoritebooks");
var q = new Parse.Query(Book);
q.equalTo("user",user);
q.find({
success: function(results){
for(i in results){
var book = results[i];
console.log(book.get("name"));
}
}
});
[/sourcecode]

Once it runs, you can see that it outputs currently logged in user’s favorite books. Pretty neat, eh?

like equalTo, there are a dozen of useful constraints which you can use with your query. You can get the complete list at https://parse.com/docs/js_guide#queries-constraints . Parse.com’s documentation is pretty solid, and you will find almost everything over there.

It’s dinner time, log me out!
Simple, just call Parse.User.logOut() and you are done!

So is it just about user management and saving data?
No!, not at all!. But saving data and managing credentials + ACL are one of the coolest features that you can do with Parse.com API. Beside these object storage, you can host your application (ExpressJS based), you can run your code in the cloud (Background Job, Cloud Code), take care of the push notifications and even upload and store binary files.

In overall, Parse.com’s API is super cool. Give it a try today, you will love it for sure. And by the way, there is a super handy data browser in your application dashboard, use that!

OpenShift PHP Rest Client Library

I have been working whole day today on writing this rest client library for php developers to communicate with Openshift REST api. OpenShift is a fantastic Polyglot PaaS (Platform-as-a-Service) brought to you by RedHat. To perform various operations with your openshift account you need to use their command line tool “rhc” (a gem, requires ruby). Their web based admin panel is good for starters, but you need to master the rhc for other essential tasks, for example to add a domain alias or to start/stop/restart your application.

This OpenShift-PHP-Client library can directly invoke their rest api and makes it easier for you if you are a PHP developer. This application is in a good stage at this moment and you can do everything with domains, applications and cartridges.

How to use this library? First checkout the library from it’s github repo located at https://github.com/hasinhayder/openshift-php-client. Then see the source code of the example.php. The example contains the bare minimum, you can actually do a lot of other things with these Domain, Application and Cartridge object. To understand the scope, feel free to check their source code as well 🙂

[sourcecode language=”php”]
include_once("lib/openshift.php");
$username = "YourUsername";
$password = "YourPassword";
$openshift = new OpenShift($username,$password);
// Create a New Domain
$data = $openshift->getDomainManager()->createDomain("osphp");

// List Domains
$data = $openshift->getDomainManager()->getDomains();

// Rename the Domain
$data = $openshift->getDomainManager()->getDomain("osphp")->updateName("moonlander") ;

// Create a Zend 5.6 App Container
$data = $openshift->getDomainManager()->getDomain("osphp")->createApplication("restclient","zend-5.6");

// Get all Applications
$data = $openshift->getDomainManager()->getDomain("osphp")->getApplications();

// Get Application Details
$data = $openshift->getDomainManager()->getDomain("osphp")->getApplication("restclient")->getDetails();

// Stop an Application
$data = $openshift->getDomainManager()->getDomain("osphp")->getApplication("restclient")->stop();

// Start an Application
$data = $openshift->getDomainManager()->getDomain("osphp")->getApplication("restclient")->start();

// Restart an Application
$data = $openshift->getDomainManager()->getDomain("osphp")->getApplication("restclient")->restart();

// Reload an Application
$data = $openshift->getDomainManager()->getDomain("osphp")->getApplication("restclient")->reload();

// Add an Alias
$data = $openshift->getDomainManager()->getDomain("osphp")->getApplication("restclient")->addAlias("mydomain.com");

// Remove an Alias
$data = $openshift->getDomainManager()->getDomain("osphp")->getApplication("restclient")->removeAlias("mydomain.com");

Add a MySQL Cartridge
$data = $openshift->getDomainManager()->getDomain("osphp")->getApplication("restclient")->addCartridge("mysql-5.1");

// Delete a MySQL Cartridge
$data = $openshift->getDomainManager()->getDomain("osphp")->getApplication("restclient")->getCartridge("mysql-5.1")->delete();

// There are many other methods supported by applications, domains and the cartridges. For details, check their source code.
[/sourcecode]

OpenShift PHP Client library is released under MIT License. I am working continuously to add more features to it.

Enjoy!

Shameless Plug

We develop beautiful Admin Panel templates for the web application developers. Our recent product is “Bolt” which is responsive and built on top of Twitter’s bootstrap. Give it a try and let us know how do you like it.

Bolt Responsive Admin Panel Template for Developers

Parsing inbound emails with Mailgun, how to

Parsing incoming emails is a common task for many web application which deals with emails, and then take decision on the parsed contents. However, piping the incoming mail stream to an external script is not everyone’s food and it needs good knowledge on shell scripting and also you need to be good with your mail server to install/configure the pipe properly. So there are third party services out there which makes it easy for you by accepting your emails to predefined mailboxes. They also parse the email and post the content over HTTP to an external script (i.e webhook) which makes the whole process a lot easier. You just outsource the email parsing to these third party providers and spend time rather on analyzing the content of the email leveraging their email->http webhook. Cloudmailin, MailNuggets, and MailGun are one the few providers which I’ve tested and they work really good with very low latency. In this article I am going to show you how to configure your free Mailgun account to accept incoming mails, parse and then accept the mail content to your php script.

Step1: Register a free account with MailGun

Don’t worry – they dont charge. And Mailgun’s free plan is quite good with 200 mails/day which is pretty good during development phase. Once you are ready, you may opt in to purchase their plans which suit you best.

Step 2: Add a domain

Free accounts are restricted to use *.mailgun.org domain for now. So just log into you Mailgun control panel and create your own domain.

Configure your Mailgun Domain

Step 2: Create a mailbox to accept incoming mails

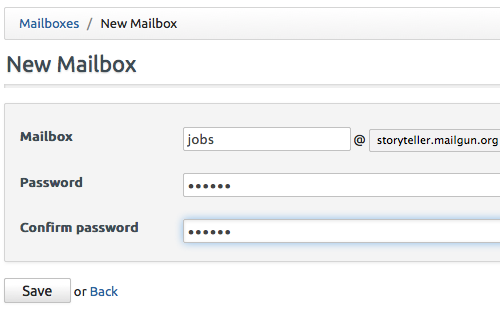
You need to configure a mailbox to start accepting inbound emails first, so you can process them later using different rules. Just go to your mailboxes tab in the Mailgun control panel and create a new mailbox.

Creating new Mailbox

Step 4: Link your incoming emails to your external script.

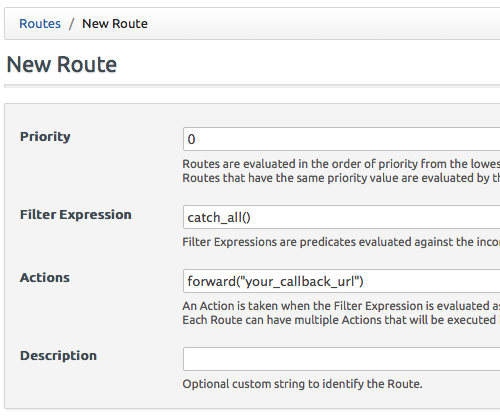
This step was a little confusing at first and I really didnt understand how to achieve the result. Mailgun will automatically parse these incoming mails, which you can filter by recipients or senders or by wildcard and then forward to your external script. To do that, just go to your Routes tab in the Mailgun control panel and create a new route, like the one shown in the screenshot below.

Configuring Routes and Linking to external scripts

See the forward() function does the job where my confusion began – I was almost clueless 😛

Ok we are done. Mailgun will now accept all mails to this mailbox [email protected] and parse the mail content including attachments, and then post the parsed contents as an array to the external PHP script we have configured in step 4. In your php script just capture those data from $_POST and do whatever you want to.

Shameless Plug

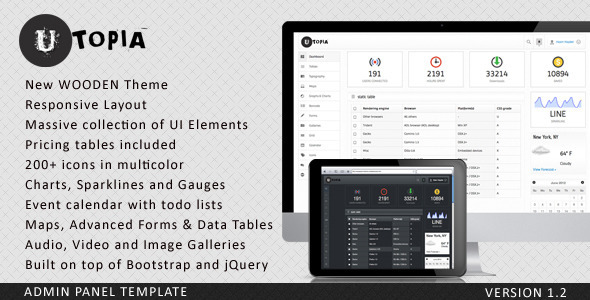
We develop beautiful dashboard and admin panel templates for the web application developers, which you can plug into your application easily. These templates comes with well documented code, even better documentation of components and a pack of essential plugins. Check out one of our admin template “Utopia” and grab your copy if you like it

Utopia Dashboard Template by Themio


RackSpace Cloud Server Client Library for PHP

We, the developers at Leevio are currently developing an open source group collaboration application. We are using RackSpace Cloud servers since the very beginning of the development and we will also deploy in on rack space cloud.

As a part of our study we’d found that RackSpace provides excellent API to manage your cloud services. Unfortunately there are no language binding library released yet (for Cloud Server). But they’ve mentioned that they are developing one for python.

So we have spend our time for last two days and developed a PHP client library to use RackSpace cloud server API from inside a PHP application.

This client library is released under New BSD license. And is available to download/svn-checkout from it’s project page at http://code.google.com/p/phprackcloud/

There is plenty of documentation and example included. The code is mostly self explanatory. Please dont forget to check the Wiki page to get some idea on how to use this library and how far you can go. We have covered all available methods by RackSpace cloud server in our client library.

Happy clouding.

Project Page and Download: http://code.google.com/p/phprackcloud

collecting data from streaming APIs in twitter

twitter’s streaming API is still in beta and is a good source of collecting public tweets. but unfortunately not all those methods are instantly usable by third parties (u need to provide written statements and so on). but for testing, three of these streaming APIs are usable by anyone at this moment which are spritzer, track and follow. spritzer streams a tiny part of public tweets to the collecting processes. in this blog post i’ll show you how to collect data from spritzer API.

as it is a stream data, so twitter keeps the HTTP connection “alive” infinitely (until any hiccup, by using Keep Alive). so when you write code, you must take care of that. and i would also suggest to make separate processes for collecting data+writing them (or sending them in queue to be written) – and for analyzing those data. and of course, to minimize the bandwidth consumption, use the json format. and json data is also easier to parse than XML as every tweet is separated by a new line (“\n”) character from twitter 🙂 – so you can read these data line by line, dcode them using json_decode() and do whatever you want

here is how you can create the collector process in php

[sourcecode language=’php’]
< ?php //datacollector.php $fp = fopen("http://username:[email protected]/spritzer.json","r"); while($data = fgets($fp)) { $time = date("YmdH"); if ($newTime!=$time) { @fclose($fp2); $fp2 = fopen("{$time}.txt","a"); } fputs($fp2,$data); $newTime = $time; } ?>
[/sourcecode]

this script will write the data collected hourly from the spritzer streaming API in filen (with names like <YmdH>.txt ). so in the directory where you are runnign this script u will see hourly data files. like 2009062020.txt . there is a special advantage to keep collecting in this way – as the file will remain open for writing (hence LOCKED) you will process files only for previous hours. it will make analyzing the data more hassle free 🙂

now run this script in background via the following command in your terminal
[sourcecode language=’html’]
php datacollector.php &
[/sourcecode]

the reason for appending an “&’ at the end of the command is starting this process in background. so that you dont have to wait for the script to end to get access to your shell back. as it is a streaming data, the script will run infinitely. and it will consume very minimal bandwidth 🙂 you can check yourself.

so i hope it will help those developers who are looking for a solution to collect data from twitter’s streaming API via PHP. If you want to track any specific keywords, use the “track” API instead :). and if you want to follow some particular person use the “follow“. Check out twitter’s documentation of streaming API for more 🙂