Running Symfony 2 Applications in OpenShift

Openshift is a fantastic Polyglot PaaS from Redhat, and you can do a lot of things with these containers. The good news is that with free accounts, OpenShift gives three gears for free, forever. Today, in this article I will show you how to install and run your Symfony applications in OpenShift.

After you have created your free account in OpenShift, go to the applications page and create a new “Zend Server 5.6” application. You can choose “PHP 5.3” containers as well, but there are many benefits of choosing ZendServer.

Before we dive into the details, please MAKE SURE that you have added your public key in your openshift settings section. This is very important that you do this.

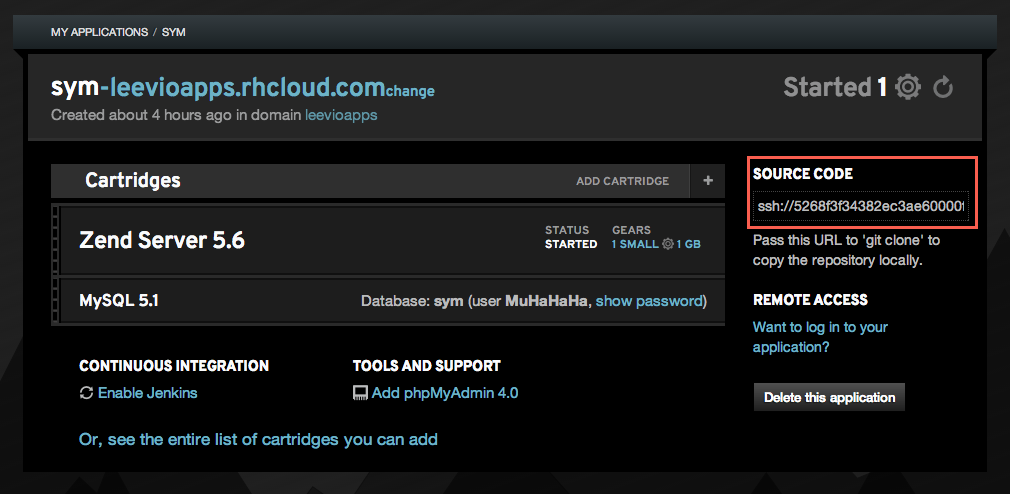
So after creating the new ZendServer 5.6 application and adding our public key in our OpenShift account, this is time to check out from our application’s git repository. OpenShift gives you a private git repository for every application and you can find the url in the right side of your application details.

Screen Shot 2013-10-24 at 8.15.05 PM

Now, follow these steps to check out this git repository and create a blank symfony application inside it’s php directory. You should have composer installed in your machine before this step.

[sourcecode language=”shell”]
git clone ssh://[email protected]/~/git/sym.git/
cd sym/php
rm -fr *.php
composer create-project symfony/framework-standard-edition ./
[/sourcecode]

After it runs, you have a blank symfony project installed inside this php directory. Now you need to add these files and commit in the git repository

[sourcecode language=”shell”]
git add -A
git commit -am "Blank Symfony Project"
git push
[/sourcecode]

OpenShift has an auto deployment feature which will deploy your application code after you push it in the git repo. It makes the deployment a lot easier for everyone.

Now you can visit your openshift container’s url but hey, why there is a blank screen? To find the answer of this question you need to open the .gitignore file. By default it’s content is like this

[sourcecode language=”shell”]
/web/bundles/
/app/bootstrap.php.cache
/app/config/parameters.yml
/app/cache/*
/app/logs/*
/vendor/
!app/cache/.gitkeep
!app/logs/.gitkeep
/build/
/bin/
/composer.phar
[/sourcecode]

Notice those lines “/app/config/parameters.yml” and “/vendor/”? These lines mean that parameters.yml file and everything in the vendor folder will be excluded from your commit. For now, just remove the line where it says about parameters.yml and keep the vendor line as is. So your final .gitignore file will look like this

[sourcecode language=”shell”]
/web/bundles/
/app/bootstrap.php.cache
/app/cache/*
/app/logs/*
/vendor/
!app/cache/.gitkeep
!app/logs/.gitkeep
/build/
/bin/
/composer.phar
[/sourcecode]

Now come to the root of your openshift repo and give this commands in the terminal

[sourcecode language=”shell”]
git add -A
git commit -am "Parameters.yml"
git push
[/sourcecode]

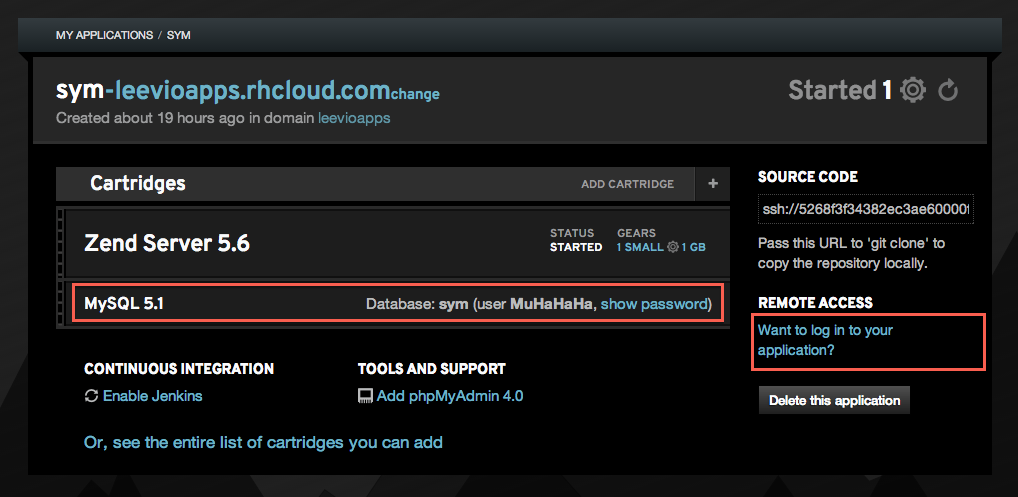
Now we need to setup the database details. To get those credentials, you need to log into your openshift gear. You can find the ssh login details in the right side of your app settings. In the following screenshot, you can get the mysql details (username and password) and ssh login details from the right side “Remote Access” section. Just click on the “Show Password” and “Want to login” links.

Screen Shot 2013-10-25 at 11.24.32 AM

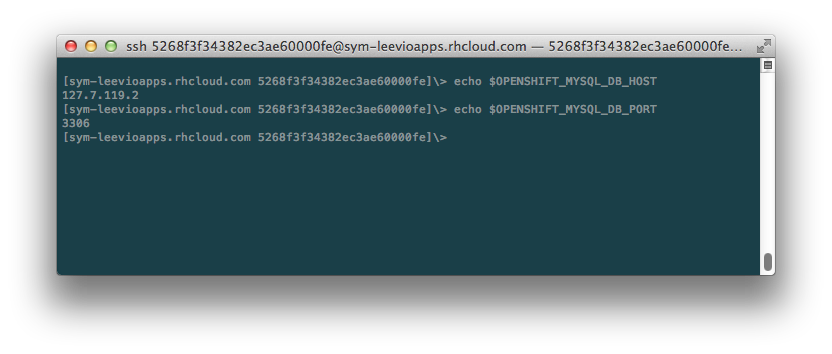
After you get the Remote Access , log into your openshift gear from your terminal. Once you are logged in, type the following commands in the terminal.

Screen Shot 2013-10-25 at 11.29.17 AM

Copy the values of mysql db host and port. Now we have all the data for our symfony app. Open your parameters.yml file and put all the essential data. For my one, it looks like this

[sourcecode language=”shell”]
parameters:
database_driver: pdo_mysql
database_host: 127.7.119.2
database_port: 3306
database_name: symfony
database_user: MuHaHaHa
database_password: "4s89-vh55G6q"
mailer_transport: smtp
mailer_host: 127.0.0.1
mailer_user: null
mailer_password: null
locale: en
secret: WhateverYouLikeTo
[/sourcecode]

Now commit this file and push

[sourcecode language=”shell”]
git commit -am "Parameters"
git push
[/sourcecode]

At this point, we need to write a deploy hook which will do the following things everytime you push your code.

  • It checks if composer is installed in our openshift gear. If not, it installs it
  • It then go to $OPENSHIFT_REOP_DIR/php folder and run composer install command
  • Then it gives write permission to app/cache and app/logs folder

Open your openshift repo, go to the .openshift folder, then go to the action_hooks folder and create a new file named deploy. Inside that file, put the following content

[sourcecode language=”shell”]
#!/bin/bash
# .openshift/action_hooks/deploy

export COMPOSER_HOME="$OPENSHIFT_DATA_DIR/.composer"

if [ ! -f "$OPENSHIFT_DATA_DIR/composer.phar" ]; then
curl -s https://getcomposer.org/installer | /usr/local/zend/bin/php — –install-dir=$OPENSHIFT_DATA_DIR
else
/usr/local/zend/bin/php $OPENSHIFT_DATA_DIR/composer.phar self-update
fi

unset GIT_DIR
cd $OPENSHIFT_REPO_DIR/php
/usr/local/zend/bin/php $OPENSHIFT_DATA_DIR/composer.phar install

chmod -R 0777 $OPENSHIFT_REPO_DIR/php/app/cache
chmod -R 0777 $OPENSHIFT_REPO_DIR/php/app/logs
[/sourcecode]

As a sidenote, if you are using regular PHP 5.3 containers instead of ZendServer 5.6, then replace “/usr/local/zend/bin/php” with “/usr/bin/php” in the deploy script above.

Save this file and give it executable permission by following command from your terminal

[sourcecode language=”shell”]
chmod +x deploy
[/sourcecode]

Now come to the root of your openshift repo and commit this deploy file. OpenShift supports different git hooks and you can check out https://www.openshift.com/developers/deploying-and-building-applications to know more about those.

[sourcecode language=”shell”]
git add -A
git commit -am "Deploy Hook"
git push
[/sourcecode]

You will notice some magical things happening at this point. After you push, you will notice in your terminal that composer is being installed in your openshift gear, and then it runs the composer install in appropriate directory.

Now visit your optnshift url (url/web/app_dev.php). Strange! now it is showing a strange error that we don’t have access to this app_dev.php. To fix this, open our app_dev.php (openshift repo/php/web/app_dev.php) and comment out line #12 to #18, I mean comment the following lines in your app_dev.php.

[sourcecode language=”php”]
//php/web/app_dev.php
if (isset($_SERVER[‘HTTP_CLIENT_IP’])
|| isset($_SERVER[‘HTTP_X_FORWARDED_FOR’])
|| !in_array(@$_SERVER[‘REMOTE_ADDR’], array(‘127.0.0.1’, ‘fe80::1’, ‘::1’))
) {
header(‘HTTP/1.0 403 Forbidden’);
exit(‘You are not allowed to access this file. Check ‘.basename(__FILE__).’ for more information.’);
}
[/sourcecode]

Sweet, now visit your openshift gear’s url (url/web/app_dev.php) and you can see that symfony is running smoothly :). But wait a minute – the URL contains the “web” part which looks ugly. All openshift PHP gear’s document root is set to $OPENSHIFT_REPO_DIR/php folder, which is in this case the root of our symfony application. But we don’t want this “web” in the URL. To do that, just create a .htaccess file in the “php” directory in our local openshift repo and put the following content

[sourcecode language=”shell”]
#php/.htaccess
RewriteEngine on
RewriteCond %{HTTP_HOST} ^your-openshift-domain$ [NC,OR]
RewriteCond %{REQUEST_URI} !web/
RewriteRule (.*) /web/$1 [L]
[/sourcecode]

And we are done, visit your openshift URL (url/app_dev.php) and it will working like a charm. So what if we want to set this app_dev.php as the default endpoint for our application? which means that we don’t even need to put “app-dev.php” in our url. To do that, open the .htaccess file from your “web” folder and replace all instance or “app.php” and “app\.php” to “app_dev.php” and “app_dev\.php” respectively. Then save your repo and make a git push and you are done! Tada!!!!

Hope you’ve enjoyed this long article. 🙂

Followup: I have automated the whole process and created a boilerplate Symfony 2.3.0 repository. Now you can get up and running in just one minute. Check out http://hasin.me/2013/10/27/install-and-run-symfony-2-3-0-in-openshift-instances-in-just-one-minute-with-this-boilerplate-repository/

Shameless Plug
Did you check our latest Onepage parallax portfolio template in Themeforest?
01_sonnet_preview.__large_preview

Playing with Parse.com API

Screen Shot 2013-10-23 at 9.29.51 PM

I’ve started using Parse.com API not more than a week ago, and I already fall in love with it. The first thing that hit me was “whoa, no extra work for storing objects in my database” and that’s really it. Saving data was never easier. Parse.com’s javascript API, the documentation is very good and it will help you to start your project in no time. Beside diving into the details, let me highlight another cool feature of Parse.com API. It’s the user management. Sign up someone, or let someone sign in, validate their email? Everything is there!

’nuff said, how to start?
Go to https://parse.com/apps, register a new application and copy the application key and javascript key.

Now open your html file, add the Parse.com’s js library
[sourcecode language=”html”]
<script type="text/javascript" src="http://www.parsecdn.com/js/parse-1.2.12.min.js"></script>
[/sourcecode]

and now initialize your Parse.com application
[sourcecode language=”javascript”]
Parse.initialize("Application ID", "Javascript Key");
[/sourcecode]

That’s it. Now you are ready to play with the rest of this article.

Sign me up, pronto!
One of the most tedious, boring work while developing an application is to deal with registration, email validation, ACL and taking care of the signing in process. With Parse.com API this is pretty straight forward. To sign up a new new user, all you gotta do is the following one!

[sourcecode language=”javascript”]
var user = new Parse.User();
user.set("username", "ElMacho");
user.set("password", "chicken");
user.set("email", "[email protected]");

user.signUp(null, {
success: function(user) {
// Everything’s done!
console.log(user.id);
},
error: function(user, error) {
alert("Error: " + error.code + " " + error.message);
}
});
[/sourcecode]

Your user is signed up! If you need to validate user’s email then log into your Parse.com dashboard and from your application’s settings section turn on the email validation. It’s simple.

Alright, let me in!
Alright, your users have signed up .Now let them get in. It’s simple to write a sign in script with Parse API

[sourcecode language=”javascript”]
Parse.User.logIn("ElMacho", "chicken", {
success: function(user) {
console.log(user.get("email"));
},
error: function(user, error) {
console.log("you shall not pass!");
}
});
[/sourcecode]

But hey, does an user have to login everytime? No, not at all. The logged in user’s state is saved in browser. So before attempting to sign in him/her again, you can check if he is already logged-in.

[sourcecode language=”javascript”]
var loggedInUser = Parse.User.current();
if(!loggedInUser){
//off you go, perform a log in
} else {
console.log(loggedInUser.get("email"));
}
[/sourcecode]

easy, eh?

Interesting, how can I deal with data?
Okay, enough with signing up and signing in. Lets save some data. Say, for example, we want to store user’s favorite books in Parse.com’s datastore. We will also retrieve the list later.

To save some data in Parse.com, we need to write code like this
[sourcecode language=”javascript”]
var user = Parse.User.current();
var Book = Parse.Object.extend("favoritebooks");
var b1 = new Book({"name":"King Solomon’s Mine","user":user});
b1.save();

var b2 = new Book({"name":"Return of She","user":user});
b2.save();
[/sourcecode]

While saving an object you can also take care of the error or success state.

[sourcecode language=”javascript”]
var b1 = new Book({"name":"King Solomon’s Mine","user":user});
b1.save(null, {
success:function(b){
console.log("successfully saved")
},
error:function(b,error){
console.log(error.message);
}
});

[/sourcecode]

You can save as many Books/data as you want, and link them up with the current user. Linking like this is useful for retrieving them in future. As we have a few saved records, lets pull them and see if they are really saved.

[sourcecode language=”javascript”]
var Book = Parse.Object.extend("favoritebooks");
var q = new Parse.Query(Book);
q.equalTo("user",user);
q.find({
success: function(results){
for(i in results){
var book = results[i];
console.log(book.get("name"));
}
}
});
[/sourcecode]

Once it runs, you can see that it outputs currently logged in user’s favorite books. Pretty neat, eh?

like equalTo, there are a dozen of useful constraints which you can use with your query. You can get the complete list at https://parse.com/docs/js_guide#queries-constraints . Parse.com’s documentation is pretty solid, and you will find almost everything over there.

It’s dinner time, log me out!
Simple, just call Parse.User.logOut() and you are done!

So is it just about user management and saving data?
No!, not at all!. But saving data and managing credentials + ACL are one of the coolest features that you can do with Parse.com API. Beside these object storage, you can host your application (ExpressJS based), you can run your code in the cloud (Background Job, Cloud Code), take care of the push notifications and even upload and store binary files.

In overall, Parse.com’s API is super cool. Give it a try today, you will love it for sure. And by the way, there is a super handy data browser in your application dashboard, use that!

Launching of WPonFIRE, the premier managed WordPress hosting for everyone

wponfire-banner

Today me and my partner Patrick have launched WPonFIRE, our WordPress based startup. If you are struggling with the performance of your wordpress blog, or spending too much because of some vague pageview based pricing model of your current provider – you may want to host with us. We will host your wordpress blog in a managed, fine tuned, Nginx based environment. We will be monitoring for the spikes, and honestly, there will always be someone listening to your emails, chitchats and try our best to satisfy the requirement.

At this moment, our plans are starting at $19/mo and the highest one is $99/mo. And if you choose yearly plans, we will be generous to give you 2 months for free.

WPonFIRE boxes are properly stress tested, because we really want to make sure that you will get premium return for your every penny, and your viewers will never be disappointed. If you want to integrate your blog with CDN, we can help you with that too. And guess what, based on your current setup you may even qualify for a free migration service. And migration services are usually expensive elsewhere, may cost you up to $500!

Anyway, to supercharge your WordPress blog please give us a shot. You will not be disappointed, promise!

Manipulating browser URL using Javascript without refreshing the page

In modern browsers, one of the most interesting feature is that you can change the browser url without refreshing the page. During this process you can store the state of the history so that you can pull the necessary data when someone hits the back-button in the browser and then take necessary action based on that. It’s not as complicated as it may sound now. Let’s write some code to see how it works.

[sourcecode language=”javascript”]
var stateObject = {};
var title = "Wow Title";
var newUrl = "/my/awesome/url";
history.pushState(stateObject,title,newUrl);
[/sourcecode]

History objects pushState() method takes three parameter as you can see in the above example. First one, a json object, is very important. Because this is where you will be storing arbitrary data related to the current url. Second parameter will be the title of the document, and third one is the new url. You will see your browser’s address bar is updated with the new url, but the page was not refreshed 🙂

Let’s see another example where we will be storing some arbitrary data against each url.

[sourcecode language=”javascript”]
for(i=0;i<5;i++){
var stateObject = {id: i};
var title = "Wow Title "+i;
var newUrl = "/my/awesome/url/"+i;
history.pushState(stateObject,title,newUrl);
}
[/sourcecode]

Now run and hit the browser back button to see how the url is being changed. For each time the url is changed, it is storing a history state object with the value “id”. But how can retrieve the history state and do something based on that. We need to add an event listener for “popstate” event which is fired everytime the history object’s state is changed.

[sourcecode language=”javascript”]
for(i=0;i<5;i++){
var stateObject = {id: i};
var title = "Wow Title "+i;
var newUrl = "/my/awesome/url/"+i;
history.pushState(stateObject,title,newUrl);
alert(i);
}

window.addEventListener(‘popstate’, function(event) {
readState(event.state);
});

function readState(data){
alert(data.id);
}
[/sourcecode]

Now you can see whenever you hit the back button, a “popstate” event is fired. Our event listener then retrieves the history state object which was associated with that url and prompt the value of “id”.

It’s easy and pretty interesting, eh?

problems uploading large files in php5-fpm and nginx – and solution to that

Today I had encountered a strange error while importing a 10MB XML file in a low end vps, where nginx was configured with php5-fpm and was working pretty nicely. But then, whenever I tried to import that file, after 25% upload the connection drops and page goes blank. It was strange and drove me nuts for some time. I definitely re checked my php.ini settings and everything was fine there, upload_max_filesize was set to 20M and post_max_size was set to 32M. So it was good and definitely not causing any problem. Then I was thinking that something was wrong with nginx config, specially because the connection was dropped in the middle. And guess what, I was actually right 🙂

So I edited the nginx.conf file and added the following values. I actually tried with just “client_max_body_size” but it was not the cause alone. So client_body_timeout fixed it together 🙂

[sourcecode language=”shell”]
client_max_body_size 100m;
client_body_timeout 600s;
[/sourcecode]

After restarting nginx, everything went just perfectly 🙂

এসো নিজে করি – ডেবিয়ানে এঞ্জিনএক্স ইনস্টলেশন এবং কনফিগারেশন

Nginx বা এঞ্জিনএক্স হল রাশিয়ান ডেভেলপার ইগর ভ্লাদিমির সিসোয়েভের তৈরী করা একটি লাইটওয়েট ওয়েব সার্ভার। স্ট্যাটিক ফাইল সার্ভ করার ক্ষেত্রে অসাধারণ পারফর্ম্যান্সের কারনে এঞ্জিনএক্স বিশ্বব্যাপী ব্যাপক জনপ্রিয়। এছাড়া ফাস্টসিজিআই ব্যবহার করে এঞ্জিনএক্স কে যেকোন সার্ভার সাইড ল্যাঙ্গুয়েজের সাথে ব্যবহার করা যায়। এই আর্টিকেলে আমরা দেখব কিভাবে ডেবিয়ান অপারেটিং সিস্টেমে আমরা এঞ্জিনএক্স ইনস্টল এবং কনফিগার করতে পারি। পরবর্তী আর্টিকেলে আমরা ফাস্টসিজিআই প্রটোকলের সাহায্যে এঞ্জিনএক্সের মাধ্যমে পিএইচপি ফাইল সার্ভ করা শিখব 🙂

এঞ্জিনএক্স ইনস্টল করা

প্রথমেই যেটা করতে হবে সেটা হল এপিটি প্যাকেজ ম্যানেজার লেটেস্ট রিপো ইনফরমেশন দিয়ে আপডেট করা। এটা আমরা কমবেশী সবাই জানি কিভাবে করতে হয়। আপনার সার্ভারের টার্মিনালে নিচের কমান্ড দিন। আপনি রুট ইউজার হিসেবে লগইন না করলে না করলে এবং সুডুয়ার্স লিস্টে আপনার ইউজার অ্যাড করা থাকলে কমান্ডের আগে sudo ব্যবহার করতে হবে 🙂

[sourcecode language=”shell”]
apt-get update
[/sourcecode]

এবার আমরা নিচের কমান্ড দিয়ে এঞ্জিনএক্স ইনস্টল করব। কমান্ড দেয়ার কিছুক্ষনের মাঝেই দেখতে পাবেন এঞ্জিনএক্স ইনস্টল হয়ে গেছে

[sourcecode language=”shell”]
apt-get install nginx
[/sourcecode]

ইনস্টল হয়ে গেলে চলুন এঞ্জিনএক্স কে স্টার্ট করি নিচের কমান্ড দিয়ে। যদি এঞ্জিনএক্স চালু হতে ব্যর্থ হয়, বা আগে থেকে অ্যাপাচি সার্ভার চালু থাকে তবে আগে অ্যাপাচিকে অফ করে নিন
(more…)

Caching Ajax requests in WordPress

In modern WordPress themes, theme developers are serving the page requests via ajax. Both paginated blog page and single posts (might be in full or partial) are served. Though WordPress is very fast if properly tuned, but it’s meaningless to pull the same data from WordPress database again and again unless there is any change. Which means, you can safely cache such ajax requests and reduce loads on your database by adding a few lines of extra code in your theme’s functions.php. In this article, we will learn how to take advantage of such caching in WordPress

Step 1: Register Ajax callback for serving paginated blog pages
Here is a typical codeblock that can serve paginated blog pages via ajax. There is no caching yet
[sourcecode language=”php”]
add_action("wp_ajax_blog", "get_blog");
add_action("wp_ajax_nopriv_blog", "get_blog");

function get_blog(){
global $post;
$page = $_REQUEST[‘page’];
if(!$page) $page=1;
$pp = get_option("posts_per_page");
$offset = ($page*1-1)*$pp;
$args = array(
"posts_per_page"=>$pp,
"offset"=>$offset
);
$posts = get_posts($args); //get the posts
foreach($posts as $post){
setup_postdata( $post );
get_template_part("templates/post",get_post_format($post->ID));
}
die();
}
[/sourcecode]

Now if you go to the url “http://your_blog_url/wp-admin/admin-ajax.php?page=1 ” you can see the latest posts, change the page value to 2,3,4 and so on to see previous posts. Each posts in the loop are rendered via get_templates(). Please note how we used the get_post_format() function in the loop to serve different templates based on post formats.

So what is bad in this code? Nothing, yet Everything! If 100 users are visiting your blog and they are visiting blog pages, each and every time these posts are pulled from database. Each and everytime they are pulling the very same data until you had edited any post, or created a new post. So why this extra load should go to DB? lets minimize it 🙂

Step 2: Add caching layer
here is a revised format of the code block above, but now with caching.
[sourcecode language=”php”]
add_action("wp_ajax_blog", "get_blog");
add_action("wp_ajax_nopriv_blog", "get_blog");

function get_blog(){
global $post;
$page = $_REQUEST[‘page’];
if(!$page) $page=1;

/** supply from cache **/
$page_from_cache = get_option( "artpress_page{$page}", 0 );
if($page_from_cache){
die($page_from_cache);
}
/** cache end **/

$pp = get_option("posts_per_page");
$offset = ($page*1-1)*$pp;
$args = array(
"posts_per_page"=>$pp,
"offset"=>$offset

);
$posts = get_posts($args);

ob_start();
foreach($posts as $post){
setup_postdata( $post );
get_template_part("templates/post",get_post_format($post->ID));
}
$new_cache = ob_get_flush();

/** save the cache **/
update_option( "artpress_page{$page}",$new_cache);
/** end cache **/
die($new_cache);
}
[/sourcecode]

In the code above, we first checked the page number. Then, checked in the wordpress options table if there is a cache present with a key named “artpress_page”. Now, for the first time it wont be there. So we just pull the records from the database as usually and then using the output buffering functions we capture the output, instead of pushing instantly to the browser. And then we update the options table with this output. So next time when same page will be requested, database wont be hit. Ok, database will be hit (this options table data is coming from the db) but you can see it wont touch the posts table again, and avoid running expensive queries (which includes many joins) in that table. It also saves CPU a bit.

Step 3: Invalidate cache whenever a post is edited, or created
This is an important step. We need to flush the cache whenever a new post or page is created to make sure our blog shows the up to date data.

[sourcecode language=”php”]
add_action("save_post","invalidate_cache");
function invalidate_cache(){
$counts = wp_count_posts();
$total_published_posts = $counts->publish;
$posts_per_page = get_option( "posts_per_page");
$total_page = ceil($total_published_posts/$posts_per_page);
for($i=1;$i<=$total_page;$i++){
delete_option( "artpress_page{$i}" );
}
}
[/sourcecode]

Now, we are in good shape. Our ajax requests are served from cache and properly purges whenever necessary. You can serve your single post same way.

If you want to serve single posts from the cache, one thing you need to keep in mind is that you are loading up an important table “options” with a lot of data. So you can change the code above and store the cache in filesystem instead of options table. You should have write permission in the uploads directory by default. So that wont be tough at all.

I hope you enjoyed this article 🙂

Displaying comments template when serving a single post via ajax in wordpress

I ran into this issue this morning, the comment form wasn’t showing up. I was using a custom comment template and I thought that there might be some issue with the custom template. So I tried with default template but the result was same. After googling for a while, I’ve found the workaround. Here is the solution for you

[sourcecode language=”php”]
//functions.php
add_action("wp_ajax_single", "get_single");
add_action("wp_ajax_nopriv_single", "get_single");

function get_single(){
error_reporting(0); //see later to understand why it is here
global $post;
$post_id = $_REQUEST[‘id’];
if($post_id){
$post = get_post( $post_id);
setup_postdata( $post );
get_template_part( "templates/single");
die();
}
}
[/sourcecode]

The code above registers an ajax callback for accepting GET/POST calls at “/wp-admin/admin-ajax.php?action=single&id=” and display the single post using the template file located at “templates/single.php” in your current theme.

Now, in the “templates/single.php” you must include the following code-block at the top to make sure the comments_template() function work

[sourcecode language=”php”]
global $withcomments;
$withcomments = true;
[/sourcecode]

Anyway, it was also mentioned in the codex like this, but I was confused as I thought it was actually inside the “single display” at first 🙂

Loads the comment template. For use in single Post and Page displays. Will not work outside of single displays unless $withcomments is set to 1.

By the way, that error_reporting(0) line is there to suppress a deprecated notice which says that your theme is missing “comments.php” even if it’s there.

Hope you enjoy this article

Saving a HUGE bandwidth cost in WordPress by automatically serving media contents from copy.com

shutterstock_132384233
The title almost says it all. Our mission is to save the bandwidth cost (and ensure better deliverability) by leveraging the power of headless installation of copy.com client in Linux, and then integrating it into WordPress. The integration must work seamlessly so that the viewers don’t see a difference, and at the same time you don’t have to put any extra effort. Beside saving bandwidth, this also reduces extra load from your web server. There’s another surprise which I will tell you later. For now, keep reading 🙂

You need at least a VPS to make this setup working, preferably with root access. These days VPSes are cheap. You can purchase an 128MB VPS for ~14/yr from Ramnode (such a fantastic provider) or may be for ~19/yr from WeLoveServers. Or feel free to use your existing VPSes if you have one.

Step 1: Headless installation of copy.com app
You can use your existing copy.com or register a new one using my referral code http://copy.com?r=Tbcrni, you and I both will be getting an extra 5GB if you do so.

Now log into your linux box via SSH, you need to have root privilege to complete this step.
(more…)

বোয়ার নিয়ে কথাবার্তা

bower

বোয়ার (Bower) হল ফ্রন্ট এন্ড ডেভেলপমেন্টের সময় যেসব জাভাস্ক্রিপ্ট ফাইল বা সিএসএস ফাইল লাগে সেগুলো ম্যানেজ করার জন্য টুইটার টিমের তৈরী করা একটা প্যাকেজ ম্যানেজার টুল। বোয়ার দিয়ে খুব সহজেই অ্যাপ্লিকেশনের জন্য প্রয়োজনীয় জেএস বা সিএসএস ফাইল অ্যাড/রিমুভ করা যায়, আপগ্রেড করা যায়। এই কাজের জন্য রয়েছে বোয়ারের বিশাল প্যাকেজ রিপোজিটরি যেখানে আপনি স্ক্রিপ্ট সার্চ করতে পারবেন খুব সহজেই। এই আর্টিকেলে আমরা দেখব কিভাবে বোয়ার ব্যবহার করতে হয় 🙂

বোয়ার ইনস্টল করা
বোয়ার ইনস্টল করার জন্য আমাদের কম্পিউটারে নোডজেএস এবং এনপিএম টুল ইনস্টল করা থাকতে হবে। নোড এবং এনপিএম ইনস্টল করার জন্য আপনারা http://nodejs.org/ থেকে ইনস্টলার টি ডাউনলোড করে চালান, একইসাথে নোড এবং এনপিএম ইনস্টল হয়ে যাবে

নোড এবং এনপিএম ঠিক মত ইনস্টল হয়েছে কিনা সেটা বোঝার জন্য আপনার কমান্ড লাইন/টার্মিনাল ওপেন করে কমান্ড দিন node -v এবং npm –v । একটু খেয়াল রাখবেন যে একটিতে -v এবং আরেকটি কমান্ডে –v ব্যবহার করা হয়েছে। । সবকিছু ঠিকঠাক থাকলে আপনারা টার্মিনালে নোড এবং এনপিএমের ভার্সন নাম্বার দেখতে পারবেন। আর কোন এরর পেলে আবার নোড অথবা এনপিএম ইনস্টল করুন অথবা ওদের সাইটে গিয়ে ট্রাবলশুটিং সেকশন দেখতে পারেন

node-npm

এবার বোয়ার ইনস্টল করার পালা, আর সেটা করার জন্য আপনার টার্মিনালে কমান্ড দিন npm install -g bower। কিছুক্ষনের মধ্যেই দেখতে পাবেন কনসোলে লেখা উঠেছে যে বোয়ার ইনস্টলেশন সাকসেসফুল হয়েছে। সহজ না?

bower-install

এবার চলুন দেখি কিভাবে আমরা বোয়ার ব্যবহার করব

বোয়ার ব্যবহার করা
প্রথমে টার্মিনাল ওপেন করে আপনার প্রজেক্ট ডিরেক্টরীতে প্রবেশ করুন, অথবা নতুন একটি ফোল্ডার তৈরী করে সেখানে প্রবেশ করুন। আমরা ধরে নিব আমাদের প্রজেক্টের জন্য নিচের তিনটি ফাইল লাগবে

  • জেকোয়েরী
  • ম্যাগনিফিক পপআপ
  • বুটস্ট্র‍্যাপ সিএসএস

আমরা টার্মিনালে এসে প্রথমে জেকোয়েরী ইনস্টল করার জন্য কমান্ড দিব bower install jquery। কিছুক্ষনের মাঝেই বোয়ার আপনাকে জানিয়ে দেবে যে জেকোয়েরী ইনস্টল করা সফল হয়েছে। আপনি আপনার প্রজেক্ট ডিরেক্টরীতে দেখবেন bower_components নামে নতুন একটি ফোল্ডার তৈরী হয়েছে, যার মাঝে জেকোয়েরী নামের একটা ফোল্ডারে jquery.js রয়েছে।

এছাড়াও আপনি bower list কমান্ড দিলে দেখবেন বোয়ার খুব সুন্দর করে ইনস্টল করা স্ক্রিপ্ট এবং তাদের ভার্সন নম্বর দেখিয়ে দেবে।

bower-jquery

খেয়াল করলে দেখবেন যে বোয়ার ডিফল্ট ভাবে প্যাকেজের বর্তমান ভার্সন ইনস্টল করেছে। কিন্তু আপনার যদি অন্য কোন ভার্সন দরকার হয় তাহলে কি করবেন? ধরুন আপনের দরকার জেকোয়েরীর ১.১০.২ ভার্সন। বোয়ারে যেকোন প্যাকেজ ইনস্টল করে দেয়ার সময় তার ভার্সন নম্বরও উল্লেখ করে দেয়া যায়। যেমন এই ক্ষেত্রে আমরা টার্মিনালে কমান্ড দেব bower install jquery#1.10.2, তাহলে বোয়ার তার ইন্টারঅ্যাকটিভ প্রম্পটের মাধ্যমে গাইড করবে ১.১০.২ ভার্সন ইনস্টল করে নেয়ার জন্য। নিচের স্ক্রিনশটটি দেখলে এটা আরও পরিষ্কার হতে পারে

bower-jquery-1.10.2

বোয়ারে প্যাকেজ সার্চ করা
কোন প্যাকেজ বা স্ক্রিপ্ট বোয়ারের রিপোজিটরীতে আছে কিনা সেটা জানতে হলে bower search কমান্ড দিলেই বোয়ার সেই প্যাকেজের বিষয়ে বিস্তারিত তথ্য দেখাবে। যেমন আমরা যদি magnigic popup জাভাস্ক্রিপ্ট প্যাকেজ ইনস্টল করার আগে চেক করে নিতে চাই যে এই নামে আসলেই কোন প্যাকেজ আছে কিনা তাহলে আমরা টার্মিনালে কমান্ড দিব bower search magnific

bower-magnific

বোয়ার দেখাচ্ছে যে magnific-popup নামে একটা প্যাকেজ আছে। সেটা ইনস্টল করতে হলে আমরা আগের মতই কমান্ড দিব bower install magnific-popup। ঠিক মত ইনস্টল হয়েছে কিনা সেটা চেক করার জন্য আমরা bower_components ফোল্ডারে দেখতে পারি অথবা bower list কমান্ড দিয়ে দেখতে পারি ।

প্যাকেজ আনইনস্টল করা
বোয়ারের মাধ্যমে কোন প্যাকেজ আনইনস্টল করা খুবই সহজ। শুধু install এর বদলে uninstall কমান্ড দিন, ব্যাস হয়ে গেল।

প্যাকেজ লিস্ট সংরক্ষন করা
এইযে আমরা এইসব প্যাকেজ ইনস্টল করলাম, এগুলো আমরা একটা লিস্ট হিসেবে সংরক্ষন করতে পারি যাতে পরবর্তীতে আপডেট করতে হলে বা ইনস্টল করতে হলে এক এক করে করতে না হয়। এজন্য অ্যাপ্লিকেশনের কারেন্ট ডিরেক্টরীতে (যেখান থেকে আমরা bower কমান্ড চালাব) একটি ফাইল তৈরী করি bower.json নামে। যেকোন টেক্সট এডিটর দিয়ে এই ফাইল এডিট করা যাবে (তবে ওয়ার্ড প্রসেসর দিয়ে নয়)। যেমন আমাদের আজকের প্রজেক্টের জন্য আমরা নিচের মত করে bower.json ফাইল লিখব, যেখানে dependencies সেকশনে আমাদের যাবতীয় প্যাকেজের লিস্ট লিখে রাখা হবে
bower-json

বোঝার সুবিধার্থে আমি এখানে আবার লিখে দিলাম
[sourcecode language=”javascript”]
{
"name": "Bower Article",
"version": "1.0.0",
"dependencies": {
"jquery":null,
"magnific-popup":null
}
}
[/sourcecode]

এরপর থেকে আমরা অ্যাপ্লিকেশন ডিরেক্টরীতে এই bower.json ফাইল কপি করে কমান্ড দিব bower install। ব্যাস তাহলেই বোয়ার এই bower.json ফাইল থেকে ডিপেন্ডেন্সী লিস্ট পরে এক এক করে সেগুলো ইনস্টল করে ফেলবে

আমরা যদি কোন প্যাকেজের কোন পার্টিকুলার ভার্সন ইনস্টল করতে চাই তাহলে null এর বদলে সেই ভার্সন নম্বর লিখে দিব, আর লেটেস্ট ভার্সন চাইলে null লিখব। যেমন যদি আমরা জেকোয়েরীর ১.১০.১ ভার্সন চাই তাহলে আমাদের bower.json ফাইল হবে নিচের মত

[sourcecode language=”javascript”]
{
"name": "Bower Article",
"version": "1.0.0",
"dependencies": {
"jquery":"1.10.1",
"magnific-popup":null
}
}
[/sourcecode]
এরপর আমরা অ্যাপ্লিকেশন ডিরেক্টরীতে কমান্ড দিব bower install, ব্যাস!

প্যাকেজ লিস্টে নতুন প্যাকেজ বা ডিপেন্ডেন্সী যোগ করা
আমরা তো ইতোমধ্যেই bower.json ফাইলে দুইটি প্যাকেজ যোগ করেছি। এখন আমরা চাই নতুন একটি প্যাকেজ bootstrap ইনস্টল করতে। সেক্ষেত্রে আমরা দুই ভাবে করতে পারি

১. আমরা ম্যানুয়ালী bower.json ফাইল এডিট করে bootstrap কে একটা নতুন ডিপেন্ডেন্সী হিসেবে যোগ করে, সেই bower.json ফাইল সেভ করে টার্মিনালে কমান্ড দিতে পারি bower install। আমরা দেখব যে বোয়ার স্বয়ংক্রীয় ভাবে bootstrap ইনস্টল করে ফেলছে

অথবা

২. আমরা bower.json ফাইল ম্যানুয়ালী এডিট না করে বরং টার্মিনালে সরাসরি কমান্ড দিতে পারি bower install bootstrap -save । খেয়াল করুন এখানে একটা অতিরিক্ত প্যারামিটার/স্যুইচ যোগ করা হয়েছে -save নামে। এর ফলে বোয়ার দুইটি কাজ করবে। প্রথমত বোয়ার bootstrap ইনস্টল করবে, দ্বিতীয়ত বোয়ার নিজেই bower.json ফাইল এডিট করে bootstrap কে ডিপেন্ডেন্সী সেক্শনে যোগ করে ফেলবে। আমরা bower install bootstrap -save এই কমান্ড দেয়ার পর bower.json ফাইল চেক করলে দেখব এটা নিচের মত কনটেন্ট দেখাচ্ছে 🙂

bower-auto-update

বোয়ার কম্পোনেন্ট নিজের পছন্দমত ডিরেক্টরীতে ইনস্টল করা
আমরা এতক্ষন দেখেছি যে বোয়ার ডিফল্টভাবে bower_components নামের ডিরেক্টরীতে সব স্ক্রিপ্ট ইনস্টল করছে। কিন্তু আমরা যদি চাই যে আমাদের সব ইনস্টল করা স্ক্রিপ্ট গুলো bower_components এর বদলে “scripts/vendor” ডিরেক্টরীতে ইনস্টল হবে, তাহলে অ্যাপ্লিকেশন ডিরেক্টরীতে নিচের মত করে .bowerrc ফাইল তৈরী করুন (খেয়াল রাখবেন নামের শুরুতে একটি . রয়েছে)। সেই .bowerrc ফাইলে নিচের মত করে নিজের পছন্দের ডিরেক্টরী উল্লেখ করে দিন
[sourcecode language=”javascript”]
{
"directory":"scripts/vendor/"
}
[/sourcecode]
এরপর আমরা অ্যাপ্লিকেশন ডিরেক্টরীতে কমান্ড দিব bower install, ব্যাস! বোয়ার নিজেই scripts/vendor ফোল্ডার তৈরী (আগে থেকে তৈরী করা না থাকলে) করে তার ভেতরে সব স্ক্রিপ্ট ইনস্টল করে ফেলবে

উপসংহার
অ্যাপ্লিকেশনে স্মার্ট ভাবে প্যাকেজ ম্যানেজ করতে বোয়ারের জুড়ি নেই। সময় বাঁচানোর জন্য এইসব টুল তৈরী হচ্ছে দিন কে দিন, এবং স্মার্ট ডেভেলপাররা সেগুলো ব্যবহার করে নিজেদের সময় যেমন বাঁচাচ্ছে পাশাপাশি তাদের প্রজেক্ট ম্যানেজমেন্ট করছে অত্যন্ত সহজভাবে। আগে বোয়ার ব্যবহার করে না থাকলে আজকে থেকেই শুরু করে দিন 🙂

এর পরের আর্টিকেলে আমরা দেখব কিভাবে আমরা রিকোয়ারজেএস (ReuireJS) ব্যবহার করে আমাদের অ্যাপ্লিকেশনে স্বয়ংক্রীয়ভাবে আমাদের জাভাস্ক্রিপ্ট ফাইল লোড করতে পারি, এবং সেখনেও বোয়ার আমাদের কিভাবে সাহায্য করে।

এই সিরিজের সব শেষের আর্টিকেলে আমরা দেখব টাস্ক ম্যানেজার গ্রান্টের (Grunt) ব্যবহার যার মাধ্যমে আমরা আমাদের অ্যাপ্লিকেশনের যাবতীয় কাজ অটোমেট করে আরও স্মার্টভাবে ডেভেলপ করতে পারব।