Using OAuth2 to make authenticated calls to WP REST API

clueless

WP REST API is a cool solution for the developers who want to interact with their WordPress blogs programmatically. It’s handy and pretty useful. However, the documentation lacks some working examples which makes a lot of people confused. I’ve started to document some working examples at http://wpapi.xyz. The list is small, but it’s growing.

Anyway, I’ve made a small video tutorial last night to demonstrate how to authenticated yourself using OAuth2 and make some authenticated calls to your WP REST API endpoint. There are hundreds of confused users floating out there looking for a solution, and I hope this video will fix it. Let me know if you find it useful

Enjoy!

Getting rid of Redux Framework annoyances

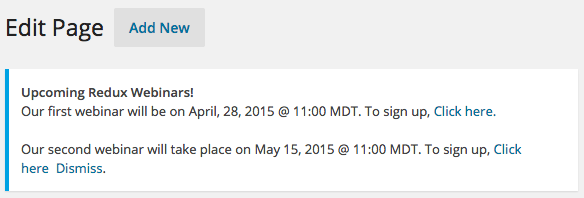
Redux Framework is a nice option framework for WordPress theme and plugin developers, and probably it is one of the most used frameworks out there. However, it comes with a few annoyances that many peoples are complaining of. First one is their dashboard widget. There should be a hook to remove that from my theme. Second, it asks the user to opt-in for tracking usage info. Third, it shows unnecessary admin notices when you’re developing in localhost. These admin notices doesn’t display in production server. But it still annoys me while in development mode because it has no effect on dev_mode value set to true or false. It also adds an extra “Redux Framework” sub menu page under Tools menu which was meant for support options but is not needed when you’re a theme developer and providing support by yourself.

Screen Shot 2015-04-24 at 9.59.11 PM

So here is how you can get rid of these things. Remember, there are no hooks to turn them off easily and you need to modify core files. Fortunately the changes are simple. Let’s do it!

1. Turn off Dashboard Widget and Stop admin notices

Open ReduxCore/framework.php and you will find the following code block around line # 405 (depending on your version of Redux Framework)

[sourcecode language=”php”]
if ( $this->args[‘dev_mode’] == true || Redux_Helpers::isLocalHost() == true ) {
include_once ‘core/dashboard.php’;

if ( ! isset ( $GLOBALS[‘redux_notice_check’] ) ) {
include_once ‘core/newsflash.php’;

$params = array(
‘dir_name’ => ‘notice’,
‘server_file’ => ‘http://www.reduxframework.com/’ . ‘wp-content/uploads/redux/redux_notice.json’,
‘interval’ => 3,
‘cookie_id’ => ‘redux_blast’,
);

new reduxNewsflash( $this, $params );
$GLOBALS[‘redux_notice_check’] = 1;
}
}
[/sourcecode]

Comment out the whole block and you’re done!

2. Turn off opt-in Tracking popup

This one is quite easy. Just add the disable_tracking in your option setting arguments (where you define your opt_name value) and you’re done

[sourcecode language=”php”]
$args = array(
// TYPICAL -> Change these values as you need/desire
‘opt_name’ => $opt_name,
‘disable_tracking’ => true,

[/sourcecode]

3. Remove “Redux Framework” sub menu under Tools

To remove that menu, add the following code-block in your functions.php. Remember to set the priority higher than 10 🙂

[sourcecode language=”php”]
/** remove redux menu under the tools **/
add_action( ‘admin_menu’, ‘remove_redux_menu’,12 );
function remove_redux_menu() {
remove_submenu_page(‘tools.php’,’redux-about’);
}
[/sourcecode]

Hope you liked this article. Enjoy!

Working with combined expressions in WHERE clauses in Laravel 4

laravel-combined

When retrieving records from tables in our database, you often have to write combined expressions in WHERE clauses like

[sourcecode language=”sql”]
SELECT * FROM users WHERE status=1 AND (fname = ‘John’ OR lname=’Doe’)
[/sourcecode]

The query above is pulling out all users who’s status is set to 1, and fname is equal to ‘John’ or status is 1 and lname is equal to ‘Doe’. Now this query is significantly different from the following one.

[sourcecode language=”sql”]
SELECT * FROM users WHERE status=1 AND fname = ‘John’ OR lname=’Doe’
[/sourcecode]

Can you tell us what can go wrong with a statement like this? Well to find out more, let’s have a look at how this query will be parsed by database engine

[sourcecode language=”sql”]
SELECT * FROM users WHERE (status=1 AND fname = ‘John’)

OR

SELECT * FROM users WHERE lname=’Doe’
[/sourcecode]

So this query will pull every record that has a status set to 1 and fname equivalent to ‘John’. Then, with the previously pulled records, it will also pull all the users who has a lname equal to ‘Doe’, but this time it will pull out all users disregarding their status. Which means that users with status = 0 or 1 or 2 will also be in the resultset. I bet that is not what you were looking for while you’re writing this query and clearly understands the difference between these two queries. So you got the point of grouping or combining logical expressions and the impact that can have in your resultset. Writing a combined logical expression is easy in SQL. But what if you’re told to do the same operation using Laravel 4’s built in ORM which is called Eloquent ORM. It’s a little tricky to do the same operation in eloquent because of this combined expression, and it needs an anonymous function 🙂 Let’s have a look at the following code in our User model

[sourcecode language=”php”]
static function searchByName($fname, $lname){
return User::where("status", 1)
->where(function ($query) use ($fname, $lname) {
$query->where("fname", ‘=’, $fname)
->orwhere("lname", ‘=’, $lname);
})
->get([‘*’]);
}
[/sourcecode]

Now searchByName(…) function will work as we expected. You can try the following one and see the difference and notice how it is VERY MUCH different from our expectation

[sourcecode language=”php”]
static function searchByName($fname, $lname)
{
return User::where("status", 1)
->where("fname", ‘=’, $fname)
->orWhere("lname", ‘=’, $lname)
->get([‘*’]);
}
[/sourcecode]

Eloquent ORM’s where function can make use of callbacks in this way. Please note how we used anonymous function as callback that also uses $fname and $lname from the arguments. That’s mainly it. I hope that you’ve enjoyed this article 🙂

Picking up random elements from DOM using jQuery

tumblr_n1zv0cTukw1tubinno1_1280

Selecting a group of DOM elements is super duper easy these days using CSS selectors, or a particular element via their ID. But what about picking up a random element from these group of elements? In this article I am going to show you how to do it by extending jQuery

Let’s consider that we have the following markup. Now we will pick a random button and change it’s value

[sourcecode language=”html”]
<div class="container">
<button>1</button>
<button>2</button>
<button>3</button>
<button>4</button>
<button>5</button>
</div>
[/sourcecode]

Let’s extend jQuery and add a random() function to it

[sourcecode language=”javascript”]
$.fn.random = function() {
return this.eq(Math.floor(Math.random() * this.length));
}
[/sourcecode]

Now we can pick up a random button and change it’s value quite easily.

[sourcecode language=”javascript”]
$(".container button").random().html("Click Me");
[/sourcecode]

That was easy, eh? Hope you’ll like it.

Delegating Events Instead of Direct Binding in DOM

tumblr_n1rr53o21A1tubinno1_1280

When it comes to attaching event listeners, be it a particular element in the DOM, or a group of elements via CSS selectors, most of us bind the event listener directly to the elements. Direct binding is fine when you’re doing for a PARTICULAR element, but it may create problems for a group of elements if you’re not taking extra care while event binding. To understand the issue, let’s have a look at the following code block (Here’s a live example)

[sourcecode language=”html”]
<!– index.html –>
<div class="container" style="margin-bottom:50px;"></div>
<input type="button" value="Add More Buttons" id="addmore" />
[/sourcecode]

And we added the following javascript (depends on jQuery)

[sourcecode language=”javascript”]
;(function($){
$(document).ready(function(){
$("#addmore").on("click",function(){

var l = $(".container button").length+1;
$("<button/>").html("Click Me "+l).appendTo($(".container"));
$(".container button").on("click",function(){
alert("Clicked");
});

});
});
})(jQuery);
[/sourcecode]

Now if you add more and more buttons, you can see that it repeatedly attaching events. See the effect in the following animation

dom-1

To avoid these repeated bindings, you can modify your code like this and detach all the event listeners which were attached previously to these buttons.

[sourcecode language=”javascript”]
$(".container button").off("click");
$(".container button").on("click",function(){
alert("Clicked");
});
[/sourcecode]

This is boring, lengthy and sometime risky because you have to manually detach events everytime a new DOM element which satisfies your CSS selector rule adds in the container. And if you forgot to do that, chances are higher to break something somewhere.

Now, to save from this pain, jQuery had introduced event delegation which doesn’t bind the event listener to the dom elements but it delegates the event from their parent. This way, you will never have to worry about detaching previous attached event listeners anymore. Let’s have a look at our final code block, and here is a live example too

[sourcecode language=”javascript”]
;(function($){
$(document).ready(function(){

//event delegation
$(".container").on("click","button",function(){
alert("Clicked");
});

$("#addmore").on("click",function(){

var l = $(".container button").length+1;
$("<button/>").html("Click Me "+l).appendTo($(".container"));

});
});
})(jQuery);
[/sourcecode]

In the above example see how we have delegated the click event to every “button” in the container div. Once the delegation is done, it doesn’t matter whenever a new dom element (in this case, a “button”) inserts in the container. It will always capture the “click” event because the parent div “.container” will delegate that event to it properly. All you have to do is select a parent element, and then delegate the event to childrens (via CSS selector) belonging to it. It’s the same .on() method, just takes an extra parameter in the middle which represents the CSS selector to which the event will be delegated.

[sourcecode language=”javascript”]
//event delegation
$(".container").on("click","button",function(){
alert("Clicked");
});
[/sourcecode]

By using event delegation in jQuery for a group of DOM elements, you can avoid risks, keep your code cleaner and save yourself from some overkill every time. Hope you’ve liked this article 🙂

How to enable some useful text formatting options in TinyMCE in WordPress

tumblr_na06t4fnlI1tubinno1_1280

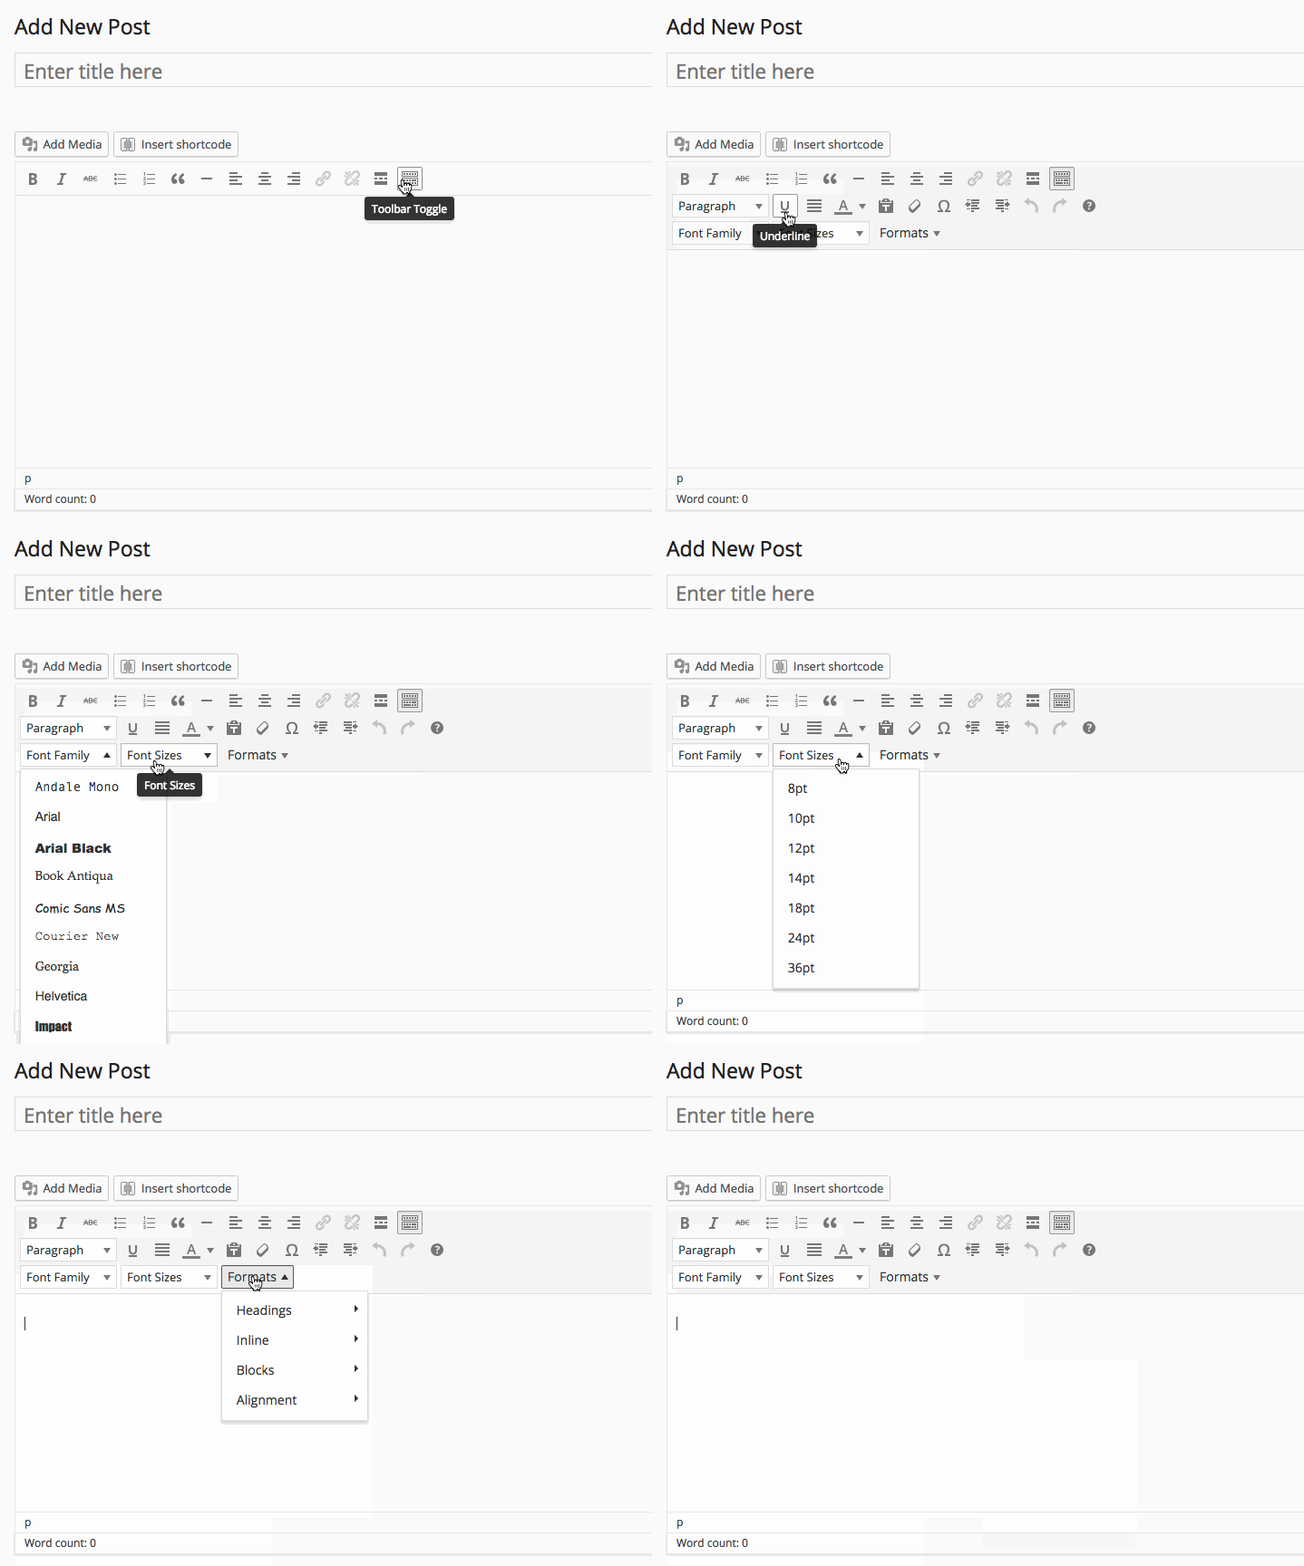
Most of the time default TinyMCE editor in WordPress is pretty adequate for everyday text formatting. However, there are a lot of extra formatting options which are hidden out of the box. Enabling these options will give you extra formatting features that will be useful for many of us. In this article, I will show you how to enable these hidden formatting options in TinyMCE. Just add the following code block in your theme’s functions.php file

[sourcecode language=”php”]
function tinymce_enable_more_buttons($buttons)
{
$buttons[1] = ‘fontselect’;
$buttons[2] = ‘fontsizeselect’;
$buttons[3] = ‘styleselect’;
return $buttons;
}

add_filter("mce_buttons_3", "tinymce_enable_more_buttons");
[/sourcecode]

Now you can see these extra options in the editor as shown in the animation below.

format

Hope you liked this article.

Find n number of posts randomly from a group of categories in WordPress

tumblr_n2hutxfrNr1tubinno1_1280

When you are developing a theme, or maybe writing a plugin, it is often required to display related posts in single posts page. These related posts are fetched by various criteria. Sometimes they are fetched from the same categories a post belongs to, or by tags. Sometimes they are set by the author of the posts.

In this article I am going to show you how to fetch the categories of a particular post, and then fetch some random posts from these categories. It’s not as tough as you’re thinking.

Fetch the categories of a post
You can quickly fetch the categories assigned to a particular post using get_the_category() function. Let’s have a look at the following code block

[sourcecode language=”php”]
$post_id = 1234;
$categories = array();
$_categories = get_the_category($post_id);
foreach ($_categories as $_cat) {
$categories[] = $_cat->term_id;
}
[/sourcecode]

Now you have the array of category ids which are assigned to a particular post with post id “1234”.

Fetch posts from these same categories
Now we are going to fetch some posts from these categories fetched in step 1. We will use kinda less documented category__in and post__not_in parameters with get_posts() function. We will make sure that the post “1234” doesn’t come in the list of random posts. Because it will be silly to display that same post as a relative.

[sourcecode language=”php”]
$args = array(
‘orderby’ => ‘rand’, //important to fetch random posts
‘post_type’ => ‘post’,
‘numberposts’ => 3,
‘post__not_in’ => array($post_id), //exclude the same post
‘category__in’ => $categories,
‘post_status’=>’publish’
);
$related_posts = get_posts($args);
[/sourcecode]

Now you have an array of 3 related posts, which are related to the post “1234” by belonging in the same categories. Their properties are described in details here in this Codex Article

That was easy, wasn’t it? Hopefully you will find it useful in your next WordPress theme project. Good night.

Passing data from PHP to the enqueued scripts in WordPress

tumblr_nau9zqjZay1tubinno1_1280

Enqueueing scripts, while being as one of the most common tasks for WordPress theme and plugin developers, has a very nice companion feature that can be used to pass data to it. These data will then be available in the native scope of those scripts. In this short article, I am going to show you how to to this

Remember the first parameter of wp_enqueue_script() function? It’s called ‘handle’, and works as a reference point. We need this handle to send some data to it with the help of wp_localize_script() function. Let’s have a look at the following example.

[sourcecode language=”php”]
add_action("wp_enqueue_scripts","my_scripts_loader");

function my_scripts_loader(){
$data = array("home"=>site_url());

wp_enqueue_script("myscript","path/to/my/script.js");
wp_localize_script( "myscript", "blog", $data );

}
[/sourcecode]

wp_localize_script() takes the handle of the script file, a variable name and an array. Finally, wp_localize_script converts that array into a JSON object and makes available in the local scope of that javascript file via that variable name. So, from the example above you can write the following code in your script.js and it will show you your blog URL, which was actually passed to it using wp_localize_script function

[sourcecode language=”javascript”]
alert(blog.home);
[/sourcecode]

This feature is pretty handy for developing themes and plugins, to pass data from your PHP scripts to the external javascript files. Hope you’ve enjoyed this article.

How to enqueue javascript files properly in the WordPress admin panel

You’d probably have answered the question already, won’t you? We all know that the correct answer is to do that we have to write a function that hooks the “admin_enqueue_scripts” and inside that function we will have to load the script via wp_enqueue_scripts() function. That’s the correct answer, but when it comes to the best practices, it fails. Because when you’re loading a javascript file blindly in all pages, it can be messy and it also may conflict with other scripts which are already loaded in that page. Besides that, why load an extra script everywhere when you actually need it in a specific page, or two perhaps.

The correct, or “precise” way to enqueue a javascript file in the WordPress admin panel is to check first which page you’re on. And when you’re on that specific page where this javascript file is actually required, load it. So how you’re gonna check which page you’re on in the admin panel? The enqueue hook passes a parameter that tells you about this. Let’s have a look at the following example

[sourcecode language=”php”]
add_action("admin_enqueue_scripts","admin_scripts_loader");

function admin_scripts_loader(){
wp_enqueue_script("myscript","path/to/my/script.js");
}
[/sourcecode]

There is nothing wrong with the enqueueing system above. However, the only problem is that it will load your script in every admin page, you need it or not. So let’s write a better version of that admin_scripts_loader function.

[sourcecode language=”php”]
function admin_scripts_loader($hook){
if(in_array($hook,array("post-new.php","post.php","edit.php"))) {
//specifically load this javascript in post editor pages
wp_enqueue_script("myscript", "path/to/my/script.js");
}
}
[/sourcecode]

Now the code is more accurately loading your javascript file only in the post editor pages. This $hook variable gives you the name of the PHP file that you’re on. So it’s quite easy for you to figure out where you should load it.

Hope you enjoyed it.

Fetch WordPress media files using BackboneJS

WordPress uses BackboneJS and Underscores in the admin panel. Though codex has a rich set of documentation on different WordPress topics, it lacks instructions of using these BackboneJS models in your code. So here’s a small snippet which shows you how to fetch an attachment from your WordPress blog using these models

First of all, you will have to enqueue media scripts via wp_enqueue_scripts or admin_enqueue_scripts hook. This will load all the necessary media js scripts needed for this task.

[sourcecode language=”php”]
wp_enqueue_media();
[/sourcecode]

And then, from your front end code you can access the attachments like this

https://gist.github.com/hasinhayder/eb62a4c02bf4134f5939

Hope you liked it 🙂