Category: Wordpress Themes

Generate Dummy Placeholder Images in the WordPress Export File Instantly

It’s a common problem for the theme developers who sell their themes in the marketplaces and ships a data file with it, that contains exported data from the demo WordPress site. The problem is, this content file contains links to the images used in the demo. And those images, which the author uses to decorate his demo sites, may not be freely distributable.

So, theme developers have to create another site with placeholder images and then export data from this site. It’s a double work. It’s a boring work as well.

To save from this pain, I’ve created a site called DimgX which is available at http://dimgx.net that can deliver placeholder images on the fly. Using this service is pretty straight forward. If your image url is http://abcd.com/image.jpg all you have to do is add a dimgx.net at the end of the image domain, like http://abcd.com.dimgx.net/image.jpg

So if the url of the original image is http://d13yacurqjgara.cloudfront.net/users/6014/screenshots/2262615/coverdribbble.png which displays like this Artwork By Greg Christman

It’s placeholder image’s url will be http://d13yacurqjgara.cloudfront.net.dimgx.net/users/6014/screenshots/2262615/coverdribbble.png and it will show like this – Tada! You don’t have to worry about the original image’s dimension or anything. Everything will be handled by DimgX on the fly.

Using this feature, DimgX allows you to upload the exported content file from your WordPress site, which has an xml extension, and then download a modified content file having all the attachment urls replaced using dimgx.net. It’s pretty handy

DimgX replaces all the <guid> and <wp:attachment_url> in the export file, which contains links to the image files, and adds .dimgx.net at the end of those domain names in those image urls.

While creating a placeholder image, DimgX needs to calculate the size of the original image, to properly draw a placeholder with the same dimension. And in PHP, you know the only way to do it using getImageSize() function. People usually download whole image and then calculate these dimensions but that’s is a pretty expensive process when you have to download lots of bigger images. Fortunately, all these popular image formats contains these dimension in the first few KB in their header. So DimX doesn’t download the whole image but only a chunk of it. And then it uses that chunk of the header data to calculate this size. It makes the whole process fast, and less resource extensive. And while doing this, it also saves a good amount of bandwidth. To feed your appetite, here’s a part of that routine

[code lang=php]
switch ($extension) {
case "jpg" :
case "jpeg" :
$range = "0-50000";
break;
case "png":
$range = "0-10000";
break;
case "gif":
$range = "0-10";
break;
default:
$range = "0-15000";
break;
}

$ch = curl_init ($url);
curl_setopt($ch, CURLOPT_HEADER, 0);
curl_setopt($ch, CURLOPT_RETURNTRANSFER, 1);
curl_setopt($ch, CURLOPT_BINARYTRANSFER,1);
curl_setopt($ch, CURLOPT_RANGE, $range);
[/code]

And here is the regular expression pattern that gets this complex URL replacement job beautifully done

[code lang=php]
$pattern1 = "/<guid([^>]+)>http://([^/]+)/([S]+)(.jpg|png|gif)</guid>/";
$pattern2 = "/<wp:attachment_url>http://([^/]+)/([S]+)(.jpg|png|gif)</wp:attachment_url>/";
$new_data = preg_replace($pattern1,'<guid${1}>http://${2}.dimgx.net/${3}${4}</guid>',$data);
$new_data = preg_replace($pattern2,'<wp:attachment_url>http://${1}.dimgx.net/${2}${3}</wp:attachment_url>',$new_data);
[/code]

Anyway, feel free to use DimgX at http://dimgx.net and let me know how you feel about this service. Right now, it can convert image urls that is served using http://, because wildcard SSLs are not cheap. But it’s in our roadmap. Stay tuned 🙂

ReduxFramework – a perfect example of how not to redesign your site!

This is not a rant. It’s a post from a fan who is sad, very sad.

I am a fan of Redux Framework and use it in all my themes. It’s easy to use and it has an excellent collection of controls which can make your life easier when you deal with option panels. However, the documentation SUCKS!!! It SUCKS big time. Not because it lacks necessary information, but because how it gives you the exact feeling of finding a needle in the haystack. If you go to their documentation, you will literally feel lost. Why not try to search the documentation of “color” control, or “text” perhaps”.

It was a lot easier to find the required information when they were using github wiki. But now, with the redesign, it’s very tough.  Their search doesn’t work as expected, gives you a lot of unnecessary information that you don’t need.

And oh, the funny thing is that in the WHOLE site, their github repository is not linked (as of the time of writing it). You simply can’t find a “DOWNLOAD” button, not even something that takes you to the original ReduxFramework repo! Heh, I submitted a ticket in their issue tracker and Dovy replied that he will take care of it. Maybe he is too busy to add a link in 3 months!

So go to ReduxFramework site, and scream “Where is the Mothe*fuck*ng  download/fork link?”. No one will hear your scream, boy, no one. They are too busy in making PAID extensions.

I love ReduxFramework. I don’t like how it gives a negative impression from the website. I really don’t like that.


Improving UX in the WordPress Admin Panel with Interactive Meta Boxes

Our goal is simple today, we want to add interactivity to our boring metaboxes. Instead of showing lots and lots of irrelevant input boxes at once, we will properly group them into different metaboxe containers and then display the required one based on the action of another one.

We will create a custom post called “profession”, then we will let our user choose from two pre defined professions, for example “photographer” and “programmer”. Based on his choice we will display another set of metaboxes to get the details of that profession.

Step 1: Register the custom post
Here is a simple custom post register script, add the following snippet in your functions.php

[sourcecode language=”php”]
add_action( ‘init’, ‘mytheme_custom_post_profession’ );
function mytheme_custom_post_profession() {

$labels = array(
‘name’ => _x( ‘Professions’, ‘profession’ ),
‘singular_name’ => _x( ‘Profession’, ‘profession’ ),
‘add_new’ => _x( ‘Add New’, ‘profession’ ),
‘all_items’ => _x( ‘Professions’, ‘profession’ ),
‘add_new_item’ => _x( ‘Add New Profession’, ‘profession’ ),
‘edit_item’ => _x( ‘Edit Profession’, ‘profession’ ),
‘new_item’ => _x( ‘New Profession’, ‘profession’ ),
‘view_item’ => _x( ‘View Profession’, ‘profession’ ),
‘search_items’ => _x( ‘Search Professions’, ‘profession’ ),
‘not_found’ => _x( ‘No professions found’, ‘profession’ ),
‘not_found_in_trash’ => _x( ‘No professions found in Trash’, ‘profession’ ),
‘parent_item_colon’ => _x( ‘Parent Profession:’, ‘profession’ ),
‘menu_name’ => _x( ‘Professions’, ‘profession’ ),
);

$args = array(
‘labels’ => $labels,
‘hierarchical’ => false,
‘public’ => true,
‘show_ui’ => true,
‘show_in_menu’ => true,
‘supports’ => array( ‘title’, ‘thumbnail’),
);

register_post_type( ‘profession’, $args );
}
[/sourcecode]

Step 2: Add the necessary libraries in your theme/plugin
Creating metaboxes is a tedious and boring task. So we will take help of one of the fantastic metabox libraries out there. We will be using Custom-Metabox-Framework which is also widely known as “CMB”. It will make our code a lot less cluttered. So download (or checkout) the library, unzip and rename the folder as “cmb” and place it inside your theme folder. Now add the following code in your functions.php

[sourcecode language=”php”]
add_action( ‘init’, ‘mytheme_initialize_cmb_meta_boxes’ );
function mytheme_initialize_cmb_meta_boxes() {
if ( !class_exists( ‘cmb_Meta_Box’ ) ) {
require_once( ‘cmb/init.php’ );
}
}
[/sourcecode]

Step 3: Create some metaboxes for this profession custom post
Now we have all the necessary tools available, lets create three metaboxes and attach them with only this “profession” type custom post.

[sourcecode language=”php”]
function mytheme_profession_metaboxes( $meta_boxes ) {
$prefix = ‘_mytheme_’; // Prefix for all fields
$meta_boxes[] = array(
‘id’ => ‘profession_details’,
‘title’ => ‘Profession Details’,
‘pages’ => array(‘profession’), // post type
‘context’ => ‘normal’,
‘priority’ => ‘high’,
‘show_names’ => true, // Show field names on the left
‘fields’ => array(

array(
‘name’ => ‘Your Name’,
‘id’ => $prefix . ‘name’,
‘type’ => ‘text’
),
array(
‘name’ => ‘Profession Type’,
‘id’ => $prefix . ‘profession_type’,
‘type’ => ‘select’,
‘options’=>array(
array("name"=>"Select a Profession","value"=>0),
array("name"=>"Photographer","value"=>1),
array("name"=>"Programmer","value"=>2),
)
),
),
);

$meta_boxes[] = array(
‘id’ => ‘profession_photographer’,
‘title’ => ‘Some details of your <b>photography</b> job’,
‘pages’ => array(‘profession’), // post type
‘context’ => ‘normal’,
‘priority’ => ‘high’,
‘show_names’ => true, // Show field names on the left
‘fields’ => array(
array(
‘name’ => "Your Camera",
‘id’ => $prefix . ‘photography_camera’,
‘type’ => ‘text_medium’
),
array(
‘name’ =>"Your primary interest is",
‘desc’ => ‘Landscape/Portrait/Street/Lifestyle’,
‘id’ => $prefix . ‘photography_interest’,
‘type’ => ‘text_medium’
),
),
);

$meta_boxes[] = array(
‘id’ => ‘profession_programmer’,
‘title’ => ‘Some details of your <b>programming</b> job’,
‘pages’ => array(‘profession’), // post type
‘context’ => ‘normal’,
‘priority’ => ‘high’,
‘show_names’ => true, // Show field names on the left
‘fields’ => array(
array(
‘name’ => "Your Favorite IDE",
‘id’ => $prefix . ‘programming_ide’,
‘type’ => ‘text_medium’
),
array(
‘name’ =>"Your primary language",
‘desc’ => ‘C/PHP/Java/Python/Javascript’,
‘id’ => $prefix . ‘programming_lang’,
‘type’ => ‘text_medium’
),
),
);

return $meta_boxes;
}

add_filter( ‘cmb_meta_boxes’, ‘mytheme_profession_metaboxes’ );
[/sourcecode]

At this point, if we click on “New Profession” from our WordPress admin panel, we will see the editor screen like this. Please notice that we have already disable the “editor” field while registering this custom post (using the “supports” attribute)
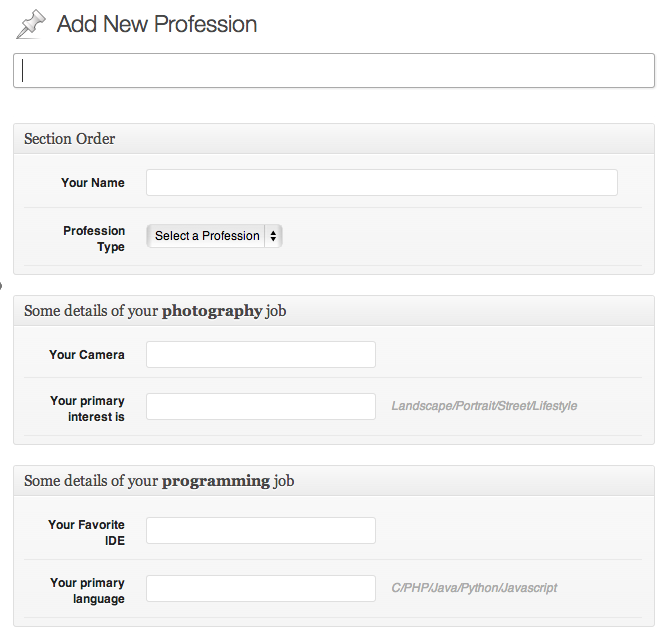
The Profession Screen

Uh, oh! that looks very confusing for people of both professions. I mean asking the photographer about their favorite language and ide is utter nonsense, and vice versa. So How can we make sure that only photographers will see the second metabox container, and programmers will see the third metabox container? Lets do this!

Step 4: The Magical Ingredient: Adding the interactivity using Javascript
We need to add some javascript at this point to improve the user experience at this point. Create a new javascript file inside the “js” folder inside your theme folder. Name the file as “profession-admin.js”. Now we need to make sure that this file is loaded properly in the admin panel.

[sourcecode language=”php”]
function mytheme_admin_load_scripts($hook) {
if( $hook != ‘post.php’ && $hook != ‘post-new.php’ )
return;

wp_enqueue_script( ‘custom-js’, get_template_directory_uri()."/js/profession-admin.js" );
}
add_action(‘admin_enqueue_scripts’, ‘mytheme_admin_load_scripts’);
[/sourcecode]

Now open the js/profession-admin.js and add the following code. Please keep in mind that jQuery is loaded in wordpress admin panel by default, and it works in no-conflict mode. So we want code like this if we want to use our favorite $ as a reference to the jQuery object.

[sourcecode language=”javascript”]
(function($){
$(document).ready(function(){
$("#profession_photographer").hide();
$("#profession_programmer").hide();

//lets add the interactivity by adding an event listener
$("#_mytheme_profession_type").bind("change",function(){
if ($(this).val()==1){
// photographer
$("#profession_photographer").show();
$("#profession_programmer").hide();
}else if ($(this).val()==2){
//programmer
$("#profession_photographer").hide();
$("#profession_programmer").show();
} else {
//still confused, hasn’t selected any
$("#profession_photographer").hide();
$("#profession_programmer").hide();
}
});

//make sure that these metaboxes appear properly in profession edit screen
if($("#_mytheme_profession_type").val()==1) //photographer
$("#profession_photographer").show();
else if ($("#_mytheme_profession_type").val()==2) //programmer
$("#profession_programmer").show();

})
})(jQuery);
[/sourcecode]

At this moment, when you click on the “New Profession” you will see like this.
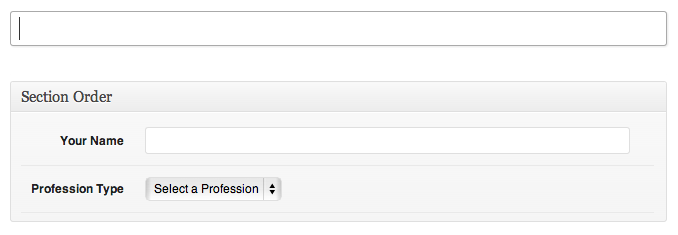
Improved Profession Screen

And if you select a profession, the appropriate metabox will be displayed instantly.
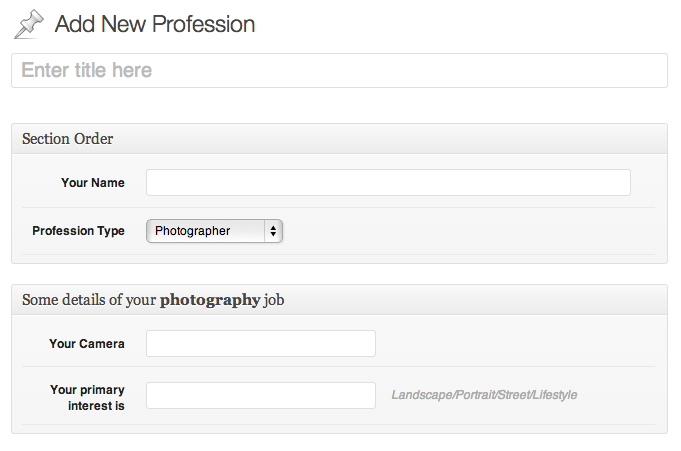
Photography

That looks good eh? So what did our javascript do? Lets have a look at the things it does

  • It passes the jQuery object to our function as $
  • It hides all the secondary metaboxes related to the professions
  • It registers a new event listener that monitors the change event in our profession select box
  • It displays the appropiate metabox when someone picks a profession
  • It also displays the correct metabox when someone edits a profession

So that’s mainly it. We have made our profession screen look much better. And we are now collecting details about the particular profession without confusing people from other professions. And most of all, it is much friendlier than before 🙂

I hope you have enjoyed this article and already started planning to implement it in your next wordpress project. Have fun!

Shameless Plug
If you are looking for a fantastic NGinx+PHP-fpm based WordPress hosting with Solid Performance, give WPonFIRE a try. You will never be disappoint at all. And if you want a 25% discount coupon for life, let me know in the comment and I will arrange you one.

WPonFIRE Premium WordPress Hosting for Everyone

Get Robo for Free – Onepage Application Landing Template for WordPress

Robo is a  small onepage template which is perfect to design a landing page, coming soon or even a small site. Though it’s one page, Robo includes custom post types like sliders, team members, features and google maps. You can showcase your work nicely with Robo.

robo

Robo for WordPress comes with beautiful documentation and includes all the necessary plugins with it, so that you don’t have to worry to leverage all the functionalities provided. Feel free to use Robo in your commercial or personal projects, no link bank is necessary at all.

Source Code: http://bit.ly/RoboWPGithub
Full Documentation is Available at: http://bit.ly/14x7UVZ
View Live at : http://bit.ly/RoboWPLive

how to add custom meta boxes in wordpress

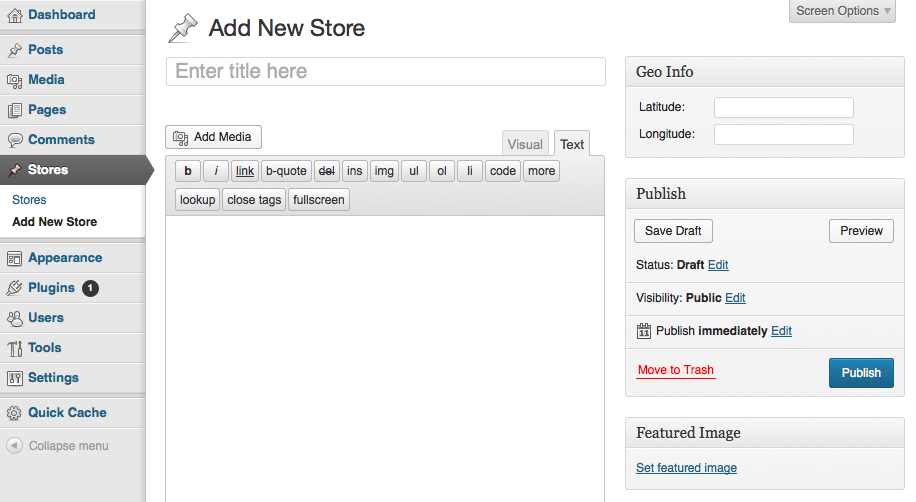
Custom meta boxes are very useful for collecting arbitrary information from the post authors, and then take decisions based on those information. For example, if you have a custom post type as “stores” and you want to collect “latitude” and “longitude” for each “store” type post, meta boxes are the way to do it conveniently. So how you can create a meta box and collect meta information from the users? The whole workflow is divided into three parts

1. Create the meta box design/markup
2. Attach them with the post/custom-post
3. Save the user input (and reuse it when required)

Creating the metabox markup: Inside your theme folder, lets create a new folder named “metaboxes” to organize all the metaboxes in same place. So once the folder is created, create a new file name coordinates.php inside the metabox folder. So the final path to the coordinates.php is your.theme.folder/metaboxes/coordinates.php. This file contains the simple markup to accept latitude and longitude from the users for our custom post type “stores”. Here comes the markup for that file

[sourcecode lang=”html”]
<fieldset id="coordinates">
<table width="100%">
<tr>
<td>
Latitude:
</td>
<td>
<input style="width:140px;" type="text" name="store_latitude" id="store_latitude" />
</td>
<tr>
<td>
Longitude:
</td>
<td>
<input style="width:140px;" type="text" name="store_longitude" id="store_longitude" />
</td>
</tr>
</table>
</fieldset>
[/sourcecode]

It’s just a simple form – no big deal, eh? At this moment this form can only take user input. But to retain the previously entered value we need to work on it and add some extra lines. I will come back later to this file.

Registering the custom post: There is a nifty tool out there which can help you to create the essential code to register a custom post type, unless you want to write all of them by yourself (I prefer writing my own, always). Create a new file named “custom-post-stores.php” inside your theme folder and include this file in the functions.php of your theme. Here is the code of the custom-post-stores.php

[sourcecode lang=”php”]
<?php
add_action(‘init’, ‘createPostType’);
function createPostType(){
register_post_type(‘stores’,
array(
‘labels’ => array(
‘name’ => __(‘Stores’),
‘singular_name’ => __(‘Store’),
‘add_new’ => __("Add New Store"),
‘add_new_item’ => __("Add New Store"),
),
‘public’ => true,
‘has_archive’ => true,
‘rewrite’ => array(‘slug’ => ‘stores’),
‘supports’ => array("title", "editor", "thumbnail")
)
);
}
[/sourcecode]

I am not going to explain what all of these parameters do in the register_post_type function, but of course, please, have a look at the beautiful reference in codex.

The code above will register a new custom post “stores” and once you logged into the wordpress admin panel, you will notice a new “Stores” menu visible on the left side. From there you can add new stores type posts.

Attaching metaboxes to the custom post: Lets attach the previously created metabox with this new “stores” type posts. In the same “custom-post-stores.php” append the following codeblock

[sourcecode lang=”php”]
/*this function will include the metabox in current posts scope*/
function customPostGeoinfo()
{
global $post;
include_once("metaboxes/coordinates.php");
}

/*this function will save the user input from the meta box*/
function customPostSave($postID)
{
// called after a post or page is saved
if ($parent_id = wp_is_post_revision($postID)) {
$postID = $parent_id;
}

$items = array("store_latitude","store_longitude"); //form elements of the meta box

foreach ($items as $item) {
if ($_POST[$item]) {
updateCustomMeta($postID, $_POST[$item], $item);
}
}

}

function updateCustomMeta($postID, $newvalue, $field_name)
{
// To create new meta
if (!get_post_meta($postID, $field_name)) {
add_post_meta($postID, $field_name, $newvalue);
} else {
// or to update existing meta
update_post_meta($postID, $field_name, $newvalue);
}
}

/* now make them working via wordpress action hooks */

function myPostOptionsBox()
{
add_meta_box(‘geoinformation’, ‘Geo Info’, ‘customPostGeoinfo’, ‘stores’, ‘side’, ‘high’);
}

add_action(‘admin_menu’, ‘myPostOptionsBox’);
add_action(‘save_post’, ‘customPostSave’);
[/sourcecode]

Tada, we are done. But only one thing left and that is revising our metabox to retain the old user value. So lets rewrite the metaboxes/coordinates.php with the following code

[sourcecode lang=”html”]
<fieldset id="coordinates">
<table width="100%">
<tr>
<td>
Latitude:
</td>
<td>
<input style="width:140px;" type="text" name="store_latitude" id="store_latitude" value="<?php echo get_post_meta($post->ID, ‘store_latitude’, true); ?>"/>
</td>
<tr>
<td>
Longitude:
</td>
<td>
<input style="width:140px;" type="text" name="store_longitude" id="store_longitude" value="<?php echo get_post_meta($post->ID, ‘store_longitude’, true); ?>"/>
</td>
</tr>
</table>
</fieldset>
[/sourcecode]

That’s it. The out put will look like the following one. Please notice the “Geo Info” metabox on the top right corner and “Stores” menu on the left menu.

Custom post with meta box

Shameless Plug: We develop beautiful themes and admin panel templates for your web applications. Why don’t have a look at our portfolio in themeforest and purchase a few to support us on the long run.

A week full of fun in Leevio, with one new product and two big updates.

This week it was full of fun in Leevio. Our new wing ThemeStudio is now fully operational and working on exciting themes every month, and has already released a cool theme “StoneHenge“. ThemeStudio is working hard to update admin panel and bring new features to make our wordpress themes more usable everytime.

And there were two new updates on MiproApps this week. We have added support for Box.net and that means you can embed files from your box.net account directly in your Facebook fanpages. And we’ve also added a new widget for creating polls and collecting feedback from your Facebook fanpage visitors.

Releasing new updates and products are always fun! But that’s not the all for this week. We went to Bandarban (A nice place with lots of mountains and forest) and spent three days over there. It was just beautiful and refreshing. I will update some pics of this event on my Facebook profile, very soon.