Category: wordpress

Changing Author Homepage URL Properly in WordPress

photo-1446280525466-6be29b257fdb
* Photo by Michael Fertig

Authors in WordPress have a homepage url like http://domain.com/author/authorname where all their posts are shown. And many of us who think it doesn’t look attractive want to change that url format. The middle part of that url, which says author, is called an author_base and it is possible to change this using some rewrite rules and filters. Let’s get our hand dirty 🙂

Modifying the permalink

To change the author base in permalink, you need to use the global $wp_rewrite class, like this

[code lang=php]
add_action("init","change_author_base_in_permalink");
function change_author_base_in_permalink() {
global $wp_rewrite;
$wp_rewrite->author_base = "users";
$wp_rewrite->flush_rules();
}
[/code]

Now, as soon as you visit http://domain.com/author/authorname you will see that it’s a 404. Good, eh? At the same time, this link http://domain.com/users/authorname will display all the posts for this particular user.

If you want to revert this change and go back to the old url structure, then all you have to do is comment that action, and then flush the permalink for once.

Other fixes

There is one small problem. Though the new permalink has been effective, but get_author_posts_url() still returns an url with the old format. So we need to fix that part too. Luckily, there is a filter 🙂

[code lang=php]
add_filter("author_link","fix_author_link");
function fix_author_link($link){
if($link){
return str_replace("author","users",$link);
}
}
[/code]

That’s mainly it. I hope you find this article useful.

Packaging thirdparty plugins with your WordPress theme using TGM Plugin Activation library

When you’re shipping your theme for sell, it’s often required to bundle the required plugins. Some people just keep these plugins like general vendor libraries inside their theme and load them using php’s require_once. However, if you’re following this style, your themes will fail to pass the theme check because these plugin files will be considered as a part of your theme, and it will prompt you that CPT functions and shortcodes should be a part of the plugin. Moreover, if someone deactivate your theme, those shortcodes and CPTs will be unavailable immediately.

This is why, along with many other developers, we use TGM Plugin Activation library. This tiny little lib can force or suggest installing the plugins which are required (or good to have) for making your WordPress theme work flawlessly.

TGM can work with plugins which are hosted in WordPress plugin repository, or in a github public repository. It can also work with plugins which are shipped with the theme as a separate zip file. In this article we’ll see all these three cases of plugin installation and activation process using TGM library.

Bootstrapping

Download the TGM library from http://tgmpluginactivation.com/download/. After unzipping, keep the class-tgm-plugin-activation.php file inside vendors/tgm/ inside your theme. Then add the following code in your functions.php (more…)

Generate Dummy Placeholder Images in the WordPress Export File Instantly

It’s a common problem for the theme developers who sell their themes in the marketplaces and ships a data file with it, that contains exported data from the demo WordPress site. The problem is, this content file contains links to the images used in the demo. And those images, which the author uses to decorate his demo sites, may not be freely distributable.

So, theme developers have to create another site with placeholder images and then export data from this site. It’s a double work. It’s a boring work as well.

To save from this pain, I’ve created a site called DimgX which is available at http://dimgx.net that can deliver placeholder images on the fly. Using this service is pretty straight forward. If your image url is http://abcd.com/image.jpg all you have to do is add a dimgx.net at the end of the image domain, like http://abcd.com.dimgx.net/image.jpg

So if the url of the original image is http://d13yacurqjgara.cloudfront.net/users/6014/screenshots/2262615/coverdribbble.png which displays like this Artwork By Greg Christman

It’s placeholder image’s url will be http://d13yacurqjgara.cloudfront.net.dimgx.net/users/6014/screenshots/2262615/coverdribbble.png and it will show like this – Tada! You don’t have to worry about the original image’s dimension or anything. Everything will be handled by DimgX on the fly.

Using this feature, DimgX allows you to upload the exported content file from your WordPress site, which has an xml extension, and then download a modified content file having all the attachment urls replaced using dimgx.net. It’s pretty handy

DimgX replaces all the <guid> and <wp:attachment_url> in the export file, which contains links to the image files, and adds .dimgx.net at the end of those domain names in those image urls.

While creating a placeholder image, DimgX needs to calculate the size of the original image, to properly draw a placeholder with the same dimension. And in PHP, you know the only way to do it using getImageSize() function. People usually download whole image and then calculate these dimensions but that’s is a pretty expensive process when you have to download lots of bigger images. Fortunately, all these popular image formats contains these dimension in the first few KB in their header. So DimX doesn’t download the whole image but only a chunk of it. And then it uses that chunk of the header data to calculate this size. It makes the whole process fast, and less resource extensive. And while doing this, it also saves a good amount of bandwidth. To feed your appetite, here’s a part of that routine

[code lang=php]
switch ($extension) {
case "jpg" :
case "jpeg" :
$range = "0-50000";
break;
case "png":
$range = "0-10000";
break;
case "gif":
$range = "0-10";
break;
default:
$range = "0-15000";
break;
}

$ch = curl_init ($url);
curl_setopt($ch, CURLOPT_HEADER, 0);
curl_setopt($ch, CURLOPT_RETURNTRANSFER, 1);
curl_setopt($ch, CURLOPT_BINARYTRANSFER,1);
curl_setopt($ch, CURLOPT_RANGE, $range);
[/code]

And here is the regular expression pattern that gets this complex URL replacement job beautifully done

[code lang=php]
$pattern1 = "/<guid([^>]+)>http://([^/]+)/([S]+)(.jpg|png|gif)</guid>/";
$pattern2 = "/<wp:attachment_url>http://([^/]+)/([S]+)(.jpg|png|gif)</wp:attachment_url>/";
$new_data = preg_replace($pattern1,'<guid${1}>http://${2}.dimgx.net/${3}${4}</guid>',$data);
$new_data = preg_replace($pattern2,'<wp:attachment_url>http://${1}.dimgx.net/${2}${3}</wp:attachment_url>',$new_data);
[/code]

Anyway, feel free to use DimgX at http://dimgx.net and let me know how you feel about this service. Right now, it can convert image urls that is served using http://, because wildcard SSLs are not cheap. But it’s in our roadmap. Stay tuned 🙂

Chrome broke WordPress Admin Panel – here's how to fix that

A recent update of Chrome browser broke the WordPress admin panel. It happened because of a setting related to slimming paint. Of course you can fix it by going to chrome options and then by disabling it. However, your client may not be able to do it because it’s a pretty confusing setting. To stay in the safe side, it’s nice to add this little snippet in your theme and it will make sure that everything works nicely

[code lang=php]
function admin_menu_chrome_bug_fix() {
echo '<style>
#adminmenu { transform: translateZ(0); }
</style>';
}
add_action('admin_head', 'admin_menu_chrome_bug_fix');
[/code]

Enjoy!

Custom post pagination in WordPress

If you’re dealing with lots of custom posts in WordPress and if you’re a theme developer, it is probably a well known issue to you. Lots of people are discussing about this pagination thing in different forums. However, it’s really not that tough to paginate custom posts. Let’s find out how we can do it easily.

Query CPTs

This is the first thing you are going to need, is to write a custom query. Because when you have a bunch of posts in your collection, you will start thinking about the pagination. So it’s time to find some posts. The following code will find all the posts of post type book and display their titles

[code lang=php]
$books = new WP_Query( array(
"posts_per_page" => – 1,
"post_type" => "book"
) );

while ($books->have_posts()){
$books->the_post();
the_title();
echo "<br/>";
}

[/code]

Now you’re probably going to use the good old next_posts_link() to display the next page. Well, that will not work because at this point next_posts_link() doesn’t know how many pages are there. So to make it work, you’ll have to pass the number of total pages found by your query. How is this total number of pages are calculated by the way?

[code lang=php]
$total_pages = ceil( $books->found_posts / get_option('posts_per_page') );
[/code]

Interestingly, you don’t need to calculate the total number of pages like this. A WP_query object already did it for you and made it available via max_num_pages property.

[code lang=php]
$total_pages = $books->max_num_pages;
[/code]

Now we need that value to show the link to our next page. Just pass it to next_posts_link() like this

[code lang=php]
next_posts_link('Prevous Posts',$books->max_num_pages)
[/code]

Now it wil show a valid link that can take you to the previous posts page. If your url is http://yoursite.com/books/ then, the link of the previous posts will be of this format http://yoursite.com/books/page/2. So you’re going to need this page number in your PHP script to fetch all the posts (or CPTs) from that page. In your theme, you can get this page number using a query var called paged. The following code will correctly fetch the current page number

[code lang=php]
$current_page = get_query_var('paged') ? get_query_var('paged'):1;
[/code]

To fetch all the posts from this page, you just need to rewrite your WP_Query like this

[code lang=php]
$books = new WP_Query( array(
"posts_per_page" => – 1,
"post_type" => "book",
"paged" => $current_page
) );
[/code]

In case you’d like to see a traditional pagination using page numbers, you will have to use the following code

[code lang=php]
paginate_links( array(
"current" => $current_page,
"total" => $books->max_num_pages
) );
[/code]

And you’re done 🙂

Getting rid of Redux Framework annoyances

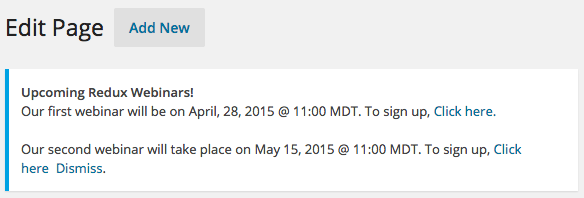
Redux Framework is a nice option framework for WordPress theme and plugin developers, and probably it is one of the most used frameworks out there. However, it comes with a few annoyances that many peoples are complaining of. First one is their dashboard widget. There should be a hook to remove that from my theme. Second, it asks the user to opt-in for tracking usage info. Third, it shows unnecessary admin notices when you’re developing in localhost. These admin notices doesn’t display in production server. But it still annoys me while in development mode because it has no effect on dev_mode value set to true or false. It also adds an extra “Redux Framework” sub menu page under Tools menu which was meant for support options but is not needed when you’re a theme developer and providing support by yourself.

Screen Shot 2015-04-24 at 9.59.11 PM

So here is how you can get rid of these things. Remember, there are no hooks to turn them off easily and you need to modify core files. Fortunately the changes are simple. Let’s do it!

1. Turn off Dashboard Widget and Stop admin notices

Open ReduxCore/framework.php and you will find the following code block around line # 405 (depending on your version of Redux Framework)

[sourcecode language=”php”]
if ( $this->args[‘dev_mode’] == true || Redux_Helpers::isLocalHost() == true ) {
include_once ‘core/dashboard.php’;

if ( ! isset ( $GLOBALS[‘redux_notice_check’] ) ) {
include_once ‘core/newsflash.php’;

$params = array(
‘dir_name’ => ‘notice’,
‘server_file’ => ‘http://www.reduxframework.com/’ . ‘wp-content/uploads/redux/redux_notice.json’,
‘interval’ => 3,
‘cookie_id’ => ‘redux_blast’,
);

new reduxNewsflash( $this, $params );
$GLOBALS[‘redux_notice_check’] = 1;
}
}
[/sourcecode]

Comment out the whole block and you’re done!

2. Turn off opt-in Tracking popup

This one is quite easy. Just add the disable_tracking in your option setting arguments (where you define your opt_name value) and you’re done

[sourcecode language=”php”]
$args = array(
// TYPICAL -> Change these values as you need/desire
‘opt_name’ => $opt_name,
‘disable_tracking’ => true,

[/sourcecode]

3. Remove “Redux Framework” sub menu under Tools

To remove that menu, add the following code-block in your functions.php. Remember to set the priority higher than 10 🙂

[sourcecode language=”php”]
/** remove redux menu under the tools **/
add_action( ‘admin_menu’, ‘remove_redux_menu’,12 );
function remove_redux_menu() {
remove_submenu_page(‘tools.php’,’redux-about’);
}
[/sourcecode]

Hope you liked this article. Enjoy!

How to enable some useful text formatting options in TinyMCE in WordPress

tumblr_na06t4fnlI1tubinno1_1280

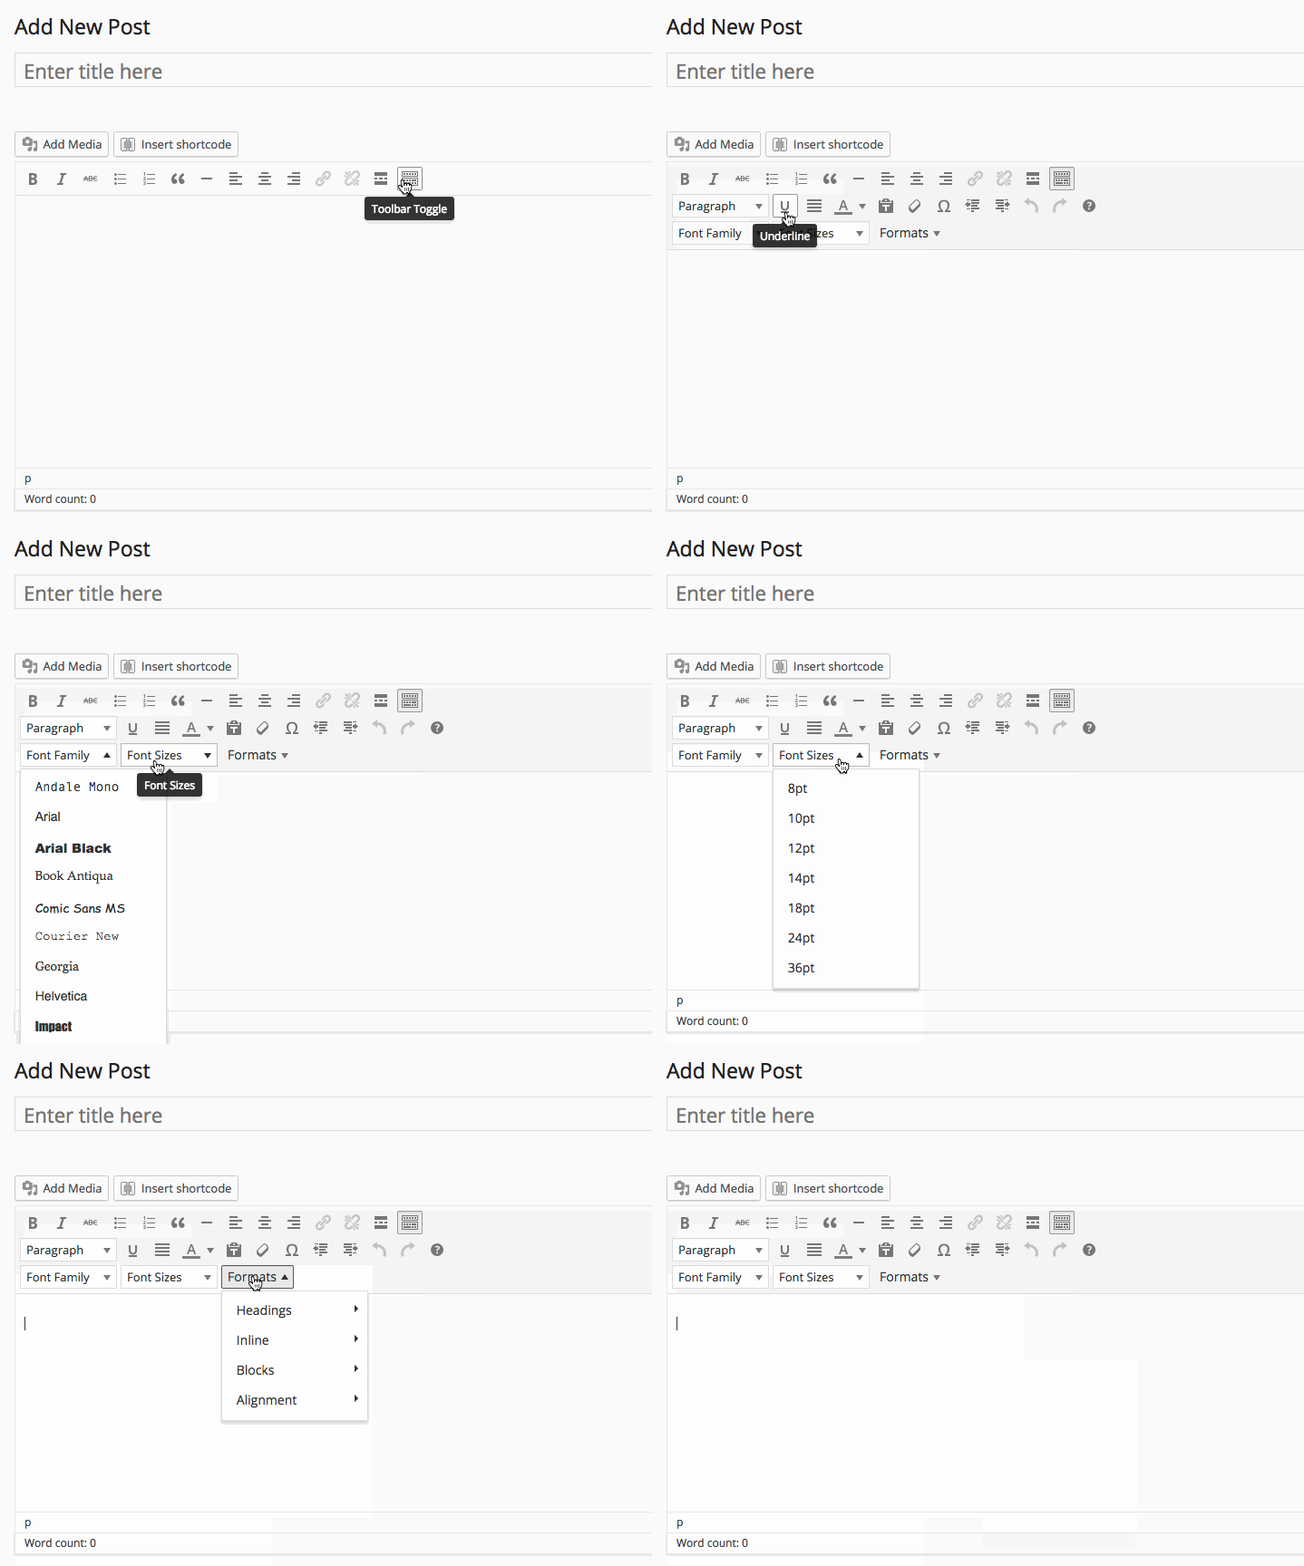
Most of the time default TinyMCE editor in WordPress is pretty adequate for everyday text formatting. However, there are a lot of extra formatting options which are hidden out of the box. Enabling these options will give you extra formatting features that will be useful for many of us. In this article, I will show you how to enable these hidden formatting options in TinyMCE. Just add the following code block in your theme’s functions.php file

[sourcecode language=”php”]
function tinymce_enable_more_buttons($buttons)
{
$buttons[1] = ‘fontselect’;
$buttons[2] = ‘fontsizeselect’;
$buttons[3] = ‘styleselect’;
return $buttons;
}

add_filter("mce_buttons_3", "tinymce_enable_more_buttons");
[/sourcecode]

Now you can see these extra options in the editor as shown in the animation below.

format

Hope you liked this article.

Find n number of posts randomly from a group of categories in WordPress

tumblr_n2hutxfrNr1tubinno1_1280

When you are developing a theme, or maybe writing a plugin, it is often required to display related posts in single posts page. These related posts are fetched by various criteria. Sometimes they are fetched from the same categories a post belongs to, or by tags. Sometimes they are set by the author of the posts.

In this article I am going to show you how to fetch the categories of a particular post, and then fetch some random posts from these categories. It’s not as tough as you’re thinking.

Fetch the categories of a post
You can quickly fetch the categories assigned to a particular post using get_the_category() function. Let’s have a look at the following code block

[sourcecode language=”php”]
$post_id = 1234;
$categories = array();
$_categories = get_the_category($post_id);
foreach ($_categories as $_cat) {
$categories[] = $_cat->term_id;
}
[/sourcecode]

Now you have the array of category ids which are assigned to a particular post with post id “1234”.

Fetch posts from these same categories
Now we are going to fetch some posts from these categories fetched in step 1. We will use kinda less documented category__in and post__not_in parameters with get_posts() function. We will make sure that the post “1234” doesn’t come in the list of random posts. Because it will be silly to display that same post as a relative.

[sourcecode language=”php”]
$args = array(
‘orderby’ => ‘rand’, //important to fetch random posts
‘post_type’ => ‘post’,
‘numberposts’ => 3,
‘post__not_in’ => array($post_id), //exclude the same post
‘category__in’ => $categories,
‘post_status’=>’publish’
);
$related_posts = get_posts($args);
[/sourcecode]

Now you have an array of 3 related posts, which are related to the post “1234” by belonging in the same categories. Their properties are described in details here in this Codex Article

That was easy, wasn’t it? Hopefully you will find it useful in your next WordPress theme project. Good night.

Passing data from PHP to the enqueued scripts in WordPress

tumblr_nau9zqjZay1tubinno1_1280

Enqueueing scripts, while being as one of the most common tasks for WordPress theme and plugin developers, has a very nice companion feature that can be used to pass data to it. These data will then be available in the native scope of those scripts. In this short article, I am going to show you how to to this

Remember the first parameter of wp_enqueue_script() function? It’s called ‘handle’, and works as a reference point. We need this handle to send some data to it with the help of wp_localize_script() function. Let’s have a look at the following example.

[sourcecode language=”php”]
add_action("wp_enqueue_scripts","my_scripts_loader");

function my_scripts_loader(){
$data = array("home"=>site_url());

wp_enqueue_script("myscript","path/to/my/script.js");
wp_localize_script( "myscript", "blog", $data );

}
[/sourcecode]

wp_localize_script() takes the handle of the script file, a variable name and an array. Finally, wp_localize_script converts that array into a JSON object and makes available in the local scope of that javascript file via that variable name. So, from the example above you can write the following code in your script.js and it will show you your blog URL, which was actually passed to it using wp_localize_script function

[sourcecode language=”javascript”]
alert(blog.home);
[/sourcecode]

This feature is pretty handy for developing themes and plugins, to pass data from your PHP scripts to the external javascript files. Hope you’ve enjoyed this article.