Our goal is simple today, we want to add interactivity to our boring metaboxes. Instead of showing lots and lots of irrelevant input boxes at once, we will properly group them into different metaboxe containers and then display the required one based on the action of another one.
We will create a custom post called “profession”, then we will let our user choose from two pre defined professions, for example “photographer” and “programmer”. Based on his choice we will display another set of metaboxes to get the details of that profession.
Step 1: Register the custom post
Here is a simple custom post register script, add the following snippet in your functions.php
[sourcecode language=”php”]
add_action( ‘init’, ‘mytheme_custom_post_profession’ );
function mytheme_custom_post_profession() {
$labels = array(
‘name’ => _x( ‘Professions’, ‘profession’ ),
‘singular_name’ => _x( ‘Profession’, ‘profession’ ),
‘add_new’ => _x( ‘Add New’, ‘profession’ ),
‘all_items’ => _x( ‘Professions’, ‘profession’ ),
‘add_new_item’ => _x( ‘Add New Profession’, ‘profession’ ),
‘edit_item’ => _x( ‘Edit Profession’, ‘profession’ ),
‘new_item’ => _x( ‘New Profession’, ‘profession’ ),
‘view_item’ => _x( ‘View Profession’, ‘profession’ ),
‘search_items’ => _x( ‘Search Professions’, ‘profession’ ),
‘not_found’ => _x( ‘No professions found’, ‘profession’ ),
‘not_found_in_trash’ => _x( ‘No professions found in Trash’, ‘profession’ ),
‘parent_item_colon’ => _x( ‘Parent Profession:’, ‘profession’ ),
‘menu_name’ => _x( ‘Professions’, ‘profession’ ),
);
$args = array(
‘labels’ => $labels,
‘hierarchical’ => false,
‘public’ => true,
‘show_ui’ => true,
‘show_in_menu’ => true,
‘supports’ => array( ‘title’, ‘thumbnail’),
);
register_post_type( ‘profession’, $args );
}
[/sourcecode]
Step 2: Add the necessary libraries in your theme/plugin
Creating metaboxes is a tedious and boring task. So we will take help of one of the fantastic metabox libraries out there. We will be using Custom-Metabox-Framework which is also widely known as “CMB”. It will make our code a lot less cluttered. So download (or checkout) the library, unzip and rename the folder as “cmb” and place it inside your theme folder. Now add the following code in your functions.php
[sourcecode language=”php”]
add_action( ‘init’, ‘mytheme_initialize_cmb_meta_boxes’ );
function mytheme_initialize_cmb_meta_boxes() {
if ( !class_exists( ‘cmb_Meta_Box’ ) ) {
require_once( ‘cmb/init.php’ );
}
}
[/sourcecode]
Step 3: Create some metaboxes for this profession custom post
Now we have all the necessary tools available, lets create three metaboxes and attach them with only this “profession” type custom post.
[sourcecode language=”php”]
function mytheme_profession_metaboxes( $meta_boxes ) {
$prefix = ‘_mytheme_’; // Prefix for all fields
$meta_boxes[] = array(
‘id’ => ‘profession_details’,
‘title’ => ‘Profession Details’,
‘pages’ => array(‘profession’), // post type
‘context’ => ‘normal’,
‘priority’ => ‘high’,
‘show_names’ => true, // Show field names on the left
‘fields’ => array(
array(
‘name’ => ‘Your Name’,
‘id’ => $prefix . ‘name’,
‘type’ => ‘text’
),
array(
‘name’ => ‘Profession Type’,
‘id’ => $prefix . ‘profession_type’,
‘type’ => ‘select’,
‘options’=>array(
array("name"=>"Select a Profession","value"=>0),
array("name"=>"Photographer","value"=>1),
array("name"=>"Programmer","value"=>2),
)
),
),
);
$meta_boxes[] = array(
‘id’ => ‘profession_photographer’,
‘title’ => ‘Some details of your <b>photography</b> job’,
‘pages’ => array(‘profession’), // post type
‘context’ => ‘normal’,
‘priority’ => ‘high’,
‘show_names’ => true, // Show field names on the left
‘fields’ => array(
array(
‘name’ => "Your Camera",
‘id’ => $prefix . ‘photography_camera’,
‘type’ => ‘text_medium’
),
array(
‘name’ =>"Your primary interest is",
‘desc’ => ‘Landscape/Portrait/Street/Lifestyle’,
‘id’ => $prefix . ‘photography_interest’,
‘type’ => ‘text_medium’
),
),
);
$meta_boxes[] = array(
‘id’ => ‘profession_programmer’,
‘title’ => ‘Some details of your <b>programming</b> job’,
‘pages’ => array(‘profession’), // post type
‘context’ => ‘normal’,
‘priority’ => ‘high’,
‘show_names’ => true, // Show field names on the left
‘fields’ => array(
array(
‘name’ => "Your Favorite IDE",
‘id’ => $prefix . ‘programming_ide’,
‘type’ => ‘text_medium’
),
array(
‘name’ =>"Your primary language",
‘desc’ => ‘C/PHP/Java/Python/Javascript’,
‘id’ => $prefix . ‘programming_lang’,
‘type’ => ‘text_medium’
),
),
);
return $meta_boxes;
}
add_filter( ‘cmb_meta_boxes’, ‘mytheme_profession_metaboxes’ );
[/sourcecode]
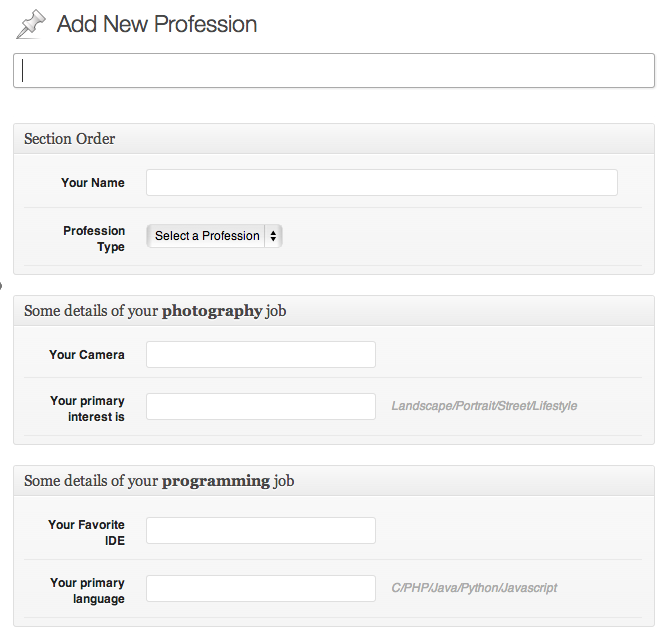
At this point, if we click on “New Profession” from our WordPress admin panel, we will see the editor screen like this. Please notice that we have already disable the “editor” field while registering this custom post (using the “supports” attribute)
Uh, oh! that looks very confusing for people of both professions. I mean asking the photographer about their favorite language and ide is utter nonsense, and vice versa. So How can we make sure that only photographers will see the second metabox container, and programmers will see the third metabox container? Lets do this!
Step 4: The Magical Ingredient: Adding the interactivity using Javascript
We need to add some javascript at this point to improve the user experience at this point. Create a new javascript file inside the “js” folder inside your theme folder. Name the file as “profession-admin.js”. Now we need to make sure that this file is loaded properly in the admin panel.
[sourcecode language=”php”]
function mytheme_admin_load_scripts($hook) {
if( $hook != ‘post.php’ && $hook != ‘post-new.php’ )
return;
wp_enqueue_script( ‘custom-js’, get_template_directory_uri()."/js/profession-admin.js" );
}
add_action(‘admin_enqueue_scripts’, ‘mytheme_admin_load_scripts’);
[/sourcecode]
Now open the js/profession-admin.js and add the following code. Please keep in mind that jQuery is loaded in wordpress admin panel by default, and it works in no-conflict mode. So we want code like this if we want to use our favorite $ as a reference to the jQuery object.
[sourcecode language=”javascript”]
(function($){
$(document).ready(function(){
$("#profession_photographer").hide();
$("#profession_programmer").hide();
//lets add the interactivity by adding an event listener
$("#_mytheme_profession_type").bind("change",function(){
if ($(this).val()==1){
// photographer
$("#profession_photographer").show();
$("#profession_programmer").hide();
}else if ($(this).val()==2){
//programmer
$("#profession_photographer").hide();
$("#profession_programmer").show();
} else {
//still confused, hasn’t selected any
$("#profession_photographer").hide();
$("#profession_programmer").hide();
}
});
//make sure that these metaboxes appear properly in profession edit screen
if($("#_mytheme_profession_type").val()==1) //photographer
$("#profession_photographer").show();
else if ($("#_mytheme_profession_type").val()==2) //programmer
$("#profession_programmer").show();
})
})(jQuery);
[/sourcecode]
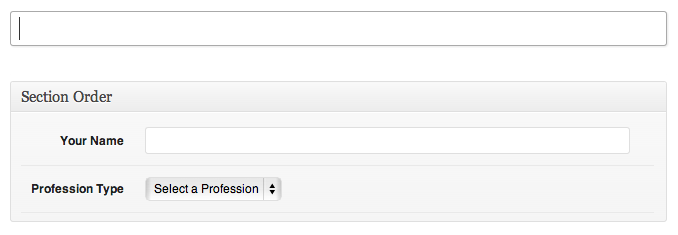
At this moment, when you click on the “New Profession” you will see like this.

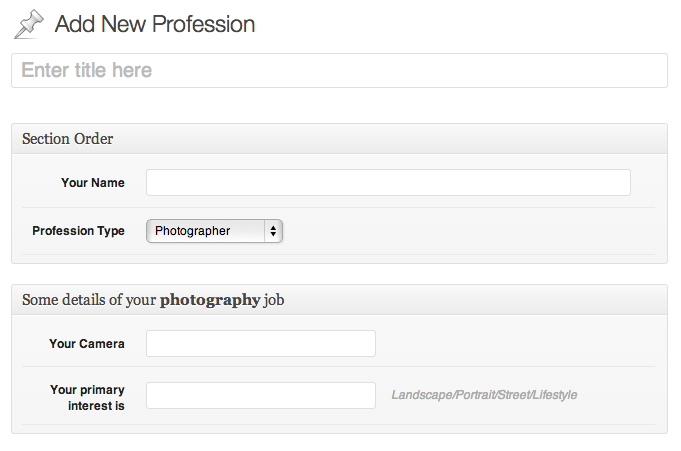
And if you select a profession, the appropriate metabox will be displayed instantly.

That looks good eh? So what did our javascript do? Lets have a look at the things it does
- It passes the jQuery object to our function as $
- It hides all the secondary metaboxes related to the professions
- It registers a new event listener that monitors the change event in our profession select box
- It displays the appropiate metabox when someone picks a profession
- It also displays the correct metabox when someone edits a profession
So that’s mainly it. We have made our profession screen look much better. And we are now collecting details about the particular profession without confusing people from other professions. And most of all, it is much friendlier than before 🙂
I hope you have enjoyed this article and already started planning to implement it in your next wordpress project. Have fun!
Shameless Plug
If you are looking for a fantastic NGinx+PHP-fpm based WordPress hosting with Solid Performance, give WPonFIRE a try. You will never be disappoint at all. And if you want a 25% discount coupon for life, let me know in the comment and I will arrange you one.


