Category: Tricks

How to enable some useful text formatting options in TinyMCE in WordPress

tumblr_na06t4fnlI1tubinno1_1280

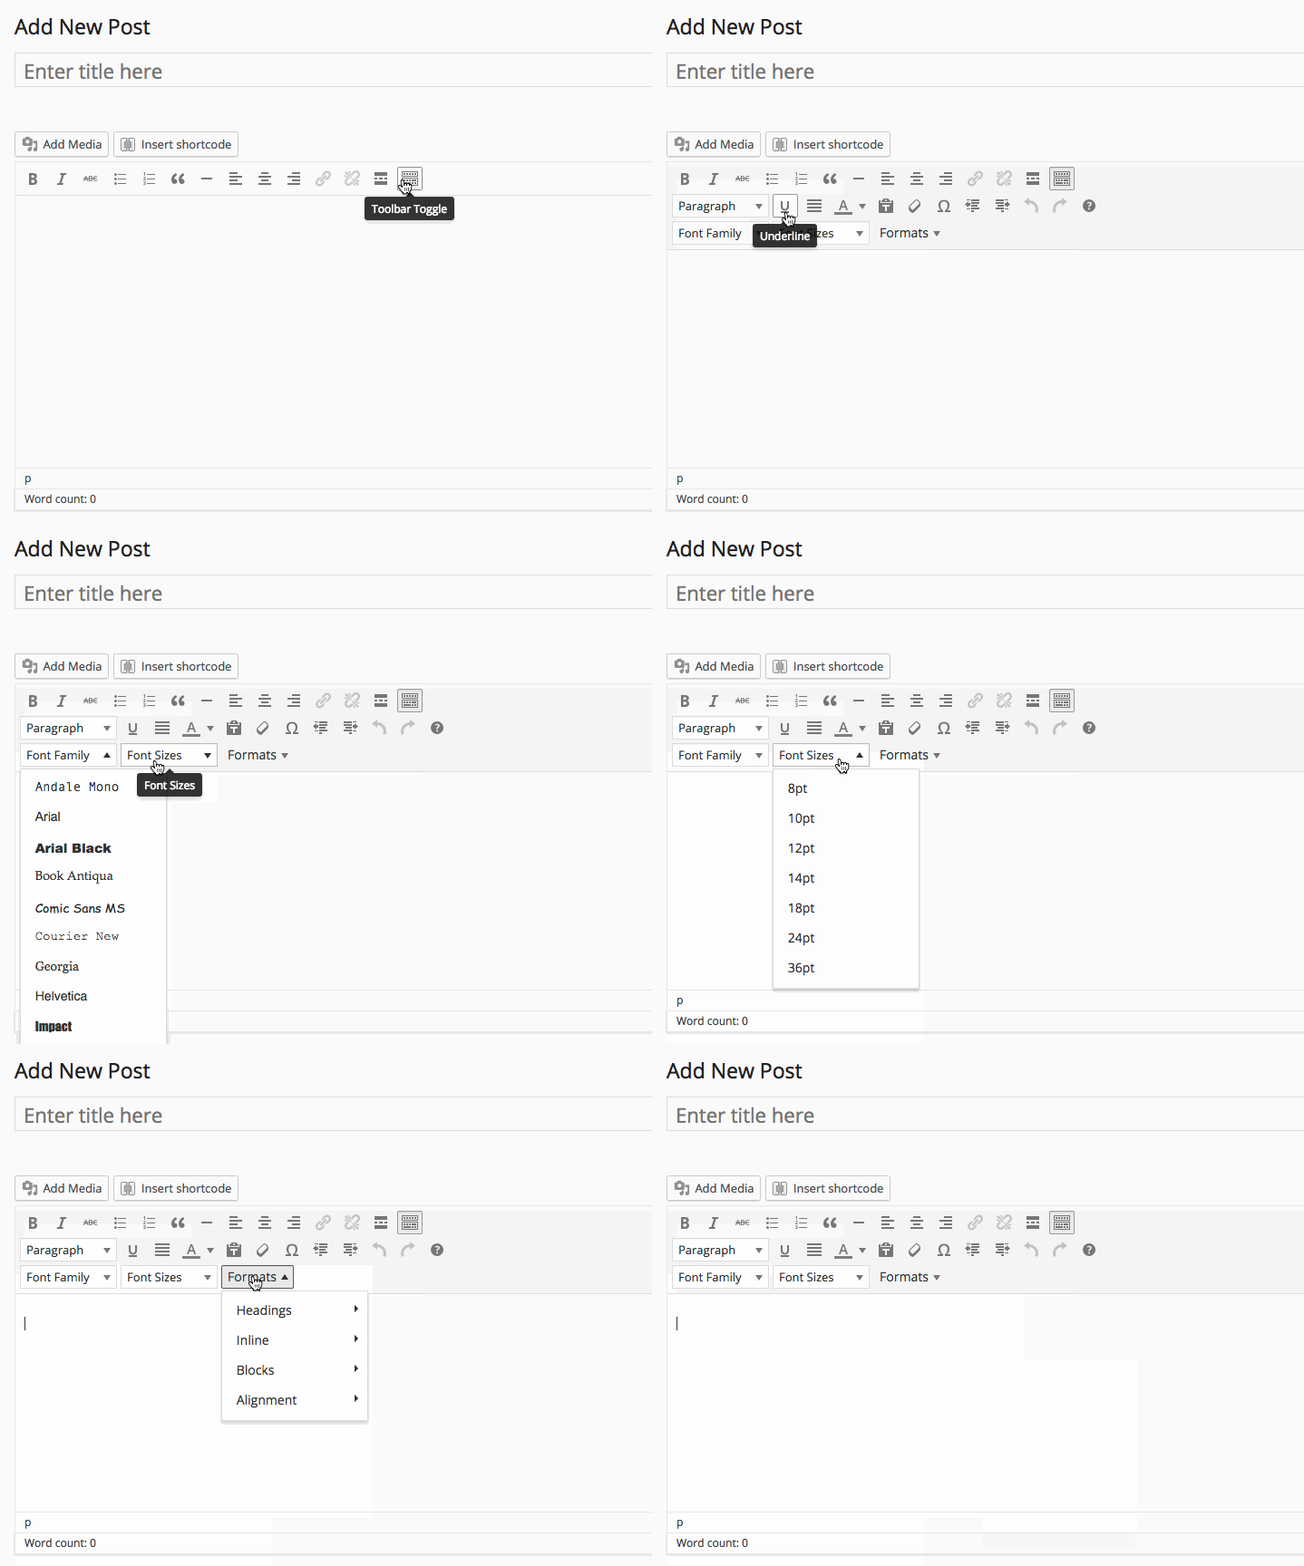
Most of the time default TinyMCE editor in WordPress is pretty adequate for everyday text formatting. However, there are a lot of extra formatting options which are hidden out of the box. Enabling these options will give you extra formatting features that will be useful for many of us. In this article, I will show you how to enable these hidden formatting options in TinyMCE. Just add the following code block in your theme’s functions.php file

[sourcecode language=”php”]
function tinymce_enable_more_buttons($buttons)
{
$buttons[1] = ‘fontselect’;
$buttons[2] = ‘fontsizeselect’;
$buttons[3] = ‘styleselect’;
return $buttons;
}

add_filter("mce_buttons_3", "tinymce_enable_more_buttons");
[/sourcecode]

Now you can see these extra options in the editor as shown in the animation below.

format

Hope you liked this article.

Find n number of posts randomly from a group of categories in WordPress

tumblr_n2hutxfrNr1tubinno1_1280

When you are developing a theme, or maybe writing a plugin, it is often required to display related posts in single posts page. These related posts are fetched by various criteria. Sometimes they are fetched from the same categories a post belongs to, or by tags. Sometimes they are set by the author of the posts.

In this article I am going to show you how to fetch the categories of a particular post, and then fetch some random posts from these categories. It’s not as tough as you’re thinking.

Fetch the categories of a post
You can quickly fetch the categories assigned to a particular post using get_the_category() function. Let’s have a look at the following code block

[sourcecode language=”php”]
$post_id = 1234;
$categories = array();
$_categories = get_the_category($post_id);
foreach ($_categories as $_cat) {
$categories[] = $_cat->term_id;
}
[/sourcecode]

Now you have the array of category ids which are assigned to a particular post with post id “1234”.

Fetch posts from these same categories
Now we are going to fetch some posts from these categories fetched in step 1. We will use kinda less documented category__in and post__not_in parameters with get_posts() function. We will make sure that the post “1234” doesn’t come in the list of random posts. Because it will be silly to display that same post as a relative.

[sourcecode language=”php”]
$args = array(
‘orderby’ => ‘rand’, //important to fetch random posts
‘post_type’ => ‘post’,
‘numberposts’ => 3,
‘post__not_in’ => array($post_id), //exclude the same post
‘category__in’ => $categories,
‘post_status’=>’publish’
);
$related_posts = get_posts($args);
[/sourcecode]

Now you have an array of 3 related posts, which are related to the post “1234” by belonging in the same categories. Their properties are described in details here in this Codex Article

That was easy, wasn’t it? Hopefully you will find it useful in your next WordPress theme project. Good night.

How to enqueue javascript files properly in the WordPress admin panel

You’d probably have answered the question already, won’t you? We all know that the correct answer is to do that we have to write a function that hooks the “admin_enqueue_scripts” and inside that function we will have to load the script via wp_enqueue_scripts() function. That’s the correct answer, but when it comes to the best practices, it fails. Because when you’re loading a javascript file blindly in all pages, it can be messy and it also may conflict with other scripts which are already loaded in that page. Besides that, why load an extra script everywhere when you actually need it in a specific page, or two perhaps.

The correct, or “precise” way to enqueue a javascript file in the WordPress admin panel is to check first which page you’re on. And when you’re on that specific page where this javascript file is actually required, load it. So how you’re gonna check which page you’re on in the admin panel? The enqueue hook passes a parameter that tells you about this. Let’s have a look at the following example

[sourcecode language=”php”]
add_action("admin_enqueue_scripts","admin_scripts_loader");

function admin_scripts_loader(){
wp_enqueue_script("myscript","path/to/my/script.js");
}
[/sourcecode]

There is nothing wrong with the enqueueing system above. However, the only problem is that it will load your script in every admin page, you need it or not. So let’s write a better version of that admin_scripts_loader function.

[sourcecode language=”php”]
function admin_scripts_loader($hook){
if(in_array($hook,array("post-new.php","post.php","edit.php"))) {
//specifically load this javascript in post editor pages
wp_enqueue_script("myscript", "path/to/my/script.js");
}
}
[/sourcecode]

Now the code is more accurately loading your javascript file only in the post editor pages. This $hook variable gives you the name of the PHP file that you’re on. So it’s quite easy for you to figure out where you should load it.

Hope you enjoyed it.

QuickTip: Turn symfony's web profiler debug bar on or off

Check out your config_dev.yml and you will notice a special section over there

[sourcecode language=”shell”]
web_profiler:
toolbar: true
intercept_redirects: false
[/sourcecode]

You can turn the debug bar on or off anytime by changing the value of toolbar in this web_profiler section.

If you want to turn debug bar off for a specific controller action, you can do so by the following line. This will actually stop the profiler for the current action.

[sourcecode language=”php”]
$this->container->get(‘profiler’)->disable();
[/sourcecode]

Enjoy!

Get a list of Top 10 authors in a WordPress blog, and sort them by firstname and last name

Getting top 10 authors’s list from WordPress is actually pretty simple with a SELECT query. Here is the SQL for that which sorts the list by number of posts of each authors
[sourcecode language=”sql”]
SELECT wp_users.id,
display_name,
user_login,
user_nicename,
count(wp_posts.id) AS number_of_posts
FROM wp_users
JOIN wp_posts
ON wp_posts.post_author = wp_users.id
GROUP BY wp_posts.post_author
ORDER BY number_of_posts DESC
LIMIT 10
[/sourcecode]

And sorting this list by first name is pretty simple as well
[sourcecode language=”sql”]
SELECT *
FROM (SELECT wp_users.id,
display_name,
user_login,
user_nicename,
count(wp_posts.id) AS number_of_posts
FROM wp_users
JOIN wp_posts
ON wp_posts.post_author = wp_users.id
GROUP BY wp_posts.post_author
ORDER BY number_of_posts DESC
LIMIT 10) AS SortedByCount
ORDER BY display_name
[/sourcecode]

However, sorting that list by Lastname is a little tricky, we need to take extra care for display_name and extract the last name from it.
[sourcecode language=”sql”]
SELECT *
FROM (SELECT wp_users.id,
display_name,
user_login,
user_nicename,
count(wp_posts.id) AS number_of_posts,
substring_index(display_name, ‘ ‘, -1) AS lastname
FROM wp_users
JOIN wp_posts
ON wp_posts.post_author = wp_users.id
GROUP BY wp_posts.post_author
ORDER BY number_of_posts DESC
LIMIT 10) AS SortedByCount
ORDER BY lastname
[/sourcecode]

Now all you need to do is run it like this
[sourcecode language=”php”]
$top_authors = $wpdb->get_results($sql, ARRAY_A);
[/sourcecode]

Sweet, eh?

Improving UX in the WordPress Admin Panel with Interactive Meta Boxes

Our goal is simple today, we want to add interactivity to our boring metaboxes. Instead of showing lots and lots of irrelevant input boxes at once, we will properly group them into different metaboxe containers and then display the required one based on the action of another one.

We will create a custom post called “profession”, then we will let our user choose from two pre defined professions, for example “photographer” and “programmer”. Based on his choice we will display another set of metaboxes to get the details of that profession.

Step 1: Register the custom post
Here is a simple custom post register script, add the following snippet in your functions.php

[sourcecode language=”php”]
add_action( ‘init’, ‘mytheme_custom_post_profession’ );
function mytheme_custom_post_profession() {

$labels = array(
‘name’ => _x( ‘Professions’, ‘profession’ ),
‘singular_name’ => _x( ‘Profession’, ‘profession’ ),
‘add_new’ => _x( ‘Add New’, ‘profession’ ),
‘all_items’ => _x( ‘Professions’, ‘profession’ ),
‘add_new_item’ => _x( ‘Add New Profession’, ‘profession’ ),
‘edit_item’ => _x( ‘Edit Profession’, ‘profession’ ),
‘new_item’ => _x( ‘New Profession’, ‘profession’ ),
‘view_item’ => _x( ‘View Profession’, ‘profession’ ),
‘search_items’ => _x( ‘Search Professions’, ‘profession’ ),
‘not_found’ => _x( ‘No professions found’, ‘profession’ ),
‘not_found_in_trash’ => _x( ‘No professions found in Trash’, ‘profession’ ),
‘parent_item_colon’ => _x( ‘Parent Profession:’, ‘profession’ ),
‘menu_name’ => _x( ‘Professions’, ‘profession’ ),
);

$args = array(
‘labels’ => $labels,
‘hierarchical’ => false,
‘public’ => true,
‘show_ui’ => true,
‘show_in_menu’ => true,
‘supports’ => array( ‘title’, ‘thumbnail’),
);

register_post_type( ‘profession’, $args );
}
[/sourcecode]

Step 2: Add the necessary libraries in your theme/plugin
Creating metaboxes is a tedious and boring task. So we will take help of one of the fantastic metabox libraries out there. We will be using Custom-Metabox-Framework which is also widely known as “CMB”. It will make our code a lot less cluttered. So download (or checkout) the library, unzip and rename the folder as “cmb” and place it inside your theme folder. Now add the following code in your functions.php

[sourcecode language=”php”]
add_action( ‘init’, ‘mytheme_initialize_cmb_meta_boxes’ );
function mytheme_initialize_cmb_meta_boxes() {
if ( !class_exists( ‘cmb_Meta_Box’ ) ) {
require_once( ‘cmb/init.php’ );
}
}
[/sourcecode]

Step 3: Create some metaboxes for this profession custom post
Now we have all the necessary tools available, lets create three metaboxes and attach them with only this “profession” type custom post.

[sourcecode language=”php”]
function mytheme_profession_metaboxes( $meta_boxes ) {
$prefix = ‘_mytheme_’; // Prefix for all fields
$meta_boxes[] = array(
‘id’ => ‘profession_details’,
‘title’ => ‘Profession Details’,
‘pages’ => array(‘profession’), // post type
‘context’ => ‘normal’,
‘priority’ => ‘high’,
‘show_names’ => true, // Show field names on the left
‘fields’ => array(

array(
‘name’ => ‘Your Name’,
‘id’ => $prefix . ‘name’,
‘type’ => ‘text’
),
array(
‘name’ => ‘Profession Type’,
‘id’ => $prefix . ‘profession_type’,
‘type’ => ‘select’,
‘options’=>array(
array("name"=>"Select a Profession","value"=>0),
array("name"=>"Photographer","value"=>1),
array("name"=>"Programmer","value"=>2),
)
),
),
);

$meta_boxes[] = array(
‘id’ => ‘profession_photographer’,
‘title’ => ‘Some details of your <b>photography</b> job’,
‘pages’ => array(‘profession’), // post type
‘context’ => ‘normal’,
‘priority’ => ‘high’,
‘show_names’ => true, // Show field names on the left
‘fields’ => array(
array(
‘name’ => "Your Camera",
‘id’ => $prefix . ‘photography_camera’,
‘type’ => ‘text_medium’
),
array(
‘name’ =>"Your primary interest is",
‘desc’ => ‘Landscape/Portrait/Street/Lifestyle’,
‘id’ => $prefix . ‘photography_interest’,
‘type’ => ‘text_medium’
),
),
);

$meta_boxes[] = array(
‘id’ => ‘profession_programmer’,
‘title’ => ‘Some details of your <b>programming</b> job’,
‘pages’ => array(‘profession’), // post type
‘context’ => ‘normal’,
‘priority’ => ‘high’,
‘show_names’ => true, // Show field names on the left
‘fields’ => array(
array(
‘name’ => "Your Favorite IDE",
‘id’ => $prefix . ‘programming_ide’,
‘type’ => ‘text_medium’
),
array(
‘name’ =>"Your primary language",
‘desc’ => ‘C/PHP/Java/Python/Javascript’,
‘id’ => $prefix . ‘programming_lang’,
‘type’ => ‘text_medium’
),
),
);

return $meta_boxes;
}

add_filter( ‘cmb_meta_boxes’, ‘mytheme_profession_metaboxes’ );
[/sourcecode]

At this point, if we click on “New Profession” from our WordPress admin panel, we will see the editor screen like this. Please notice that we have already disable the “editor” field while registering this custom post (using the “supports” attribute)
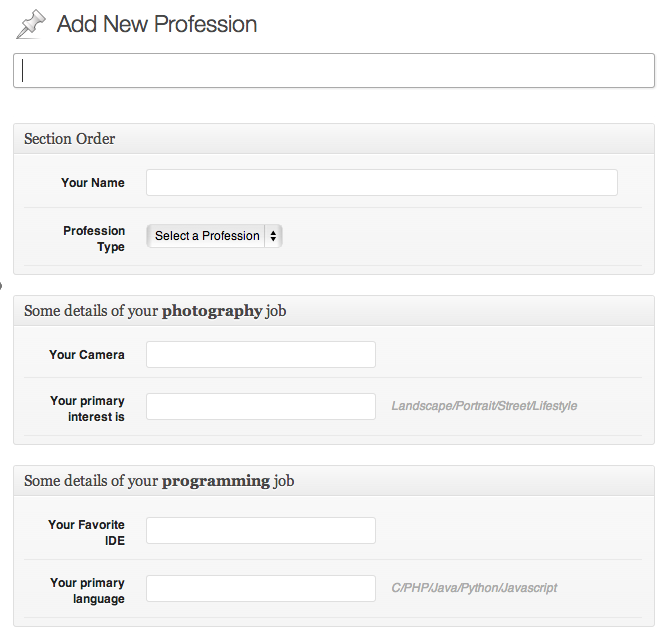
The Profession Screen

Uh, oh! that looks very confusing for people of both professions. I mean asking the photographer about their favorite language and ide is utter nonsense, and vice versa. So How can we make sure that only photographers will see the second metabox container, and programmers will see the third metabox container? Lets do this!

Step 4: The Magical Ingredient: Adding the interactivity using Javascript
We need to add some javascript at this point to improve the user experience at this point. Create a new javascript file inside the “js” folder inside your theme folder. Name the file as “profession-admin.js”. Now we need to make sure that this file is loaded properly in the admin panel.

[sourcecode language=”php”]
function mytheme_admin_load_scripts($hook) {
if( $hook != ‘post.php’ && $hook != ‘post-new.php’ )
return;

wp_enqueue_script( ‘custom-js’, get_template_directory_uri()."/js/profession-admin.js" );
}
add_action(‘admin_enqueue_scripts’, ‘mytheme_admin_load_scripts’);
[/sourcecode]

Now open the js/profession-admin.js and add the following code. Please keep in mind that jQuery is loaded in wordpress admin panel by default, and it works in no-conflict mode. So we want code like this if we want to use our favorite $ as a reference to the jQuery object.

[sourcecode language=”javascript”]
(function($){
$(document).ready(function(){
$("#profession_photographer").hide();
$("#profession_programmer").hide();

//lets add the interactivity by adding an event listener
$("#_mytheme_profession_type").bind("change",function(){
if ($(this).val()==1){
// photographer
$("#profession_photographer").show();
$("#profession_programmer").hide();
}else if ($(this).val()==2){
//programmer
$("#profession_photographer").hide();
$("#profession_programmer").show();
} else {
//still confused, hasn’t selected any
$("#profession_photographer").hide();
$("#profession_programmer").hide();
}
});

//make sure that these metaboxes appear properly in profession edit screen
if($("#_mytheme_profession_type").val()==1) //photographer
$("#profession_photographer").show();
else if ($("#_mytheme_profession_type").val()==2) //programmer
$("#profession_programmer").show();

})
})(jQuery);
[/sourcecode]

At this moment, when you click on the “New Profession” you will see like this.
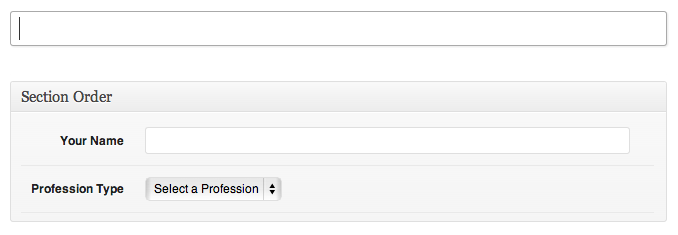
Improved Profession Screen

And if you select a profession, the appropriate metabox will be displayed instantly.
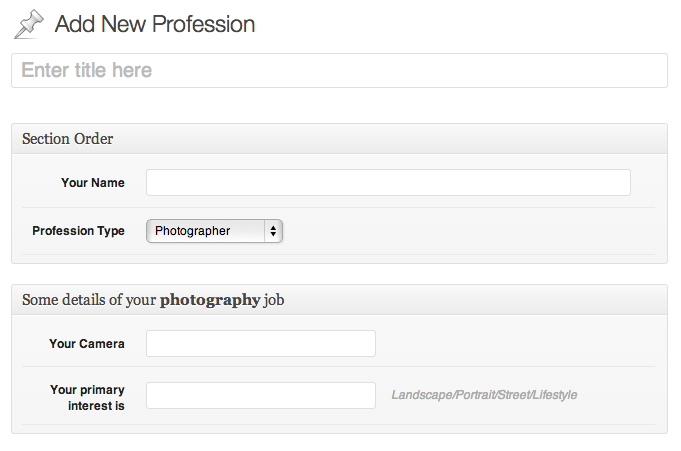
Photography

That looks good eh? So what did our javascript do? Lets have a look at the things it does

  • It passes the jQuery object to our function as $
  • It hides all the secondary metaboxes related to the professions
  • It registers a new event listener that monitors the change event in our profession select box
  • It displays the appropiate metabox when someone picks a profession
  • It also displays the correct metabox when someone edits a profession

So that’s mainly it. We have made our profession screen look much better. And we are now collecting details about the particular profession without confusing people from other professions. And most of all, it is much friendlier than before 🙂

I hope you have enjoyed this article and already started planning to implement it in your next wordpress project. Have fun!

Shameless Plug
If you are looking for a fantastic NGinx+PHP-fpm based WordPress hosting with Solid Performance, give WPonFIRE a try. You will never be disappoint at all. And if you want a 25% discount coupon for life, let me know in the comment and I will arrange you one.

WPonFIRE Premium WordPress Hosting for Everyone

Limit number of posts an user can create in WordPress admin panel

If you, by any chance, want to limit the number of posts an user can create in your multi author WordPress blog, there is a nice way to do it. Add the following code in your theme’s functions.php file

[sourcecode language=”php”]
add_action("load-post-new.php","limit_user_by_post_count");
function limit_user_by_post_count(){
$user = get_current_user_id();
if (!current_user_can( ‘manage_options’)) {
//not an admin – so impose the limit
$user_post_count = count_user_posts($user);
if($user_post_count>=10)
header("Location: /wp-admin/edit.php");
}
}
[/sourcecode]

In this example, if the user has 10 posts he/she can not create a new post anymore. Every time he clicks on the “New Post” menu, he will be redirected to “All Posts” page. But the “admin” will not be limited at all 🙂

Sweet, eh?

problems uploading large files in php5-fpm and nginx – and solution to that

Today I had encountered a strange error while importing a 10MB XML file in a low end vps, where nginx was configured with php5-fpm and was working pretty nicely. But then, whenever I tried to import that file, after 25% upload the connection drops and page goes blank. It was strange and drove me nuts for some time. I definitely re checked my php.ini settings and everything was fine there, upload_max_filesize was set to 20M and post_max_size was set to 32M. So it was good and definitely not causing any problem. Then I was thinking that something was wrong with nginx config, specially because the connection was dropped in the middle. And guess what, I was actually right 🙂

So I edited the nginx.conf file and added the following values. I actually tried with just “client_max_body_size” but it was not the cause alone. So client_body_timeout fixed it together 🙂

[sourcecode language=”shell”]
client_max_body_size 100m;
client_body_timeout 600s;
[/sourcecode]

After restarting nginx, everything went just perfectly 🙂

Saving a HUGE bandwidth cost in WordPress by automatically serving media contents from copy.com

shutterstock_132384233
The title almost says it all. Our mission is to save the bandwidth cost (and ensure better deliverability) by leveraging the power of headless installation of copy.com client in Linux, and then integrating it into WordPress. The integration must work seamlessly so that the viewers don’t see a difference, and at the same time you don’t have to put any extra effort. Beside saving bandwidth, this also reduces extra load from your web server. There’s another surprise which I will tell you later. For now, keep reading 🙂

You need at least a VPS to make this setup working, preferably with root access. These days VPSes are cheap. You can purchase an 128MB VPS for ~14/yr from Ramnode (such a fantastic provider) or may be for ~19/yr from WeLoveServers. Or feel free to use your existing VPSes if you have one.

Step 1: Headless installation of copy.com app
You can use your existing copy.com or register a new one using my referral code http://copy.com?r=Tbcrni, you and I both will be getting an extra 5GB if you do so.

Now log into your linux box via SSH, you need to have root privilege to complete this step.
(more…)

Time to put those FUCKING captchas to an end!

So, by now – you know what’s this post is all about, what will be the writing style and some of you probably consider it as NSFW! Well I dont care about that – all I care is that my eyes are burning and I am turning into a retard, I am fucking annoyed and I have been under irritating mental pressure because of those fucking text based CAPTCHAS where I have to spend couple of extremely annoying minutes to look at those gibberish texts , understand that and then input what I am seeing on the screen! Oh yeah baby, It feels like I am sitting for a VIRGINITY TEST inside one of those bloody fucking Egyptian prisons. I AM A HUMAN AND I CERTAINLY DONT WANT TO BE TORTURED TO PROVE THAT! If you are still in favor of those CRAPPY FUCKING text based CAPTCHAS, you can leave the rest of the post because I dont give a damn about your love for those eye-tearing, getting-on-the-nerve style alien things.

Well, if you really have to FUCKING test me as a HUMAN, DONT DO THAT by slicing my ribs apart to check if there is any heart. There are certainly many other ways to check if your visitors are human or bot. Record their mouse movement (and put it into a pattern), or check if mouse was really over the submit button or blah blah blah. AND IF YOU WANT A FULLPROOF military grade PREVENTION against BOTS, go fuck with your document under a 200000ft dungeon.

Alright, the reason I am writing this article is that CAPTCHAs don’t have to be so fucking annoying. You can make intuitive captcha images instead of asking your visitors to translate what the hell your great great grandfather had seen in his UFO dreams, printed in those images.

WHY not make it something like these ones, keeping the actual captcha validation flow intact. Dont change it’s working style. Keep the same style of of public private key, salts, user inputs and everything. JUST FOR GODS SAKE change those images. Ask something different. Why not you think about something like these three below – if you ask yoru users to fill in the blanks (in the input box – instead of the mind fucking gibberish and garbled craps)


ANS: liberty OR LIBERY or LiBeRtY (whatever caps)


ANS: tree


ANS: rectangle or rectangles (consider fail safe or singular/plural for more user friendliness)

Seriously, why on EARTH do I have to prove that I am a HOMO-SAPIENS by filling up these freaking awful garbled text based CAPTCHAs. Lets make it easy, unless you are planning to serve your $100000000000 secret sausage recipe thinking that an annoying old school CAPTCHA will prevent it from being stolen. Please for gods sake, help making these moments your visitors will spend on your site a little more pleasing.

If no one starts this project, I will seriously start it as a web service with a name “NFC”. You know what that means? NO – FUCKING – CAPTCHA!

Arrrrrggggghhh!!