Category: redux

Getting rid of Redux Framework annoyances

Redux Framework is a nice option framework for WordPress theme and plugin developers, and probably it is one of the most used frameworks out there. However, it comes with a few annoyances that many peoples are complaining of. First one is their dashboard widget. There should be a hook to remove that from my theme. Second, it asks the user to opt-in for tracking usage info. Third, it shows unnecessary admin notices when you’re developing in localhost. These admin notices doesn’t display in production server. But it still annoys me while in development mode because it has no effect on dev_mode value set to true or false. It also adds an extra “Redux Framework” sub menu page under Tools menu which was meant for support options but is not needed when you’re a theme developer and providing support by yourself.
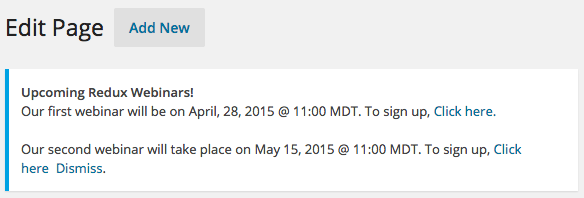
Screen Shot 2015-04-24 at 9.59.11 PM

So here is how you can get rid of these things. Remember, there are no hooks to turn them off easily and you need to modify core files. Fortunately the changes are simple. Let’s do it!

1. Turn off Dashboard Widget and Stop admin notices

Open ReduxCore/framework.php and you will find the following code block around line # 405 (depending on your version of Redux Framework)

[sourcecode language=”php”]
if ( $this->args[‘dev_mode’] == true || Redux_Helpers::isLocalHost() == true ) {
include_once ‘core/dashboard.php’;

if ( ! isset ( $GLOBALS[‘redux_notice_check’] ) ) {
include_once ‘core/newsflash.php’;

$params = array(
‘dir_name’ => ‘notice’,
‘server_file’ => ‘http://www.reduxframework.com/’ . ‘wp-content/uploads/redux/redux_notice.json’,
‘interval’ => 3,
‘cookie_id’ => ‘redux_blast’,
);

new reduxNewsflash( $this, $params );
$GLOBALS[‘redux_notice_check’] = 1;
}
}
[/sourcecode]

Comment out the whole block and you’re done!

2. Turn off opt-in Tracking popup

This one is quite easy. Just add the disable_tracking in your option setting arguments (where you define your opt_name value) and you’re done

[sourcecode language=”php”]
$args = array(
// TYPICAL -> Change these values as you need/desire
‘opt_name’ => $opt_name,
‘disable_tracking’ => true,

[/sourcecode]

3. Remove “Redux Framework” sub menu under Tools

To remove that menu, add the following code-block in your functions.php. Remember to set the priority higher than 10 🙂

[sourcecode language=”php”]
/** remove redux menu under the tools **/
add_action( ‘admin_menu’, ‘remove_redux_menu’,12 );
function remove_redux_menu() {
remove_submenu_page(‘tools.php’,’redux-about’);
}
[/sourcecode]

Hope you liked this article. Enjoy!

কিভাবে ওয়ার্ডপ্রেসে নিজের থিমে রিডাক্স ফ্রেমওয়ার্ক যোগ করব?

Screen Shot 2014-07-16 at 10.14.36 PM
ওয়ার্ডপ্রেসের যতগুলো অ্যাডমিন প্যানেল বা অপশন ফ্রেমওয়ার্ক আছে তাদের মাঝে রিডাক্স অন্যতম। অনেকগুলো চমৎকার ফিচার, প্রচুর ফিল্ডের সমারোহ এবং সহজ ব্যবহারোপযোগিতার কারনে রিডাক্স খুব দ্রুতই ওয়ার্ডপ্রেস থিম ডেভেলপার দের দৃষ্টি আকর্ষন করতে সক্ষম হয়েছে। এছাড়াও রিডাক্সে ডেভেলপাররা ক্রমাগত এটাকে আপডেট করে চলেছেন, যার ফলে আমরা মাঝেমাঝেই পাচ্ছি নিত্য নতুন ফিচার। আজকের এই আর্টিকেলে আমি দেখাবো কিভাবে আমরা আমাদের থিমে এই রিডাক্স ফ্রেমওয়ার্ক দিয়ে তৈরী অপশন প্যানেল যোগ করব

১. এজন্য প্রথমেই https://github.com/ReduxFramework/ReduxFramework/ এখানে ডানদিকের নিচে গিয়ে “Download zip” বাটনে ক্লিক করে রিডাক্স ফ্রেমওয়ার্ক ডাউনলোড করে নিন

২. ডাউনলোড করা জিপ ফাইলটি আনজিপ/এক্সট্রাক্ট করলে redux-framework-master নামে একটা ফোল্ডার পাবেন। সেটা ওপেন করে একমাত্র ReduxCore এবং sample নামের ফোল্ডার দুটো রাখুন, আর class.redux-plugin.php, index.php, license.txt, redux-framework.php নামের ফাইলগুলো রেখে বাকি সবকিছু ডিলেট করে দিন। ডিলেট করার পরে redux-framework-master ফোল্ডার এর কনটেন্ট হবে নিচের মত

Screen Shot 2014-07-16 at 9.47.41 PM

৩. এবার আপনার থিমে libs নামে একটা ডিরেক্টরী তৈরী করে তার ভেতরে এই redux-framework-master ফোল্ডার পেস্ট করে দিন।

৪. এবার আপনার থিমের functions.php ফাইলে নিচের কোড টুকু যোগ করুন

if(!class_exists("ReduxFrameworkPlugin")){
    require_once(get_template_directory()."/libs/redux-framework-master/redux-framework.php");
    require_once(get_template_directory()."/libs/redux-framework-master/sample/sample-config.php");
}

৫. এবার আপনার থিম অ্যাক্টিভেট করে ওয়ার্ডপ্রেস এর অ্যাডমিন প্যানেলে আসলেই বামপাশে দেখবেন “Sample Options” নামে একটা মেনু চলে এসেছে, যা আসলে রিডাক্সের স্যাম্পল ফাইল টির আউটপুট।

Screen Shot 2014-07-16 at 9.58.57 PM

ব্যাস, আমাদের থিমে রিডাক্স ফ্রেমওয়ার্ক যোগ করা শেষ। একদম সহজ, তাই না? এখন আপনি sample-config.php ফাইলটি স্টাডি করে দেখতে পারেন কিভাবে বিভিন্ন ধরনের ফিল্ড যোগ করা হয়েছে। লাইন নম্বর ২৩৯ থেকে এই সেকশন এবং ফিল্ড গুলোর ডেফিনিশন শুরু হয়েছে। এখন একটা বিষয় খুবই জরুরী, আর সেটা হল এই যে আমাদের থিমের ইউজার রা রিডাক্সের সাহায্যে বিভিন্ন ডেটা ইনপুট দিবে – আমরা সেগুলো থিমে ব্যবহার করব কিভাবে। এর জন্য আমাদের দেখতে হবে ১৫৩৫ নম্বর লাইনে (বর্তমান আপডেট অনুযায়ী) এই লাইনটি আছে

'opt_name'          => 'redux_demo',

এখানে আপনি আপনার পছন্দ মতো ভ্যারিয়েবলের নাম লিখতে পারবেন। যেমন আপনার থিমের নাম যদি হয় FlyHigh তাহলে আপনি লিখতে পারেন

'opt_name'          => 'flyhigh',

এটা করা হয়ে গেলে আপনার থিমের ফাইলে সবার উপরে এই লাইনটি লিখবেন

global $flyhigh;

এর পর থেকে রিডাক্সের যেকোন ফিল্ডের ডেটা আপনি অ্যাক্সেস করতে পারবেন $flyhigh[‘fieldid’] এইভাবে। ফিল্ডের আইডি কিভাবে লিখতে হয় এটা জানতে হলে আপনি স্যাম্পল কনফিগ ফাইলে অনেক উদাহরণ পাবেন, যেমন ধরুন একটা ফিল্ডের ডেফিনিশন হল

array(
    'id'        =>  'my_text_field',
    'type'      =>  'text',
    'desc'      =>  'Add some awesome text here',
    'default'   =>  'Oh WOW!',
    'title'     =>  'My Awesome Text'

),

উপরের উদাহরণে ফিল্ডের আইডি হল my_text_field। আরেকটা জিনিশ, সেটা হল যে “Sample Options” নামের মেনুর নাম পরিবর্তন করতে চাইলে নিচের লাইনটি খুঁজে বের করে আপনার পছন্দ মত মেনু নাম দিন

'menu_title'        => __('Sample Options', 'redux-framework-demo'),

এই স্যাম্পল ফাইলটি আপনার জানার সুবিধার্থে রিডাক্স টিম করে দিয়েছে। এই ফাইলে পরিবর্তন না করে বরং একই ফোল্ডারে দেখবেন barebones-config.php নামে আরেকটা ফাইল রয়েছে, যেটাতে শুধু যেটুকু দরকার সেটুকুই কোড আছে। আপনি সেই ফাইলটি আপনার থিমের কোথাও কপি করে নিয়ে আপনার থিমের জন্য নিজের মত করে অ্যাডমিন প্যানেল বানাতে পারবেন।

আশাকরি আর্টিকেলটি আপনাদের ভালো লেগেছে। তারপরেও মন্তব্যে জানালে খুশি হব 🙂