Category: PHP

removing empty elements from an array, the php way :)

removing empty elements from array is most likely a very common task for everyday programming. different people work on it differently. some runs N times loop and some other tries by finding offset and then by unsetting that. let me show you some common approach of doing it and possibly the best way too :), needless to say, in a php way – most of the time such a microsecond does not matter, but well, its still good to find out the best solution 🙂

first of all, lets write a function which will create a random array with empty elements
[source lang=’php’]
function generateRandomArray($count=10000)
{
$array = range(0,($count-1));
for($i = 0;$i<1000;$i++)
{
$offset = mt_rand(0,$count);
$array[$offset] = “”;
}
return $array;
}
[/source]

now lets see some different approaches to get it done.
probably most common approach
[source lang=’php’]
$array = generateRandomArray();
$len = count($array);
$start = microtime(true);
for ($i=0;$i< $len;$i++) { if(""==$array[$i]) unset($array[$i]); } $end = microtime(true); echo ($end-$start); [/source] you can see the output varies from 0.13-0.14 seconds for an array with 10000 elements in a 2.66 ghz core 2duo machine running mac osx 10.5.8 with 4GB ram. here is another better approach using array_diff() [source lang='php'] $array = generateRandomArray(); $start= microtime(true); $empty_elements = array(""); $array = array_diff($array,$empty_elements); $end = microtime(true); echo ($end-$start); [/source] this one takes 0.052-0.059 seconds and surely is a significant improvement over the last one here is another improved version using array_filter() [source lang='php'] $array = generateRandomArray(); $start= microtime(true); $array = array_filter($array); $end = microtime(true); echo ($end-$start); [/source] it takes like 0.002 seconds to complete 🙂 - pretty good one, eh? (thanks damdec, for reminding about it) and this is the last one which was my favorite one using array_keys() taking advantage of the optional search_values parameter 🙂 [source lang='php'] $array = generateRandomArray(); $start= microtime(true); $empty_elements = array_keys($array,""); foreach ($empty_elements as $e) unset($array[$e]); $end = microtime(true); echo ($end-$start); [/source] this is an amazing improvement over the previous solutions, it takes only around 0.0008 - 0.0009 seconds for an array of 10000 elements. i hope you enjoyed this post with micro benchmarks 😀 - happy phping

Using Google WorldMap visualization component in your applications

Its really hard to find a good flash based world map component to use in your web applications. They are either too complex to add or they cost quite a lot. And even sometime if you pay that, its tough to customize the chart as you want it to look like. But you know there is someone called “Uncle G” (i.e google) here who has almost all the components in his Pandora’s box. So lets see how can we use the geomap component from their Visualization Library.

First we need to create a datatable which will act as a data source for this world map, as usual like all other google visualization component.

[source lang=’javascript’]
var data = new google.visualization.DataTable();
data.addRows(5);
data.addColumn(‘string’, ‘Country’);
data.addColumn(‘number’, ‘Number of ZCEs’);
data.setValue(0, 0, ‘Bangladesh’);
data.setValue(0, 1, 19);
data.setValue(1, 0, ‘India’);
data.setValue(1, 1, 150);
data.setValue(2, 0, ‘Pakistan’);
data.setValue(2, 1, 4);
data.setValue(3, 0, ‘Nepal’);
data.setValue(3, 1, 5);
data.setValue(4, 0, ‘Sri Lanka’);
data.setValue(4, 1, 7);
[/source]

now we will initialize the google visualization framework and draw this component using this data source

[source lang=’javascript’]
var geomap = new google.visualization.GeoMap(document.getElementById(‘‘));
geomap.draw(data, null);
[/source]

but wait, we are not done yet – to make sure that everything works properly, we need to wrap all of these code inside a function (for example name this function as drawGeoMap) and we will use that function as a callback to draw this map. and of course, we need to load the google visualization library and geomap component first

so here is the complete code of this
[source lang=’javascript’]


[/source]

you can check the demo at http://sandbox.ofhas.in/geomapv1.php

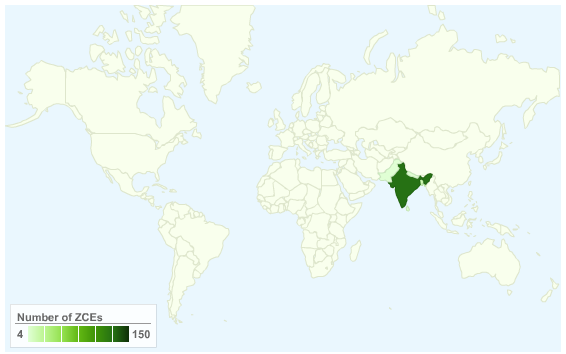
it will display a world map with highlighted countries like below
Geomap V 1

but wait – lets make ca nifty change and add event listeners to it. we will add event listeners in such a way so that whenever users click on any country in the map, it will take you to zend yellow page corresponding to that country 🙂 that will make it really an useful component :). here is the code

[source lang=’javascript’]


[/source]

check the demo at http://sandbox.ofhas.in/geomapv2.php

now you can click on any country and it will open a new tab with that particular country pre selected – and you can see who are the zend certified engineers from that country. i hope you’ve liked this :). Thanks goes the theam Visualization team at google for creating these awesome components and to make them free for use

For reference – check out geomap reference at google code at http://code.google.com/apis/visualization/documentation/gallery/geomap.html. you can do many other cool things like displaying only US states map or Canadian States map with this 🙂

collecting data from streaming APIs in twitter

twitter’s streaming API is still in beta and is a good source of collecting public tweets. but unfortunately not all those methods are instantly usable by third parties (u need to provide written statements and so on). but for testing, three of these streaming APIs are usable by anyone at this moment which are spritzer, track and follow. spritzer streams a tiny part of public tweets to the collecting processes. in this blog post i’ll show you how to collect data from spritzer API.

as it is a stream data, so twitter keeps the HTTP connection “alive” infinitely (until any hiccup, by using Keep Alive). so when you write code, you must take care of that. and i would also suggest to make separate processes for collecting data+writing them (or sending them in queue to be written) – and for analyzing those data. and of course, to minimize the bandwidth consumption, use the json format. and json data is also easier to parse than XML as every tweet is separated by a new line (“\n”) character from twitter 🙂 – so you can read these data line by line, dcode them using json_decode() and do whatever you want

here is how you can create the collector process in php

[sourcecode language=’php’]
< ?php //datacollector.php $fp = fopen("http://username:[email protected]/spritzer.json","r"); while($data = fgets($fp)) { $time = date("YmdH"); if ($newTime!=$time) { @fclose($fp2); $fp2 = fopen("{$time}.txt","a"); } fputs($fp2,$data); $newTime = $time; } ?>
[/sourcecode]

this script will write the data collected hourly from the spritzer streaming API in filen (with names like <YmdH>.txt ). so in the directory where you are runnign this script u will see hourly data files. like 2009062020.txt . there is a special advantage to keep collecting in this way – as the file will remain open for writing (hence LOCKED) you will process files only for previous hours. it will make analyzing the data more hassle free 🙂

now run this script in background via the following command in your terminal
[sourcecode language=’html’]
php datacollector.php &
[/sourcecode]

the reason for appending an “&’ at the end of the command is starting this process in background. so that you dont have to wait for the script to end to get access to your shell back. as it is a streaming data, the script will run infinitely. and it will consume very minimal bandwidth 🙂 you can check yourself.

so i hope it will help those developers who are looking for a solution to collect data from twitter’s streaming API via PHP. If you want to track any specific keywords, use the “track” API instead :). and if you want to follow some particular person use the “follow“. Check out twitter’s documentation of streaming API for more 🙂

what is your favorite IDE/editor for writing code?

hmm, tough question for me. i have (had actually) so many favorites depending on context. but definitely it’s interesting to write here about them

1. notepad – i am a notepad fan, for a very long time since 98 to 2006 and still i like it very much. but well, after that i’d found notepad++ and i liked it for it’s outstanding syntax highlighting features. if by any chance, i have to use windows these days, i work in notepad++

2. visual studio 6: yup, i must agree it is one of the best ide i’ve ever came in touch with. i have worked on visual basic for a long time (99 to 2006) and i was simply in love with visual studio ide. and it’s awesome intellisense + gui designer was the center of the attraction.

3. zend studio: i still use it. its one of my most favorite ide because of it’s os independent distribution. i like most of the features in it (SQL editor, subversion support, FTP etc) and ofcourse the feature to check the output of yourcode inside it. the object inspector is really a very cool feature. and i also use “find in files” feature very often to find the file i am particularly looking to edit. oh by the way – i use the old version (the non-eclipse version) and still use the 5.5.1 version for my everyday development.

4. phped: its a good editor for windows (never tried it’s linux version) but for some unknown reason i’ve failed to get used to with it.

5. netbeans: its superb 🙂 i like it very much. but as i am used to with zend studio i dont use it much. but i always suggest netbeans to someone who is looking for a decent and powerful ide for php (well, yeah also for java specially for the outstanding GUI designer for swing based apps)

6. aptana studio and spket ide : both of them are very very good for editing javascript. i use spket in linux for it’s small footprint. and aptana studio in my regular home and office machines.

6. nano – yeah it is the latest editor that i use almost everyday. you know it is available in both linux and mac. so i use it frequently in my local dev platform (mac osx based) and remote machines (linux based). and it is much more easier than vi – i know vi(m) is a very good editor and there are millions of user of vi(m), so what? if i can’t find it useful then i wont use it 🙂 – i find nano is very handy and easy to use. i have enabled php syntax highlighting in nano (via nanoarc) and it works really cool in shell 🙂

i dont like eclipse. there is no particular reason but for some unknown reason (i remember one, extremely resource hungriness and large footprint) i never feel comfortable with it. i use only one eclipse based ide (aptana) becoz there is no other good alternative to it. and only for this reason i also don’t use the new zend studio.

so hey, what is your favorite ide?

expanding short url to original url using PHP and CURL

there are numbers of url shortening services available these days, including the good old tinyurl and something really short like u.nu. now when you get the short url shortened by using any of these services, you dont know where your browser is taking you! so if you are interested to figure out the original url hiding behind these short url, you need to have a little knowledge on how these services actually work. if you go to any of these short urls, they tell your browser “HTTP 30X: Object has moved” HTTP HEADER (optionally, some does it, some doesn’t) and then asks your browser to move to the original url using “Location” in HTTP HEADER. so all you have to do is just get the HTTP HEADER out first (PHP and Curl is pretty good at doing this, heh heh) and then parse the “Location” parameter from it.

lets see how that works in code

[sourcecode lang=”php”]
< ?php $url = "http://tinyurl.com/2dfmty"; $ch = curl_init($url); curl_setopt($ch,CURLOPT_HEADER,true); curl_setopt($ch,CURLOPT_RETURNTRANSFER,true); curl_setopt($ch, CURLOPT_FOLLOWLOCATION,false); $data = curl_exec($ch); $pdata = http_parse_headers($data); echo "Short URL: {$url}
“;
echo “Original URL: {$pdata[‘Location’]}”;

function http_parse_headers( $header )
{
$retVal = array();
$fields = explode(“\r\n”, preg_replace(‘/\x0D\x0A[\x09\x20]+/’, ‘ ‘, $header));
foreach( $fields as $field ) {
if( preg_match(‘/([^:]+): (.+)/m’, $field, $match) ) {
$match[1] = preg_replace(‘/(?< =^|[\x09\x20\x2D])./e', 'strtoupper("")', strtolower(trim($match[1]))); if( isset($retVal[$match[1]]) ) { $retVal[$match[1]] = array($retVal[$match[1]], $match[2]); } else { $retVal[$match[1]] = trim($match[2]); } } } return $retVal; } ?>
[/sourcecode]

now you see that the output of this code is
[sourcecode lang=”HTML”]
Short URL: http://tinyurl.com/2dfmty
Original URL: http://ghill.customer.netspace.net.au/embiggen/
[/sourcecode]

pretty interesting huh? if you analyze the full headers for each of these services you will find that most of them are using PHP in backend with Apache. only http://u.nu is using mod_rails (hence RoR) and bit.ly uses nginx 🙂

have fun in expanding!

using oauth pecl extension to talk to twitter

if you are interested in developing twitter applications, you must have read about twitter API and it’s authentication protocol. your application can fetch user’s private data but it has to authenticate itself as the user for that. so there are two ways to do it

1. asking user to provide his twitter username and password to your application (well, i am not interested to give away my PASSWORD to anyone!!!)
2. let twitter handle the authentication on behalf of you and ask user to grant permission to your application (hmm!! interesting)

now you see that #2 is more safe for your user. and i think most security concerned users will choose this way. so your application have to initiate this type of authentication system using twittter’s supported authentication protocol oAuth (it’s a commonly used authentication protocol used among number of popular service providers like yahoo, google and others)

to implement oauth in php, the best way is to use an existing library. there are now numbers of libraries available for this purpose. following are some of them
1. oauth lib by andy smith
2. oauth library by marc worrell
3. oauth pecl extension by rasmus lerdorf and john jawed and felipe pena

now you see, pecl extensions are written in c and runs pretty faster. so i choose it without thinking much abt it. i have assumed that you know how to install a pecl extension in your php hosting and i am not going to blog detail about that right now. all that can help you right now is shell command “pecl install -f oauth” – you know, nothing talks better than command or code 🙂

after installing oauth extension in my hosting account, i start developing my twitter application. first i have to register my application with twitter. you can create your one by pointing your browser to http://twitter.com/oauth_clients/new. please remember that you have to provide a callback url which twitter use to redirect user of your application after a success/unsuccessful authentication. i will refer to that url as “callback_url” through out this blog post. my applications callback_url is “http://mydomain.tld/auth.php”

after you have done registering your application with twitter, it will give you the following important data.
1. consumer key
2. consumer secret
3. request token url
4. access token url
5. authorize url

you will be going to use all of these in your application. now lets see how oauth works in brief. it initiate the talk using your consumer key and secret key. and then it request the “request token” from the service provider. if u r successful, you have to forward user of your application to the “authorize url” with the “request token”. now the service provider will ask to grant permission to your application from the user. if user grants (or disagree) the permission, the service provider (here, twitter) will forward your user again to the “callback url” of your application with a “new token”. now with the help of this new token and the token grabbed from previous “request token” your application will ask for “access token”. once you have the access token, you can authorize you application as the user itself with same privilege.

lets see how to do it in php with the help of oauth pecl extension. here we are going to initiate the talk, get the token and forward user to the service provider’s authorizing url.

token.php
[sourcecode lang=”php”]
< ?php //token.php $oauth = new OAuth("consumer key","consumer secret",OAUTH_SIG_METHOD_HMACSHA1,OAUTH_AUTH_TYPE_URI); //initiate $request_token_info = $oauth->getRequestToken(“http://twitter.com/oauth/request_token”); //get request token
file_put_contents(“token.txt”,$request_token_info[‘oauth_token_secret’]);//store the oauth token secret of request token
header(‘Location: http://twitter.com/oauth/authorize?oauth_token=’.$request_token_info[‘oauth_token’]);//forward user to authorize url
?>
[/sourcecode]

you see that we are storing the oauth_token_secret of the “request_token” because we need it in our next step to fetch access token. in the example above i am storing it in flat file, but you will have to store it in db/file with proper index to the userid so that you can retrieve it later in our next step.

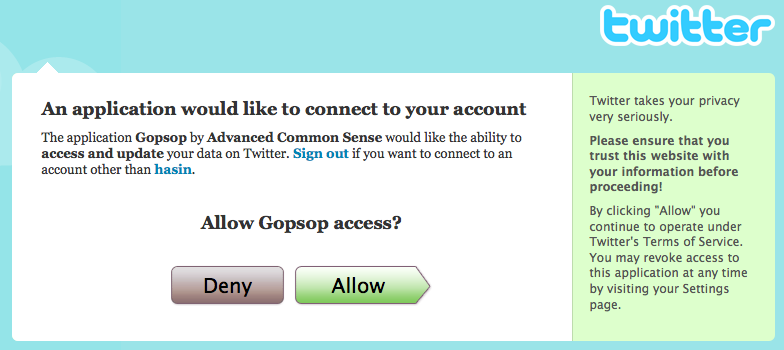
if user visit this page, he will be redirected to twitter authorize url and that may look like the following one with different app name.
picture-26

now lets see how we handle if the user click “allow” or “deny” in the above page.

this is the callback file you specified in settings of your app [auth.php]
[sourcecode lang=”php”]
< ?php //auth.php $oauth = new OAuth("consumer key","consumer secret",OAUTH_SIG_METHOD_HMACSHA1,OAUTH_AUTH_TYPE_URI); //initiate $request_token_secret = file_get_contents("token.txt"); //get the oauth_token_secret of request token we stored previously if(!empty($_GET['oauth_token'])){ $oauth->setToken($_GET[‘oauth_token’],$request_token_secret);//user allowed the app, so u
$access_token_info = $oauth->getAccessToken(‘http://twitter.com/oauth/access_token’);
}
?>
[/sourcecode]

access token is the most important token for your application. there are two object in this token – one is “oauth_token” and “oauth_token_secret”. if you print_r the access token it will look like the following one (actual value is not shown here)

Array (
    [oauth_token] => abcdefg
    [oauth_token_secret] => uvwxyz
)

you have to store this access token for authorizing later as this user (the user that was visiting). using this token you can anytime authorize yourself as that user and fetch user’s data from twitter. so lets see how we can fetch user’s profile data in rss (or json) format. the REST API url to fetch this data is “http://twitter.com/account/verify_credentials.json”. you can find other important REST urls to fetch user’s timeline, public timeline and friends timeline (also update status) in twitter’s documentation of it’s REST API

fetch user’s profile data
[sourcecode lang=”php”]
< ?php //profile.php $oauth = new OAuth("consumer key","consumer secret",OAUTH_SIG_METHOD_HMACSHA1,OAUTH_AUTH_TYPE_URI); //initiate $oauth->setToken($accesstoken[‘oauth_token’],$accesstoken[‘oauth_token_secret’]);
$data = $oauth->fetch(‘http://twitter.com/account/verify_credentials.json’);
if($data){
$response_info = $oauth->getLastResponse();
echo “

";
    print_r(json_decode($response_info));
    echo "

“;
}
[/sourcecode]

the output of this code is the following one (my twitter username is hasin)

[sourcecode lang=”php”]
stdClass Object
(
[time_zone] => Dhaka
[friends_count] => 97
[profile_text_color] => 666666
[description] => Smoking too much PHP
[following] =>
[utc_offset] => 21600
[favourites_count] => 2
[profile_image_url] => http://s3.amazonaws.com/twitter_production/profile_images/84574185/afif_b_normal.jpg
[profile_background_image_url] => http://s3.amazonaws.com/twitter_production/profile_background_images/5565492/777481225666153.jpg
[profile_link_color] => 2FC2EF
[screen_name] => hasin
[profile_sidebar_fill_color] => 252429
[url] => http://hasin.wordpress.com
[name] => hasin
[protected] =>
[status] => stdClass Object
(
[text] => ok, understood how twitter auth works via oauth pecl ext. of #php. thanks to @rasmus for his excellent example
[in_reply_to_user_id] =>
[favorited] =>
[in_reply_to_screen_name] =>
[truncated] =>
[created_at] => Sat May 02 16:08:28 +0000 2009
[id] => 1679349376
[in_reply_to_status_id] =>
[source] => web
)

[profile_sidebar_border_color] => 181A1E
[profile_background_tile] => 1
[notifications] =>
[statuses_count] => 1147
[created_at] => Fri Nov 09 10:40:14 +0000 2007
[profile_background_color] => 1A1B1F
[followers_count] => 265
[location] => Dhaka, Bangladesh
[id] => 10094392
)
[/sourcecode]
RSS Feed Mashup + Twitter = Yummy!

if you want to get all tech news update (or php news, did i forget to say python news or web 2/3/x news??) in one place, what could be better than a twitter account or a RSS feed reader. If you have a RSS feed aggregator, its plain and simple. But if you choose the other one (I mean Twitter) you have to be something more than a dumbass, as you have to create it by your own- lol!

so let me be something more than a “dumbass” today and show you how did i do it. i choose my all time best tool “php” for it. added some toppings with an external rss mashup builder and finally served the dish with twitter api. lets see what was the difficult part in it

goal:
you will provide a set of rss feed urls, then your application will create a mashed up feed with them (all in one place, sorted in ascending order by date), and publish the latest feed titles since last time update.

challenges
0. building a mashup with rss feed
1. keeping track of last time update and separate items which are new
3. post them to twitter
4. setting up cron to run it periodically

getting hand dirty
step 1: creating a rss feed mashup
so lets build a mashup of your favorite rss feed urls. you can make use of yahoo pipes for this or take help of any other web based mashup service. for this one, i experimented with the one available at xfruits.com. go there, open an account and add your feed urls. xfruit will give you a single feedurl which will deliver the mashed up content, sortedn in ascending order by date. so this part is done.

[update]
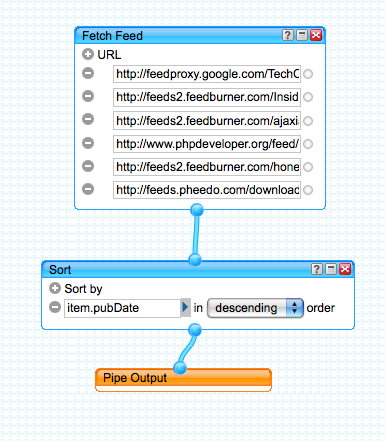
I tried with Xfruit but it doesn’t work well, most of the time it is down – and their update frequency is slow. so i build the mashup with yahoo pipes. here is the source
picture-24

after making a mashup of techcrunch, phpdeveloper, insidefacebook, ajaxian and honeytechblog my final mashed up feed url (via yahoo pipes)is http://pipes.yahoo.com/pipes/pipe.run?_id=bDfi0Pww3hGhpiLVPm7D0g&_render=rss

step 2: coding your little franky, the frankenstein
well, this code makes use of a tinyurl API to shorten the url of each feed story, SimpleXML to parse the RSS feed and extract stories and story-links from it, a text file to keep track of last updated content and twitter API to post them to twitter. here they come one by one.

class.tinyurl.php
[sourcecode lang=’php’]
< ?php /** * shorten any url with the help of tinyurl API * */ class TinyUrl { static function getTinyUrl($url) { $tinyurl = file_get_contents("http://tinyurl.com/api-create.php?url={$url}"); return $tinyurl; } } ?>
[/sourcecode]

class.cachemanager.php
[sourcecode lang=’php’]
< ?php /** * keeps track of updated items since last execute * */ class CacheManager { private $lastHash; function __construct() { $this->lastHash = file_get_contents(“hash.txt”);
}

function getLashHash()
{
return $this->lastHash;
}

function setLastHash($hash)
{
$this->lastHash = $hash;
file_put_contents(“hash.txt”,$hash);
}
}
?>
[/sourcecode]

class.twitter.php
[sourcecode lang=’php’]
< ?php /** * update user's status in twitter * */ class Twitter { private $username; private $password; function __construct($username, $password) { $this->username = $username;
$this->password = $password;
}
function publishMessage($message)
{
try{
$tweetUrl = “http://{$this->username}:{$this->password}@www.twitter.com/statuses/update.xml”;
$curl = curl_init();
curl_setopt($curl, CURLOPT_URL, $tweetUrl);
curl_setopt($curl, CURLOPT_CONNECTTIMEOUT, 2);
curl_setopt($curl, CURLOPT_RETURNTRANSFER, 1);
curl_setopt($curl, CURLOPT_POST, 1);
curl_setopt($curl, CURLOPT_POSTFIELDS, “status={$message}”);
$result = curl_exec($curl);
//print_r($result);
}
catch(Exception $e)
{
//print_r($e);
error_log($e->getMessage());
}
}
}
?>
[/sourcecode]

now the most interesting part, to make use of all your objects and to cook them properly. here is the code of index.php

index.php
[sourcecode lang=’php’]
< ?php include_once("class.cachemanager.php"); include_once("class.tinyurl.php"); include_once("class.twitter.php"); $twitter = new Twitter("username","password"); $cm = new CacheManager(); $lastHash = $cm->getLashHash();
$firstHash= “”;
$feedUrl = “http://pipes.yahoo.com/pipes/pipe.run?_id=bDfi0Pww3hGhpiLVPm7D0g&_render=rss”;
$rss = new SimpleXMLElement($feedUrl,LIBXML_NOCDATA, true);
$feedcount = count($rss->channel->item)-1;
$items = array();
/**
* process elements to get a list of items to post in twitter
* also set a check point so that items are not double posted
*/
for($i=0;$i< =$feedcount;$i++) { $title = $rss->channel->item[$i]->title;
$link = $rss->channel->item[$i]->link;
//echo “{$title}
{$link}


“;
if($i==0) $firstHash = md5($title);
$hash = md5($title);
if($lastHash!=$hash)
{
$shortlink = TinyUrl::getTinyUrl($link);
$items[] = array(“title”=>$title,”link”=>$shortlink);
}
else
break;
}
/**
* set the checkpoint
*/
$cm->setLastHash($firstHash);
/**
* post to twitter
*/
$items = array_reverse($items);
foreach ($items as $item)
{
$message = “{$item[‘title’]} – {$item[‘link’]}”;
$twitter->publishMessage($message);
echo $message.”
“;
}
echo “Whoa, Done Finally!”;
?>
[/sourcecode]

so you are done coding it. now set it as a cron job (you can use http://www.setcronjob.com if you are looking for a free one) from your cpanel. you are done.

You can check my twitter news updater at http://twitter.com/techupdater

Cropping any part of any website – thats fun!

after seeing the excellent jCrop this evening, i was thinking how to use it fro cropping any part of any website. Using a little bit CSS and Iframe – you can simulate the cropping of any webpage and thats what I did this evening

check out http://sandbox.ofhas.in/pagecrop/ – type any url in the “Url” box, load it and then select any part of it (that part is done using jCrop) – and then click “crop selection” – tada!

you can use this technology to add any particular part of any website to your website. it is done using javascript (jQuery and jCrop)- no PHP at all 🙂

check it out – you will definitely enjoy it 🙂

picture-21

started writing on facebook cookbook blog

facebook cookbook, what is that? well first thing first – this is not something related with “facebook cookbook” published by o’reilly. usually you know cookbook is a term commonly used to describe books which focus mainly on problems and their solutions. these cookbooks contains quick solutions of common and frequently used programming problems.

so i am planning to star writing an open book (right now it is a blog, when we will have thousands or recipes we will make it a book) which will follow cookbook approach for facebook application developers. i will highlight common problems (there are numbers of problems with no solutions in their wikis) and their solutions which i’ve learned in my last one and half year journey as an application developer on facebook platform.

so the journey began, i’ve started writing on facebook cookbook. you will find it at http://fbcookbook.ofhas.in

if you are interested to participate and share your snippets or right an article for the rest of us, you are very welcome.

check out Facebook Cookbook at http://fbcookbook.ofhas.in

develop your own gtalk/jabber/aim/yahoo bot using imified API

i’ve found http://bot.im (imified) few days ago and it’s a nice free service for creating your own messenger bots. it provides excellent API to develop bots for various platform like AIM/Yahoo/Gtalk/Jabber and interact with your bot users. To ease developing bots, I have written a wrapper class of imified API for php developers and made it open source under BSD license. You can download the wrapper from below

Download the wrapper with example

To see the example bots developed using this wrapper, please add “[email protected]” in your gtalk/jabber client or “storytellerbot” in your YM client. then type help and TADA!

please note that processing “help” is different. you need to type the response of “help” command in your bot settings page. also bots allows only one HTML tag which is <br>

example [the callback of this bot is set to http://bot.ofhas.in]

include_once("class.imified.php");
if(!isset($_REQUEST['msg']))
{
die ("This is Hasin's personal bot [email protected] to demonstrate the imified API - please add this bot from your gtalk/jabber client Or add [email protected] in your YM client. Source code is available from hasin's personal blog at http://hasin.wordpress.com");
}
//initiate
$im = new ImifiedHelper("7DCDECB6-C895-9643-909CDC85CBF09954 ","[email protected]","Oye!MyPassword!");
//callback
$im->setCallback("callback");
function callback($message, $step, $network, $userKey)
{
global $im;
$message = strtolower($message);
if("whois"==$message)
{
echo "about me";
}
else if("work"==$message)
{
echo "about my work";
}
elseif("status"==$message)
{
echo "my status";
}
elseif("quit"==$message)
{
echo "ok, bye";
}
else
{
echo "Sorry, I dont understand hierogliphics @^#%@*&#(&!*&@^!*&@#!!!";
}
$im->resetStep();
}

This class also supports fetching user info and sending message to a group of bot users. Check it out

Happy bot development