Category: pecl

Installing gearmand, libgearman and pecl gearman extension for php from source in Debian 6 & 7

I had a pretty rough evening today. No, not because the waiter forgot to add sugar in my tea, but because it was so boring to go through the trial and errors of installing gearman daemon and pecl gearman extension for php.

First I tried with the pretty-obvious-awe-fucking-some way.

[sourcecode language=”shell”]
apt-get update
apt-get install gearman
pecl install gearman
[/sourcecode]

In above steps, “apt-get install gearman” ran smoothly. But then “pecl install gearman” failed saying that it doesn’t have libgearman. Eh? so I installed libgearman4 (in Debian Squeezy. It was libgearman6 in Wheezy) and libgearman-dev. But pecl failed again to compile the extension saying that libgearman is missing. Strange! So I googled about this issue and found that it could be a link error where a symbolic link might be required of “/usr/include/libgearman” as “/usr/include/libgearman-1.0″. Still no luck.

So I decided to compile gearmand from the source. And libgearman is also included with that, so it will fix two errors at once. I downloaded the latest gearman package from launchpad and tried to compile it

[sourcecode language=”shell”]
wget https://launchpad.net/gearmand/1.2/1.1.11/+download/gearmand-1.1.11.tar.gz
tar -zxvf gearmand-1.1.11.tar.gz
cd gearmand-1.1.11
./configure
[/sourcecode]

Failure 1:
At this step, configure stopped showing the following error

[sourcecode language=”shell”]
configure: error: cannot find Boost headers version >= 1.39.0
[/sourcecode]

To fix this, I had to install “libboost-all-dev” by following command
[sourcecode language=”shell”]
apt-get install libboost-all-dev
[/sourcecode]

And I tried to compile gearman and it failed again

Failure 2:
At this step, configure stopped showing that it cannot find gperf. That’s fine – I have installed gperf and tried to configure gearman again

[sourcecode language=”shell”]
apt-get install gperf
[/sourcecode]

Failure 3:
Now it failed again, showing that libevent is missing. Hmm! Had to fix it anyway

[sourcecode language=”shell”]
apt-get install libevent-dev
[/sourcecode]

Failure 4:
Heck! Another failure. Now it’s showing that it can’t find libuuid. This part was a little tricky to solve, but finally fixed with the following package

[sourcecode language=”shell”]
apt-get install uuid-dev
[/sourcecode]

Let’s configure again. And sweet that the configure script ran smoothly. Let’s compile using make

Failure 5:
Grrr! At this point the make script failed with a bunch of text, where the following lines were at the top

[sourcecode language=”shell”]
libgearman/backtrace.cc: In function ‘void custom_backtrace()’:
libgearman/backtrace.cc:64:6: sorry, unimplemented: Graphite loop optimizations can only be used if the libcloog-ppl0 package is installed
[/sourcecode]

So it cannot find a library named libcloog-ppl. Let’s fix this problem by

[sourcecode language=”shell”]
apt-get install libcloog-ppl-dev
[/sourcecode]

Now I’ve tried to run the make script, and it was good. So i also ran make install to complete the installation.

[sourcecode language=”shell”]
make
make install
[/sourcecode]

Now gearmand and libgearman both are installed. So I tried to install pecl-gearman with the following extension and voila! it worked. No more missing libgearman anymore.

[sourcecode language=”shell”]
pecl install gearman
[/sourcecode]

Now all I had to do is add the line “extension=gearman.so” in my php.ini .

The process was tedious and boring and took me more time than writing this article. If you have seen “Despicable Me 2” when Lucy and Gru went to ElMacho’s restaurant and were attacked by that crazy chicken and finally Lucy exclaimed “What’s wrong with that chicken!”

I really wanted to say “What’s wrong with this chicken” after gearman was installed at last.

Enjoy!

connecting to flickr using PHP and PECL oAuth extension

flickr, one of the world dominant in photo sharing service, has added support to oAuth recently. Though their old authentication system still works (marked as deprecated but not discontinued) I find it’s wise to use their oAuth system for the better future proof application development.

PHP has a nice extension to perform oAuth dance in it’s pecl repository – pecl oAuth. Here is the code to connect to flickr using this extension. The only catch I found and took me more than 30 minutes to figure out a failed attempt, is you will have to append the permission flag in it’s oAuth authorization url. Pass either one of these permission flags “read”,”write” or “delete” as “&perms=” (flickr.php, line # 20) and then the redirection will be successful. Register your Flickr application from here, you will find your consumer key and secret key in next page in the App Garden.

While creating new application in flickr app garden, point the callback url to your flickr.php – thats it.

source code of config.php
[sourcecode lang=”php”]
<?php
$oauth[‘flickr’][‘consumerkey’]="9e251c5bcc*********cac050bf50ef";
$oauth[‘flickr’][‘consumersecret’]="d1c057904945****";
$oauth[‘flickr’][‘requesttokenurl’]="http://www.flickr.com/services/oauth/request_token";
$oauth[‘flickr’][‘accesstokenurl’]="http://www.flickr.com/services/oauth/access_token";
$oauth[‘flickr’][‘authurl’]="http://www.flickr.com/services/oauth/authorize";
?>
[/sourcecode]

And here is the source code of flickr.php
[sourcecode lang=”php”]
<?php
/**
* flickr authentication script based on
* pecl oauth extension
*/
session_start();
include_once("config.php");
/*
unset($_SESSION[‘frequest_token_secret’]);
unset($_SESSION[‘faccess_oauth_token’]);
unset($_SESSION[‘faccess_oauth_token_secret’]);
*/
$oauthc = new OAuth($oauth[‘flickr’][‘consumerkey’],
$oauth[‘flickr’][‘consumersecret’],
OAUTH_SIG_METHOD_HMACSHA1,OAUTH_AUTH_TYPE_URI); //initiate
if(empty($_SESSION[‘frequest_token_secret’])) {
//get the request token and store it
$request_token_info = $oauthc->getRequestToken($oauth[‘flickr’][‘requesttokenurl’]); //get request token
$_SESSION[‘frequest_token_secret’] = $request_token_info[‘oauth_token_secret’];
header("Location: {$oauth[‘flickr’][‘authurl’]}?oauth_token=".$request_token_info[‘oauth_token’]."&perms=read");//forward user to authorize url with appropriate permission flag
}
else if(empty($_SESSION[‘faccess_oauth_token’])) {
//get the access token – dont forget to save it
$request_token_secret = $_SESSION[‘frequest_token_secret’];
$oauthc->setToken($_REQUEST[‘oauth_token’],$request_token_secret);//user allowed the app, so u
$access_token_info = $oauthc->getAccessToken($oauth[‘flickr’][‘accesstokenurl’]);
$_SESSION[‘faccess_oauth_token’]= $access_token_info[‘oauth_token’];
$_SESSION[‘faccess_oauth_token_secret’]= $access_token_info[‘oauth_token_secret’];
}
if(isset($_SESSION[‘faccess_oauth_token’])) {
//now fetch current users profile
$access_token = $_SESSION[‘faccess_oauth_token’];
$access_token_secret =$_SESSION[‘faccess_oauth_token_secret’];
$oauthc->setToken($access_token,$access_token_secret);
$data = $oauthc->fetch(‘http://api.flickr.com/services/rest/?method=flickr.test.login&api_key=ae29ce34e831937ac26483498e93f3e9&format=json’);
$response_info = $oauthc->getLastResponse();
echo "<pre>";
print_r(json_decode($response_info));
echo "</pre>";
}
?>
[/sourcecode]

You can download the complete package from here (Thanks Box.net)

Note: I have written a similar post to demonstrate connecting to twitter and linkedin via their oAuth protocol which you can find here 🙂

Box.net widget in MiproApps – why did it require special care…

In MiproApps, our Visual Facebook Fanpage Desiger from Leevio, everything is built on top of a scalable plugin based architecture. Every plugin manages it’s data using a central plugin manager. Most of these data are isolated from each other, stored and served by the plugin manager without any special coding required from plugin developers. That makes everything simple. As storage and serving is fully managed by Plugin Manager, it helps us to cache, validate and sanitize user data properly from a single place.

But when we decided to add support for box.net, there comes a challenge. We have asked for username and password for box.net account from our users to pull out the data from their shared folders and files. “PASSWORD” – and that is the thing everyone thinks twice before providing to a third party. Everyone cares about their personal data security.

In MiproApps every data collected from user are submitted to storage service via Ajax request. And we simply cant send plain password collected by users in an Ajax request. What we did in this case is we had signed user’s sensitive information using a 128 bit public key (RSA) in client side. The private key is stored securely in our server and that encrypted information is decrypted only in server side. So client application has just the public key.

Box.net widget in Facebook Fanpages powered by MiproApps

There were other challenges as well, while we went to implement this encryption in client side by Javascript and Decryption by PHP. Unfortunately PHPs Mcrypt doesnt support RSA, and Zend Framework doesnt provide any component for that. And there was a trick when you encrypt your data in JS. You must add a null byte at the end of your data, otherwise PHP cant decrypt it.

We have used RSA library (a combination of RSA, BigInt and Barett Library) from Ohdave and used the Crypt_RSA library from PEAR. And it also required us to install bigint PECL extension.

You can see some example code at here and you can use the RSA public/private key pair either by openssl shell command or the RSA key generator from ohdave.

The service layer is working smooth. Plugin developers doesnt need to bother about encryption and decryption. Everything was managed transparently under the hood. And so far we are only developing our plugins, data is secured and safe. Users can add their publicly shared box.net files directly in their facebook fanpage. For a sample output, you can check out my page. You will find the box.net component at the bottom right corner.

Complete oAuth script for Twitter and LinkedIn using PECL oAuth Extension

After searching for help to connect with LinkedIn via their oAuth protocol using PECL oAuth extension, I’ve found that lots of people are posting in their forum for the code samples. And only very few obscure code examples are available. I’ve found phplinkedin script but that is just too bulky for a simple oAuth dance 🙂

So here are two files to perform 3 step oAuth Dance for both twitter and linkedin. Just set your consumer key and consumer secret key in these scripts (config.php) and in your LinkedIn and Twitter application, set the url of these scripts as authentication callback 🙂 thats it 🙂

check out the source code below or just straight download them from the following url
http://www.box.net/shared/oc0u7ym5y7

config.php: source
[sourcecode lang=”php”]
<?
//config.php
$oauth[‘twitter’][‘consumersecret’]="UtNkcJC5VqmHgSgxMIRl2UcHaJLWINzr1g2q*****";
$oauth[‘twitter’][‘consumerkey’]="LveyUCUf9Ym96AU7*****";
$oauth[‘twitter’][‘requesttokenurl’]="http://twitter.com/oauth/request_token";
$oauth[‘twitter’][‘accesstokenurl’]="http://twitter.com/oauth/access_token";
$oauth[‘twitter’][‘authurl’]="http://twitter.com/oauth/authorize";
$oauth[‘linkedin’][‘consumersecret’]="SX9FS_Ptz7yNA3WtTW0e8z3_XSiROnVSpOEbAVCfKAn7fqFq4kjelVXiNMO*****";
$oauth[‘linkedin’][‘consumerkey’]="qQkxCNYQbuALhWyBZO03V–6dtwUnQHz7KFE4PBpdIL6hy_87SHygEZAJj9*****";
$oauth[‘linkedin’][‘requesttokenurl’]="https://api.linkedin.com/uas/oauth/requestToken";
$oauth[‘linkedin’][‘accesstokenurl’]="https://api.linkedin.com/uas/oauth/accessToken";
$oauth[‘linkedin’][‘authurl’]="https://api.linkedin.com/uas/oauth/authorize";
?>
[/sourcecode]

twitter.php: source
[sourcecode lang=”php”]
<?
//twitter.php
/**
* twitter authentication script based on
* pecl oauth extension
*/
session_start();
include_once("config.php");
/*
unset($_SESSION[‘trequest_token_secret’]);
unset($_SESSION[‘taccess_oauth_token’]);
unset($_SESSION[‘taccess_oauth_token_secret’]);
*/
$oauthc = new OAuth($oauth[‘twitter’][‘consumerkey’],
$oauth[‘twitter’][‘consumersecret’],
OAUTH_SIG_METHOD_HMACSHA1,OAUTH_AUTH_TYPE_URI); //initiate
if(empty($_SESSION[‘trequest_token_secret’])) {
//get the request token and store it
$request_token_info = $oauthc->getRequestToken($oauth[‘twitter’][‘requesttokenurl’]); //get request token
$_SESSION[‘trequest_token_secret’] = $request_token_info[‘oauth_token_secret’];
header("Location: {$oauth[‘twitter’][‘authurl’]}?oauth_token=".$request_token_info[‘oauth_token’]);//forward user to authorize url
}
else if(empty($_SESSION[‘taccess_oauth_token’])) {
//get the access token – dont forget to save it
$request_token_secret = $_SESSION[‘trequest_token_secret’];
$oauthc->setToken($_REQUEST[‘oauth_token’],$request_token_secret);//user allowed the app, so u
$access_token_info = $oauthc->getAccessToken($oauth[‘twitter’][‘accesstokenurl’]);
$_SESSION[‘taccess_oauth_token’]= $access_token_info[‘oauth_token’];
$_SESSION[‘taccess_oauth_token_secret’]= $access_token_info[‘oauth_token_secret’];
}
if(isset($_SESSION[‘taccess_oauth_token’])) {
//now fetch current users profile
$access_token = $_SESSION[‘taccess_oauth_token’];
$access_token_secret =$_SESSION[‘taccess_oauth_token_secret’];
$oauthc->setToken($access_token,$access_token_secret);
$data = $oauthc->fetch(‘http://twitter.com/account/verify_credentials.json’);
$response_info = $oauthc->getLastResponse();
echo "<pre>";
print_r(json_decode($response_info));
echo "</pre>";
}
?>
[/sourcecode]

linkedin.php: source
[sourcecode lang=”php”]
<?
//linkedin.php
/**
* linkedin authentication script based on
* pecl oauth extension
*/
session_start();
include_once("config.php");
/*
unset($_SESSION[‘lrequest_token_secret’]);
unset($_SESSION[‘laccess_oauth_token’]);
unset($_SESSION[‘laccess_oauth_token_secret’]);
*/
$oauthc = new OAuth($oauth[‘linkedin’][‘consumerkey’],
$oauth[‘linkedin’][‘consumersecret’],
OAUTH_SIG_METHOD_HMACSHA1,OAUTH_AUTH_TYPE_AUTHORIZATION); //initiate

$oauthc->setNonce(rand());

if(empty($_SESSION[‘lrequest_token_secret’])) {
//get the request token and store it
$request_token_info = $oauthc->getRequestToken($oauth[‘linkedin’][‘requesttokenurl’]); //get request token
$_SESSION[‘lrequest_token_secret’] = $request_token_info[‘oauth_token_secret’];
header("Location: {$oauth[‘linkedin’][‘authurl’]}?oauth_token=".$request_token_info[‘oauth_token’]);//forward user to authorize url
}
else if(empty($_SESSION[‘laccess_oauth_token’])) {
//get the access token – dont forget to save it
$request_token_secret = $_SESSION[‘lrequest_token_secret’];
$oauthc->setToken($_REQUEST[‘oauth_token’],$request_token_secret);//user allowed the app, so u
$access_token_info = $oauthc->getAccessToken($oauth[‘linkedin’][‘accesstokenurl’]);
$_SESSION[‘laccess_oauth_token’]= $access_token_info[‘oauth_token’];
$_SESSION[‘laccess_oauth_token_secret’]= $access_token_info[‘oauth_token_secret’];
$_SESSION[‘loauth_verifier’] = $_REQUEST[‘oauth_verifier’];
}
if(isset($_SESSION[‘laccess_oauth_token’])) {
//now fetch current user’s profile
echo "<pre>";
$access_token = $_SESSION[‘laccess_oauth_token’];
$access_token_secret =$_SESSION[‘laccess_oauth_token_secret’];
$oauth_verifier = $_SESSION[‘loauth_verifier’];
$oauthc->setToken($access_token,$access_token_secret);
$data = $oauthc->fetch(‘http://api.linkedin.com/v1/people/~’);
$response_info = $oauthc->getLastResponse();
print_r(htmlspecialchars($response_info));
echo "</pre>";
}
?>
[/sourcecode]

Download these files from http://www.box.net/shared/oc0u7ym5y7 – Happy dancing time, in oAuth way 😉

Installing Storytlr in your own domain

When lifestreaming services come under the spotlight, Storytlr is definitely a promising one. They started their journey not more than a year ago, was loved by many other people out there, and decided to shutdown! Ok, that makes sense when the economy was so scary lately, but the good thing is that – they didn’t just announced “We are shutdown, and we don’t care what the fuck had you built with us”. Those brilliant people behind Storytlr did something very much appreciable, they made their brain child open source. I really loved that. The source code is available to download from their google code project page.

Other than Storytlr, there is another open source life streaming service available at this moment which is “pubwich” and is available to download from http://pubwich.org

My post is about how you can grab the source code of Storytlr and set it up in your own webserver. I’ve seen many people were asking on the mailing list an their news blog about how to install this one successfully. So I decided to give it a shot and install it. Follow these steps and you are good to go 🙂

#1 Add a wildcard A record pointing to your server’s IP
#2 If you are hosted in VPS, and you have multiple domains hosted, you may want to create a Virtual Host with the following entries. I just assumed that your document root for Storytlr will be at “/var/www/storytlr”
[sourcecode lang=”php”]
<VirtualHost *:80>
ServerName domain.tld
ServerAlias domain.tld
ServerAdmin [email protected]
DocumentRoot /var/www/storytlr
<Directory /var/www/storytlr>
Options FollowSymLinks
AllowOverride All
</Directory>
</VirtualHost>
[/sourcecode]

Dont forget to restart/reload your web server after this.

#3 change your current workign directory to /var/www/storytlr and download the latest available storytlr from google code, and then extract it 🙂
[sourcecode lang=”bash”]
wget http://storytlr.googlecode.com/files/storytlr-0.9.2.tgz
tar -zxvf storytlr-0.9.2.tgz
[/sourcecode]

Now you will see some directories in the same path.

#4 Create a mysql database named “storytlr” (You can name it whatever, just dont forget to change the DB settings accordingly in the config. I will be discussing this later) – also create a user for this db and grant it all permission for this db.
[sourcecode lang=”sql”]
mysql> create database storytlr;
mysql> grant all on storytlr.* to ‘storytlr’@’localhost’ identified by ‘password’;
mysql> flush privileges;
[/sourcecode]

#5 Now you need to import storytlr’s schema into it. change your working directory to /var/www/storytlr/protected/install and import the database.sql into the recently created “storytlr” db
[sourcecode lang=”bash”]
mysql -u storytlr -p storytlr < database.sql
[/sourcecode]

#6 You need to install a PECL extension “tidy” to make Storytlr work properly. So if you dont have that installed on your server, you can do this using the following command
[sourcecode lang=”bash”]
apt-get install php5-tidy
or
pecl install tidy
[/sourcecode]

if you install it via “pecl” then dont forget to add this line “extension=tidy.so” in your php.ini. Also in this case, make sure that put tidy.so inside the directory which is mentioned in the php.ini as “extension_dir”

restart your webserver
[sourcecode lang=”bash”]
/etc/init.d/apache2 restart
[/sourcecode]

#7 Now you need to add write permission to some directories that storytlr needs. Change your workign directory to /var/www/storytlr/protected and apply the following commands
[sourcecode lang=”bash”]
chmod 0755 logs
chmod 0755 feeds
chmod 0755 temp
chmod 0755 upload
[/sourcecode]

#8 We are almost done. Now change your working directory to /var/www/storytlr/protected/config and copy the config.ini.sample as config.ini. Edit this config.ini – you need to make various changes here.

#line number 1: if you have PDO and PDO_MYSQL installed in your machine, leave it as is – or else change it to “MYSQL” instead of “PDO_MYSQL”

Change DB settings. Add appropritae uername, db name and password there

Change line number 14, 15, 16 and remove the comments (the semicolon 😉 from in front of them. Its better to add caching.

Change line number 19 and add your host name. You may also change the timezone to your working one.

Change line # 25, set app.closed = 0. You want to enable registration for your visitors, right?

Comment out line number 28 (app.user = admin) and add a semicolon in front of it 🙂

Change line #39 (flickr.api_key=) – add your Flickr API key there. This is optional 🙂

You may also change line number 57 and add a google map api key for your domain. This is also optional 😉

#9 Last step, create /tmp/cache directory and add write permission to it 🙂

Done and Enjoy!

Using new PECL Memcached extension for storing session data

Many of you already know that managing session is a critical task for web applications, specially when you want to avoid I/O hop and also a significant load over your database by writing a custom session handler. Beside that, if your application makes use of multiple web servers behind a proxy, then its more than a critical job to share and manage session data among these servers effectively. This is why a central session manager is very important for your application to scale. In this article I am going to show you how you can use the latest Memcached extension (developed by Andrei Zmievski and his team) to isolate the session storage from web servers. I will show you how to compile the extension and use it.

Step1: Install Memcached Server
If you are using Debian its just plain simple
[sourcecode lang=”bash”]
apt-get install memcached
[/sourcecode]

Step 2: Run memcached instances
Lets run two instances of memcached in same machine (well, this article is just for demonstrating you how you can get things done. In the production environment, you can deploy as many memcached instances as you want in different servers in same network)
[sourcecode lang=”bash”]
memcached -d -l 127.0.0.1 -p 11211 -u <username> -m 16
memcached -d -l 127.0.0.1 -p 11212 -u <username> -m 16
[/sourcecode]

Above commands will run two instances of memcached listening on port number 11211 and 11212, same IP 127.0.0.1. Each of them get an allocation of 16 MB of memory (on RAM).

Step 3: Install the PECL Memcached extension.
Lets install the new PECL memcached extension in your web server. This new extension depends on libmemcached. You can grab the latest distribution of libmemcached from https://launchpad.net/libmemcached and compile it in your own machine. Make sure you have the dependencies met.

[sourcecode lang=”bash”]
wget http://launchpad.net/libmemcached/1.0/0.34/+download/libmemcached-0.34.tar.gz
tar -zxvf libmemcached-0.34.tar.gz
cd libmemcached-0.34
./configure
make && make install
[/sourcecode]

Considering everything went fine, lets install the PECL memcached extension
[sourcecode lang=”bash”]
pecl install memcached
[/sourcecode]

If everything goes fine, you should see the output similar like this
[sourcecode]
Build process completed successfully
Installing ‘/usr/lib/php5/20060613/memcached.so’
install ok: channel://pecl.php.net/memcached-1.0.0
configuration option "php_ini" is not set to php.ini location
You should add "extension=memcached.so" to php.ini
[/sourcecode]

Make sure that memcached.so is placed in your PHP extension_dir folder (here /usr/lib/php5/20060613). Add the line “extension=memcached.so” in your php.ini and restart your web server.

To make sure, everything’s done and working – run a phpinfo() and check the output. There should be a “memcached” sesction which will look like the following one.

Memcached PECL Extension

Now we need to make change in our php.ini to register Memcached as a session handler and set the necessary properties there. Open your php.ini and add the following two lines. If you find any similar line un-commented, comment them out first.

[sourcecode lang=”php”]
session.save_handler=memcached
session.save_path="127.0.0.1:11211, 127.0.0.1:11212"
[/sourcecode]

Restart your web server. And …… you are done! 🙂 – Now all your session data will be saved and served from these memcached servers. No matter whenever you need to extend your setup by adding extra web servers, all user data and session data will remain valid and served from a central location. No I/O issue, no huge write load on DB servers.

converting standard wordpress into a SQLite powered multi user blogging platform

wordpress is one of the very popular blogging platforms which is not only free but also released as a open source project. officially wordpress runs only on mysql. so if you want to run it with SQLite, you will not find any official support for that. but fortunately justin addie has written an excellent plugin (pdo for wordpress) which will work as an adapter just between the wordpress DAL and mysql. this plugin hooks all the SQL queries which are sent to execute on mysql by wordpress, convert those into PDO compatible statements and then execute them. currently PDO for WordPress is written to work smoothly with mysql and sqlite.

on the other hand, WPMU (wordpress mu or multi-user) is another version of wordpress which uses the core wp with some modifications and convert any single user wordpress blog into a multi user blogging platform. in this blog post i will show you how you can convert a general installation of wordpress into multi user blogging platform (like WPMU, but fully featured) and take advantage of SQLite 🙂 – so let the fun begin.

step 1: check if your domain support wildcard A record. if so, then create a “*” A record and point it to your server. if it works, now you can point http://.. to your server 🙂 – that is very much required. alo please check that in your webserver it has “pdo” and “pdo_sqlite” php extensions enabled. you can check that using phpinfo(); – needless to say, you need PHP5

step 2: install wordpress

step 3: install pdo for wordpress
download the pdo_for_wordpress plugin. inside it you will find one file named “db.php” and a folder named “pdo”.
put the db.php inside “wp-content” directory
now put the “pdo” folder inside “wp-content” directory

open wp-config.php
find the following line
[sourcecode lang=”php”]
define(‘DB_COLLATE’, ”);
[/sourcecode]

add the following line just below that line
[sourcecode lang=”php”]
define(‘DB_TYPE’, ‘sqlite’);
[/sourcecode]

step 4: create a directory named “userdb” anywhere in your server, make sure to give it write access. in this example we’ve created one as /opt/userdb – DONT FORGET TO ASSIGN WRITE PERMISSION to this “userdb” directory.

step 5: now we will be modifying that “db.php” which we had copied into “wp-content” folder.

find the line in db.php where it says
[sourcecode lang=”php”]
define (‘FQDBDIR’, ABSPATH .’/wp-content/database/’);
define (‘FQDB’, FQDBDIR .’MyBlog.sqlite’);
[/sourcecode]

now change those lines as below
[sourcecode lang=”php”]
define (‘FQDBDIR’, ‘/opt/userdb/’);
define (‘FQDB’, FQDBDIR ."{$_SERVER[‘SERVER_NAME’]}.sqlite");
[/sourcecode]

and tada – you are done. now point your browser to any subdomain under your domain and it will comeup with registration page. register some blog and check it out 🙂 (at the bottom of this post you can find the link of a live demo)

now you can extract some themes in the wp-content/themes folder or some plug-ins into wp-content/plugins folder. all users will be able to choose only from those pre installed themes and plugins, and everyones data and configuration will remain separate from others, as everyone is running from their own database. set only “read” access to “wp-content/themes” and “wp-content/plugins” folders to avoid any security loophole.

happy blogging.

[note – i’ve checked it against latest wordpress 2.8.4 and it runs okay]

To check out a live example of a running wordpress 2.8.4 on SQLite – click on http://anything.twistats.com/wp/ – and to create your own – just go to this url http://<any_subdomain>.twistats.com/wp and register your one :). You can select from six pre installed themes too 🙂

using oauth pecl extension to talk to twitter

if you are interested in developing twitter applications, you must have read about twitter API and it’s authentication protocol. your application can fetch user’s private data but it has to authenticate itself as the user for that. so there are two ways to do it

1. asking user to provide his twitter username and password to your application (well, i am not interested to give away my PASSWORD to anyone!!!)
2. let twitter handle the authentication on behalf of you and ask user to grant permission to your application (hmm!! interesting)

now you see that #2 is more safe for your user. and i think most security concerned users will choose this way. so your application have to initiate this type of authentication system using twittter’s supported authentication protocol oAuth (it’s a commonly used authentication protocol used among number of popular service providers like yahoo, google and others)

to implement oauth in php, the best way is to use an existing library. there are now numbers of libraries available for this purpose. following are some of them
1. oauth lib by andy smith
2. oauth library by marc worrell
3. oauth pecl extension by rasmus lerdorf and john jawed and felipe pena

now you see, pecl extensions are written in c and runs pretty faster. so i choose it without thinking much abt it. i have assumed that you know how to install a pecl extension in your php hosting and i am not going to blog detail about that right now. all that can help you right now is shell command “pecl install -f oauth” – you know, nothing talks better than command or code 🙂

after installing oauth extension in my hosting account, i start developing my twitter application. first i have to register my application with twitter. you can create your one by pointing your browser to http://twitter.com/oauth_clients/new. please remember that you have to provide a callback url which twitter use to redirect user of your application after a success/unsuccessful authentication. i will refer to that url as “callback_url” through out this blog post. my applications callback_url is “http://mydomain.tld/auth.php”

after you have done registering your application with twitter, it will give you the following important data.
1. consumer key
2. consumer secret
3. request token url
4. access token url
5. authorize url

you will be going to use all of these in your application. now lets see how oauth works in brief. it initiate the talk using your consumer key and secret key. and then it request the “request token” from the service provider. if u r successful, you have to forward user of your application to the “authorize url” with the “request token”. now the service provider will ask to grant permission to your application from the user. if user grants (or disagree) the permission, the service provider (here, twitter) will forward your user again to the “callback url” of your application with a “new token”. now with the help of this new token and the token grabbed from previous “request token” your application will ask for “access token”. once you have the access token, you can authorize you application as the user itself with same privilege.

lets see how to do it in php with the help of oauth pecl extension. here we are going to initiate the talk, get the token and forward user to the service provider’s authorizing url.

token.php
[sourcecode lang=”php”]
< ?php //token.php $oauth = new OAuth("consumer key","consumer secret",OAUTH_SIG_METHOD_HMACSHA1,OAUTH_AUTH_TYPE_URI); //initiate $request_token_info = $oauth->getRequestToken(“http://twitter.com/oauth/request_token”); //get request token
file_put_contents(“token.txt”,$request_token_info[‘oauth_token_secret’]);//store the oauth token secret of request token
header(‘Location: http://twitter.com/oauth/authorize?oauth_token=’.$request_token_info[‘oauth_token’]);//forward user to authorize url
?>
[/sourcecode]

you see that we are storing the oauth_token_secret of the “request_token” because we need it in our next step to fetch access token. in the example above i am storing it in flat file, but you will have to store it in db/file with proper index to the userid so that you can retrieve it later in our next step.

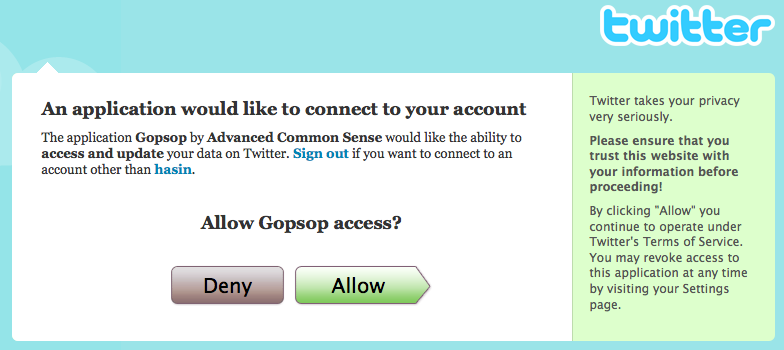
if user visit this page, he will be redirected to twitter authorize url and that may look like the following one with different app name.
picture-26

now lets see how we handle if the user click “allow” or “deny” in the above page.

this is the callback file you specified in settings of your app [auth.php]
[sourcecode lang=”php”]
< ?php //auth.php $oauth = new OAuth("consumer key","consumer secret",OAUTH_SIG_METHOD_HMACSHA1,OAUTH_AUTH_TYPE_URI); //initiate $request_token_secret = file_get_contents("token.txt"); //get the oauth_token_secret of request token we stored previously if(!empty($_GET['oauth_token'])){ $oauth->setToken($_GET[‘oauth_token’],$request_token_secret);//user allowed the app, so u
$access_token_info = $oauth->getAccessToken(‘http://twitter.com/oauth/access_token’);
}
?>
[/sourcecode]

access token is the most important token for your application. there are two object in this token – one is “oauth_token” and “oauth_token_secret”. if you print_r the access token it will look like the following one (actual value is not shown here)

Array (
    [oauth_token] => abcdefg
    [oauth_token_secret] => uvwxyz
)

you have to store this access token for authorizing later as this user (the user that was visiting). using this token you can anytime authorize yourself as that user and fetch user’s data from twitter. so lets see how we can fetch user’s profile data in rss (or json) format. the REST API url to fetch this data is “http://twitter.com/account/verify_credentials.json”. you can find other important REST urls to fetch user’s timeline, public timeline and friends timeline (also update status) in twitter’s documentation of it’s REST API

fetch user’s profile data
[sourcecode lang=”php”]
< ?php //profile.php $oauth = new OAuth("consumer key","consumer secret",OAUTH_SIG_METHOD_HMACSHA1,OAUTH_AUTH_TYPE_URI); //initiate $oauth->setToken($accesstoken[‘oauth_token’],$accesstoken[‘oauth_token_secret’]);
$data = $oauth->fetch(‘http://twitter.com/account/verify_credentials.json’);
if($data){
$response_info = $oauth->getLastResponse();
echo “

";
    print_r(json_decode($response_info));
    echo "

“;
}
[/sourcecode]

the output of this code is the following one (my twitter username is hasin)

[sourcecode lang=”php”]
stdClass Object
(
[time_zone] => Dhaka
[friends_count] => 97
[profile_text_color] => 666666
[description] => Smoking too much PHP
[following] =>
[utc_offset] => 21600
[favourites_count] => 2
[profile_image_url] => http://s3.amazonaws.com/twitter_production/profile_images/84574185/afif_b_normal.jpg
[profile_background_image_url] => http://s3.amazonaws.com/twitter_production/profile_background_images/5565492/777481225666153.jpg
[profile_link_color] => 2FC2EF
[screen_name] => hasin
[profile_sidebar_fill_color] => 252429
[url] => http://hasin.wordpress.com
[name] => hasin
[protected] =>
[status] => stdClass Object
(
[text] => ok, understood how twitter auth works via oauth pecl ext. of #php. thanks to @rasmus for his excellent example
[in_reply_to_user_id] =>
[favorited] =>
[in_reply_to_screen_name] =>
[truncated] =>
[created_at] => Sat May 02 16:08:28 +0000 2009
[id] => 1679349376
[in_reply_to_status_id] =>
[source] => web
)

[profile_sidebar_border_color] => 181A1E
[profile_background_tile] => 1
[notifications] =>
[statuses_count] => 1147
[created_at] => Fri Nov 09 10:40:14 +0000 2007
[profile_background_color] => 1A1B1F
[followers_count] => 265
[location] => Dhaka, Bangladesh
[id] => 10094392
)
[/sourcecode]

How to make your own springloops in PHP

Springloops is a nice code management service recently came into focus. It helps you to manage the code base of your application, monitor the commit and deploy the final version easily to another server. So if you are wondering how to build such a system and how it actually works, this article is for you.

Please note that I am neither way affiliated with Springloops nor any of it’s contacts. This article expresses completely my own opinion.

The primary obstacles of making such a service are
1. Managing the subversion repositories and users
2. Interaction with subversion repositories (Not same as option 1)
3. Payment gateways
4. Code browser
5. User friendliness
6. Scaling

Among these options, 4 and 6 are out of the scope of this article. There are thousands of article explaining those topics to you. So I am not going to talk about them. There are excellent libraries available to manage many popular payment gateways. Just google it and you are done. And about user friendliness and design, you can hire a consultant who’s specializing on this subject and get it done.

1. Managing the subversion repositories and users
In springloops or any other subversion hosting service, you need to do some basic shell scripting which is required for adding the subversion repositories dynamically and to add users in it. There are some excellent articles how you can do it with apache2. To avoid any traffic related issue, best practice will be hosting these repositories in another server, and using htaccess – just point your user’s svn URL to the exact url. Check out the following urls to find out how to host subversion repositories with apache. Linux should be the first choice, heh heh.

Reference:
1. Setting up subversion with apache in Ubuntu gutsy gibon
2. Setting up subversion with apache2
3. Setting up subversion with apache2 and DAV in debian
4. Host your open source projects in ubuntu in 3 easy steps

All you have to do is writing shell script to automate these steps and restart the apache2 demon once an user register his/her project with your service. You are done

2. Interaction with subversion repositories (Not same as option 1)
Now this is quite a challenging part and many of you are lost how to achieve this kind of functionality for such services. For PHP developers, you know there are an excellent repository of extensions named PECL and also repository of libraries name PEAR. In PECL there is an excellent extension which is cent percent appropriate for this work. Yup, I am talking about “SVN” extension. You have to install this extension to use it with your PHP code. Once you are done with installing it, now you got the complete power to interact with the subversion repositories hosted by your users. This extension is very rich and provides all the functionalities you need to interact. For details please point your browser to the appropriate section in PHP manual.

Reference
1. Installing PECL SVN extension for PHP in Ubuntu Gutsy Gibon
2. PECL svn package
3. SVN extension documentation

4. Code Browser
Another challenging part of the total setup. If you cannot provide excellent code browser which will clearly demonstrate the changes in code from different revisions, figure out the log and the notes made during each commit and finally, make note on it to show to your fellow team members.

Using svn_diff, svn_ls and svn_log you can clearly find out the difference of a file in two different revisions, the file and directory structure of the repository and the log of each commit. So basically once you got the file and directory structure of your repository for a revision, you can just traverse through it and display as a nice report using your PHP code. And when user will ask you to display the difference, you will find the difference using svn_diff which returns the difference as standard diff format. Now using regular expression (or whatever way) you will mark the lines which was changed and just display them highlighting using different colors to your user, as a nice report. And You can also browse the log of any revision using svn_log and show it to your user.

And last but not the least, you can create tags, branch and whatever addition by maintaining a local shadow working copy of your repository. Only the thing that you cannot do (or still I am thinking how-to) is merging, heh heh.

And when it comes about deploy the latest code base to your server, you can do it using svn_update where the path is the working directory in your server.

Reference
1. Standard Diff Format
2. svn_diff
3. svn_log
4. svn_ls
5. svn_add
6. svn_update
7. svn_checkout

Basically this is how a service like Springloops is built. I hope, you’ve enjoyed this article as much as I did to write it, heh heh.

Installing PECL subversion extension for PHP in Ubuntu 7.10

I was trying to interact with my subversion repositories using PHP yesterday and I knew that PECL has a extension named “SVN” for PHP users. So I tried to install in in my machine by when I tried to install it with the following command it always failed saying “unable to locate svn_client.h

sudo pecl install -f svn

Then I googled for some time to find out which package actually and I found that it is a part of libsvn which I didnt install in my machine which has ubuntu 7.10. so I found the appropriate package using the following command and it obviously locate the appropriate lib to install, which is “libsvn-dev

sudo apt-cache search libsvn

After that I just installed it via the standard procedure “sudo apt-get install libsvn-dev” and then tried to install the pecl extension once again. And whoa!, it works.

Here’s a small snippet to find out the difference of a single file from the repository under two separate revisions. in the following example svn_diff function returns two streams. one of them contains the difference and another one contains the error block.


<?php
list($diff,$error) = svn_diff("http://orchidframework.googlecode.com/svn/trunk/app/config/configs.php",
52,
"http://orchidframework.googlecode.com/svn/trunk/app/config/configs.php",
61);
echo "<pre>";
fpassthru($diff);
?>

Easy, huh?