Category: MySQL

Working with combined expressions in WHERE clauses in Laravel 4

laravel-combined

When retrieving records from tables in our database, you often have to write combined expressions in WHERE clauses like

[sourcecode language=”sql”]
SELECT * FROM users WHERE status=1 AND (fname = ‘John’ OR lname=’Doe’)
[/sourcecode]

The query above is pulling out all users who’s status is set to 1, and fname is equal to ‘John’ or status is 1 and lname is equal to ‘Doe’. Now this query is significantly different from the following one.

[sourcecode language=”sql”]
SELECT * FROM users WHERE status=1 AND fname = ‘John’ OR lname=’Doe’
[/sourcecode]

Can you tell us what can go wrong with a statement like this? Well to find out more, let’s have a look at how this query will be parsed by database engine

[sourcecode language=”sql”]
SELECT * FROM users WHERE (status=1 AND fname = ‘John’)

OR

SELECT * FROM users WHERE lname=’Doe’
[/sourcecode]

So this query will pull every record that has a status set to 1 and fname equivalent to ‘John’. Then, with the previously pulled records, it will also pull all the users who has a lname equal to ‘Doe’, but this time it will pull out all users disregarding their status. Which means that users with status = 0 or 1 or 2 will also be in the resultset. I bet that is not what you were looking for while you’re writing this query and clearly understands the difference between these two queries. So you got the point of grouping or combining logical expressions and the impact that can have in your resultset. Writing a combined logical expression is easy in SQL. But what if you’re told to do the same operation using Laravel 4’s built in ORM which is called Eloquent ORM. It’s a little tricky to do the same operation in eloquent because of this combined expression, and it needs an anonymous function 🙂 Let’s have a look at the following code in our User model

[sourcecode language=”php”]
static function searchByName($fname, $lname){
return User::where("status", 1)
->where(function ($query) use ($fname, $lname) {
$query->where("fname", ‘=’, $fname)
->orwhere("lname", ‘=’, $lname);
})
->get([‘*’]);
}
[/sourcecode]

Now searchByName(…) function will work as we expected. You can try the following one and see the difference and notice how it is VERY MUCH different from our expectation

[sourcecode language=”php”]
static function searchByName($fname, $lname)
{
return User::where("status", 1)
->where("fname", ‘=’, $fname)
->orWhere("lname", ‘=’, $lname)
->get([‘*’]);
}
[/sourcecode]

Eloquent ORM’s where function can make use of callbacks in this way. Please note how we used anonymous function as callback that also uses $fname and $lname from the arguments. That’s mainly it. I hope that you’ve enjoyed this article 🙂

Install and Run Symfony 2.3.6 projects in OpenShift instances in just one minute with this boilerplate repository

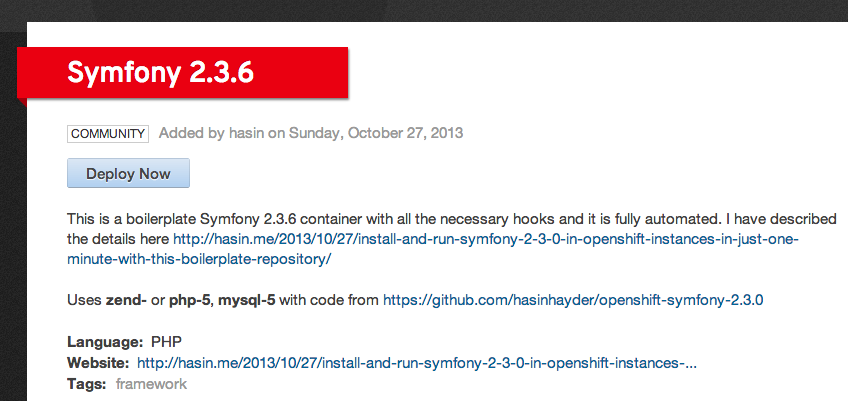
Okay, I have written an article 2 days ago where I went through every details. But today. I have created a blank symfony container with all the necessary deploy hook and mods so that you can get your symfony 2 project up and running in an openshift container within a minute, fully automated, seriously!

Github Repo: https://github.com/hasinhayder/openshift-symfony-2.3.0

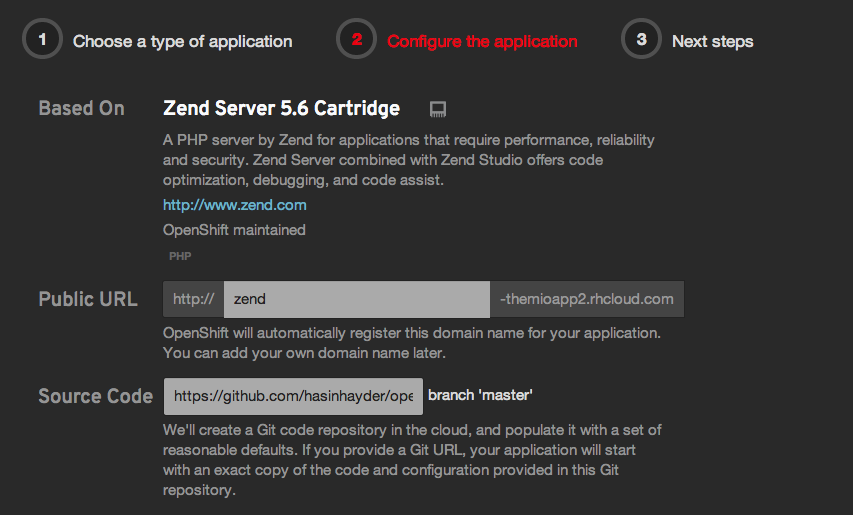
Just create a new ZendServer 5.6 or PHP 5.3 gear from your OpenShift control panel and while creating, supply this git repository’s checkout URL (https://github.com/hasinhayder/openshift-symfony-2.3.0) in the “Source Code” field. That’s it. And oh by the way, don’t forget to add a MySQL cartridge later in this gear. You don’t have to do anything else at all! The deploy script will take care of everything.

howtouseit

Here’s a quicktip just for the first time ssh login. You may not have to do it at all, but if by any chance you cannot connect to mysql database from app/console then all you need to do is clear the cache and you are done 🙂

[sourcecode language=”shell”]
cd $OPENSHIFT_REPO_DIR/php
php app/console clear:cache –env=dev
[/sourcecode]

Now Symfony can be installed in just one minute in your openshift instances. Enjoy!

By the way, if you are wondering how did I manage to load OpenShift MySQL credentials automatically in the container, then open the app/config/config.yml and you will notice that I have imported a new file named “params.php” from the same directory

[sourcecode language=”shell”]
# app/config/config.yml
imports:
– { resource: parameters.yml }
– { resource: security.yml }
– { resource: params.php }
[/sourcecode]

and in the app/config/params.php I have added these lines which injects the database parameters in the container with appropriate value

[sourcecode language=”php”]
<?php
# app/config/params.php
$container->setParameter(‘database_host’, getEnv("OPENSHIFT_MYSQL_DB_HOST"));
$container->setParameter(‘database_port’, getEnv("OPENSHIFT_MYSQL_DB_PORT"));
$container->setParameter(‘database_name’, getEnv("OPENSHIFT_APP_NAME"));
$container->setParameter(‘database_user’, getEnv("OPENSHIFT_MYSQL_DB_USERNAME"));
$container->setParameter(‘database_password’, getEnv("OPENSHIFT_MYSQL_DB_PASSWORD"));
?>
[/sourcecode]

Update: This repo is now a part of OpenShift Quickstarts and you can directly access and instantly deploy it from here https://www.openshift.com/quickstarts/symfony-236, as well as from PHP Section in your OpenShift app control panel

Screen Shot 2013-10-28 at 10.41.08 PM

Running Symfony 2 Applications in OpenShift

Openshift is a fantastic Polyglot PaaS from Redhat, and you can do a lot of things with these containers. The good news is that with free accounts, OpenShift gives three gears for free, forever. Today, in this article I will show you how to install and run your Symfony applications in OpenShift.

After you have created your free account in OpenShift, go to the applications page and create a new “Zend Server 5.6” application. You can choose “PHP 5.3” containers as well, but there are many benefits of choosing ZendServer.

Before we dive into the details, please MAKE SURE that you have added your public key in your openshift settings section. This is very important that you do this.

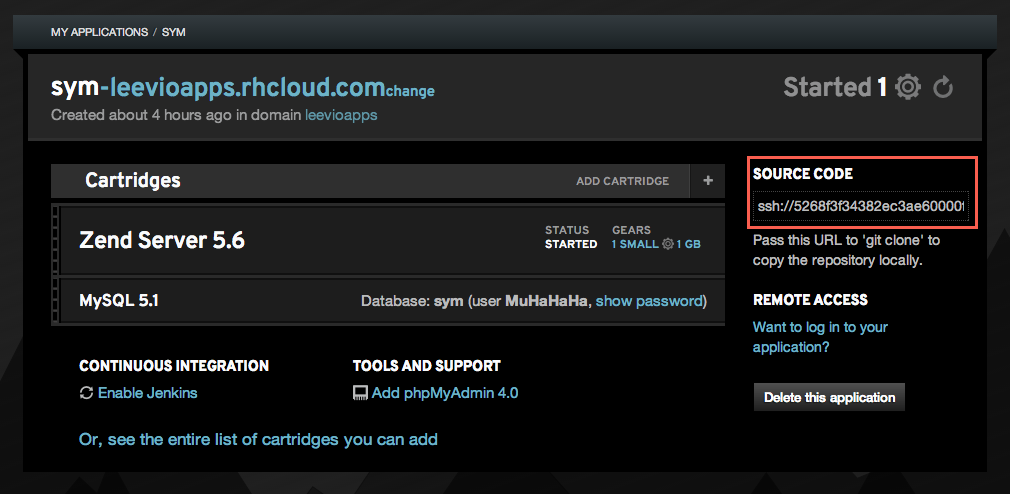
So after creating the new ZendServer 5.6 application and adding our public key in our OpenShift account, this is time to check out from our application’s git repository. OpenShift gives you a private git repository for every application and you can find the url in the right side of your application details.
Screen Shot 2013-10-24 at 8.15.05 PM

Now, follow these steps to check out this git repository and create a blank symfony application inside it’s php directory. You should have composer installed in your machine before this step.

[sourcecode language=”shell”]
git clone ssh://[email protected]/~/git/sym.git/
cd sym/php
rm -fr *.php
composer create-project symfony/framework-standard-edition ./
[/sourcecode]

After it runs, you have a blank symfony project installed inside this php directory. Now you need to add these files and commit in the git repository

[sourcecode language=”shell”]
git add -A
git commit -am "Blank Symfony Project"
git push
[/sourcecode]

OpenShift has an auto deployment feature which will deploy your application code after you push it in the git repo. It makes the deployment a lot easier for everyone.

Now you can visit your openshift container’s url but hey, why there is a blank screen? To find the answer of this question you need to open the .gitignore file. By default it’s content is like this

[sourcecode language=”shell”]
/web/bundles/
/app/bootstrap.php.cache
/app/config/parameters.yml
/app/cache/*
/app/logs/*
/vendor/
!app/cache/.gitkeep
!app/logs/.gitkeep
/build/
/bin/
/composer.phar
[/sourcecode]

Notice those lines “/app/config/parameters.yml” and “/vendor/”? These lines mean that parameters.yml file and everything in the vendor folder will be excluded from your commit. For now, just remove the line where it says about parameters.yml and keep the vendor line as is. So your final .gitignore file will look like this

[sourcecode language=”shell”]
/web/bundles/
/app/bootstrap.php.cache
/app/cache/*
/app/logs/*
/vendor/
!app/cache/.gitkeep
!app/logs/.gitkeep
/build/
/bin/
/composer.phar
[/sourcecode]

Now come to the root of your openshift repo and give this commands in the terminal

[sourcecode language=”shell”]
git add -A
git commit -am "Parameters.yml"
git push
[/sourcecode]

Now we need to setup the database details. To get those credentials, you need to log into your openshift gear. You can find the ssh login details in the right side of your app settings. In the following screenshot, you can get the mysql details (username and password) and ssh login details from the right side “Remote Access” section. Just click on the “Show Password” and “Want to login” links.
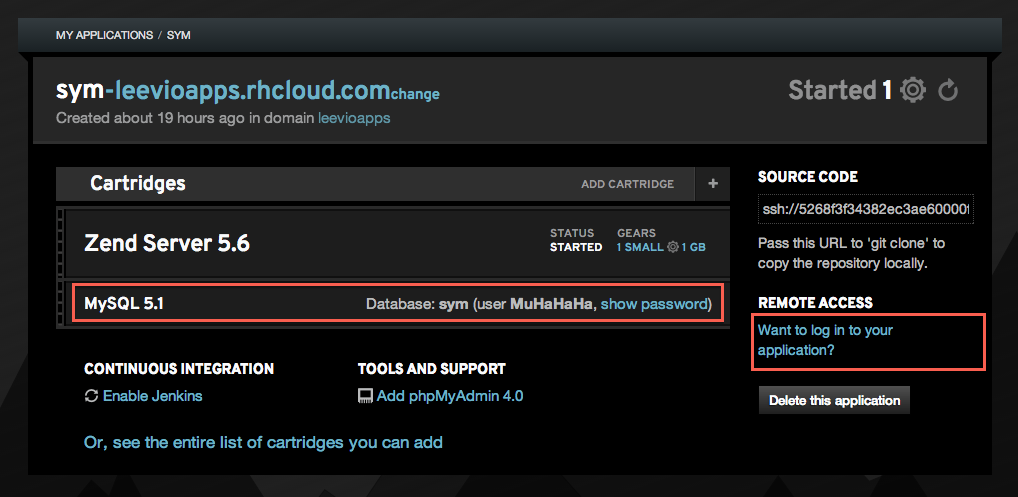
Screen Shot 2013-10-25 at 11.24.32 AM

After you get the Remote Access , log into your openshift gear from your terminal. Once you are logged in, type the following commands in the terminal.
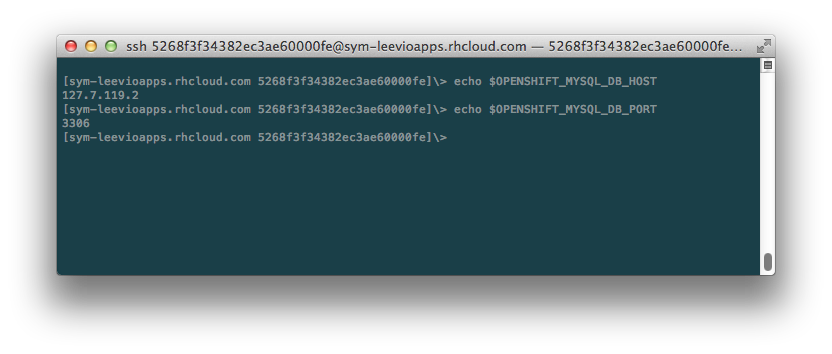
Screen Shot 2013-10-25 at 11.29.17 AM

Copy the values of mysql db host and port. Now we have all the data for our symfony app. Open your parameters.yml file and put all the essential data. For my one, it looks like this

[sourcecode language=”shell”]
parameters:
database_driver: pdo_mysql
database_host: 127.7.119.2
database_port: 3306
database_name: symfony
database_user: MuHaHaHa
database_password: "4s89-vh55G6q"
mailer_transport: smtp
mailer_host: 127.0.0.1
mailer_user: null
mailer_password: null
locale: en
secret: WhateverYouLikeTo
[/sourcecode]

Now commit this file and push

[sourcecode language=”shell”]
git commit -am "Parameters"
git push
[/sourcecode]

At this point, we need to write a deploy hook which will do the following things everytime you push your code.

  • It checks if composer is installed in our openshift gear. If not, it installs it
  • It then go to $OPENSHIFT_REOP_DIR/php folder and run composer install command
  • Then it gives write permission to app/cache and app/logs folder

Open your openshift repo, go to the .openshift folder, then go to the action_hooks folder and create a new file named deploy. Inside that file, put the following content

[sourcecode language=”shell”]
#!/bin/bash
# .openshift/action_hooks/deploy

export COMPOSER_HOME="$OPENSHIFT_DATA_DIR/.composer"

if [ ! -f "$OPENSHIFT_DATA_DIR/composer.phar" ]; then
curl -s https://getcomposer.org/installer | /usr/local/zend/bin/php — –install-dir=$OPENSHIFT_DATA_DIR
else
/usr/local/zend/bin/php $OPENSHIFT_DATA_DIR/composer.phar self-update
fi

unset GIT_DIR
cd $OPENSHIFT_REPO_DIR/php
/usr/local/zend/bin/php $OPENSHIFT_DATA_DIR/composer.phar install

chmod -R 0777 $OPENSHIFT_REPO_DIR/php/app/cache
chmod -R 0777 $OPENSHIFT_REPO_DIR/php/app/logs
[/sourcecode]

As a sidenote, if you are using regular PHP 5.3 containers instead of ZendServer 5.6, then replace “/usr/local/zend/bin/php” with “/usr/bin/php” in the deploy script above.

Save this file and give it executable permission by following command from your terminal

[sourcecode language=”shell”]
chmod +x deploy
[/sourcecode]

Now come to the root of your openshift repo and commit this deploy file. OpenShift supports different git hooks and you can check out https://www.openshift.com/developers/deploying-and-building-applications to know more about those.

[sourcecode language=”shell”]
git add -A
git commit -am "Deploy Hook"
git push
[/sourcecode]

You will notice some magical things happening at this point. After you push, you will notice in your terminal that composer is being installed in your openshift gear, and then it runs the composer install in appropriate directory.

Now visit your optnshift url (url/web/app_dev.php). Strange! now it is showing a strange error that we don’t have access to this app_dev.php. To fix this, open our app_dev.php (openshift repo/php/web/app_dev.php) and comment out line #12 to #18, I mean comment the following lines in your app_dev.php.

[sourcecode language=”php”]
//php/web/app_dev.php
if (isset($_SERVER[‘HTTP_CLIENT_IP’])
|| isset($_SERVER[‘HTTP_X_FORWARDED_FOR’])
|| !in_array(@$_SERVER[‘REMOTE_ADDR’], array(‘127.0.0.1’, ‘fe80::1’, ‘::1’))
) {
header(‘HTTP/1.0 403 Forbidden’);
exit(‘You are not allowed to access this file. Check ‘.basename(__FILE__).’ for more information.’);
}
[/sourcecode]

Sweet, now visit your openshift gear’s url (url/web/app_dev.php) and you can see that symfony is running smoothly :). But wait a minute – the URL contains the “web” part which looks ugly. All openshift PHP gear’s document root is set to $OPENSHIFT_REPO_DIR/php folder, which is in this case the root of our symfony application. But we don’t want this “web” in the URL. To do that, just create a .htaccess file in the “php” directory in our local openshift repo and put the following content

[sourcecode language=”shell”]
#php/.htaccess
RewriteEngine on
RewriteCond %{HTTP_HOST} ^your-openshift-domain$ [NC,OR]
RewriteCond %{REQUEST_URI} !web/
RewriteRule (.*) /web/$1 [L]
[/sourcecode]

And we are done, visit your openshift URL (url/app_dev.php) and it will working like a charm. So what if we want to set this app_dev.php as the default endpoint for our application? which means that we don’t even need to put “app-dev.php” in our url. To do that, open the .htaccess file from your “web” folder and replace all instance or “app.php” and “app\.php” to “app_dev.php” and “app_dev\.php” respectively. Then save your repo and make a git push and you are done! Tada!!!!

Hope you’ve enjoyed this long article. 🙂

Followup: I have automated the whole process and created a boilerplate Symfony 2.3.0 repository. Now you can get up and running in just one minute. Check out http://hasin.me/2013/10/27/install-and-run-symfony-2-3-0-in-openshift-instances-in-just-one-minute-with-this-boilerplate-repository/

Shameless Plug
Did you check our latest Onepage parallax portfolio template in Themeforest?
01_sonnet_preview.__large_preview

NeedForSpeed – Our First Facebook Application for Electronic Arts

I am a big fan of NeedForSpeed since version 2. You remember that? Those days were complete fun chasing with FZR2000 or McLaren F1. I specially liked to run on Hollywood track in NFS2SE.

Today, a new version of NFS (ProStreet) has been released. And we, a small developers team in Trippert Labs released the Facebook app named NeedForSpeed for this game . This is built using PHP and MySQL having MemCached as caching engine.

Lets have some Racing!

List of RSS Feeds I read almost everyday

I am sharing a list of RSS feeds that I read almost everyday. And which one is my favorites RSS reader? Well, I use GoogleReader because of it’s excellent features like star and feed history. also I like it’s feed sharing feature.

1. Ajaxian : http://www.ajaxian.com/index.xml
2. Cow’s Blog : http://cow.neondragon.net/xml.php
3. IBM Developer Works (Web) : http://www.ibm.com/developerworks/views/web/rss/libraryview.jsp
4. IBM Developer Works (Open Source) : http://www.ibm.com/developerworks/views/opensource/rss/libraryview.jsp
5. Designer Folio : http://feeds.feedburner.com/dezinerfolio
6. Digg Technology : http://digg.com/rss/containertechnology.xml
7. DZone Latest Front Page Links : http://www.dzone.com/feed/frontpage/rss.xml
8. Freelance Switch : http://feeds.feedburner.com/FreelanceSwitch
9. HacksZine : http://hackszine.com/index.xml
10. International PHP Magazine News : http://www.php-mag.net/magphpde/psecom,id,26,noeid,26,.html
11. JSLabs High Performance Web Apps : http://feeds.feedburner.com/jaslabs
12. LifeHack : http://www.lifehack.org/feed/
13. Mashable : http://feeds.feedburner.com/Mashable
14. Maxdesign : http://www.maxdesign.com.au/feed/
15. Newsvine (PHP) : http://www.newsvine.com/_feeds/rss2/tag?id=php&d=v
16. PHP Freaks : http://www.phpfreaks.com/feeds/articles.xml
17. PHP Magazine : http://www.phpmagazine.net/syndicate.xml
18. PHP Coding Practise: http://php-coding-practices.com/feed/
19. PHP Developer : http://phpdeveloper.org/phpdev.rdf
20. PHP Geek : http://www.phpgeek.com/wordpress/feed
21. PHP Architct News : http://www.phparch.com/phpa.rss
22. Planet Ajaxian : http://planet.ajaxian.com/index.xml
23. Planet PHP : http://planet-php.org/rdf/
24. Programmable Web : http://feeds.feedburner.com/ProgrammableWeb
25. ROScripts : http://feeds.feedburner.com/ArticlesAndProgrammingTutorials
26. Sitepoint Blogs : http://www.sitepoint.com/blogs/feed/
27. Sitepoint News : http://www.sitepoint.com/recent.rdf
28. Smashing Magazine : http://www.smashingmagazine.com/wp-rss.php
29. Jonathan Snooks Blog : http://snook.ca/jonathan/index.rdf
30. TechCrunch : http://feeds.feedburner.com/Techcrunch
31. Technorati Javascript Links : http://feeds.technorati.com/search/Javascript
32. Technorati PHP Links: http://feeds.technorati.com/search/PHP
33. Veerle’s Blog : http://feeds.feedburner.com/veerlesblog
34. Web2List : http://feeds.feedburner.com/Web2list
35. Zen Habits : http://feeds.feedburner.com/zenhabits
36. Del.icio.us PHP Tags : http://del.icio.us/rss/tag/php
37. PHPExperts Forum : http://rss.groups.yahoo.com/group/phpexperts/rss
38. 456 Berea Street : http://www.456bereastreet.com/feed.xml
39. Particle Tree : http://feeds.feedburner.com/particletree
40. Simple Bits : http://simplebits.com/xml/rss.xml

Using ActiveRecord Library Separately from CodeIgniter

CodeIgniters ActiveRecord library is a nice implementation (though modified) of ActiveRecord design pattern. It comes bundled with CodeIgniter. So if you want to use Just this library in your application individually instead of using full CodeIgniter framework, what to do?

Today I’ve spent some time and separate the ActiveRecord library from CodeIgniter. Now you can use it via a class named ActiveRecordFactory. Here’s how to do it (I separate only the MySQL driver) .

I separate the “database” folder under the “system” directory of CodeIgniter. Then I removed all folders in database/drivers except “mysql”. (I need only MySQL, :D)

I modified the class definition at database/drivers/mysql_driver.php
Previously It Was : class CI_DB_mysql_driver extends CI_DB {
Now : class CI_DB_mysql_driver {

I modified the class definition at database/DB_driver.php
Previously It Was : class CI_DB_driver {
Now : class CI_DB_driver extends CI_DB_mysql_driver {

And finally I create a ActiveRecord Factory to instantiate codeigniters Active Record Properly. Here is the code

File: database/ActiveRecordFactory.php


<?
/**
 * This is a Factory to create an instance of Code Igniters Active Record Class
 *
 * @author Hasin [http://hasin.wordpress.com]
 */

define(BASEPATH,"./");
include_once (
"drivers/mysql/mysql_driver.php");
include_once (
"DB_driver.php");
include_once (
"DB_active_rec.php");
include_once (
"DB_result.php");
include_once (
"drivers/mysql/mysql_result.php");

function log_message(){/*just suppress logging*/}

Class ActiveRecordFactory {
    private static 
$dsn;
    private static 
$CIAR;
    public static function 
Factory($dsn=null)
    {
        if (!empty(
$dsn)) self::$dsn $dsn;
        if (empty(
self::$CIAR))
        {
            if (!empty(
self::$dsn))
            
self::$CIAR = new CI_DB_active_record($dsn) ;
            else 
            throw new 
Exception("Please give a DSN in this format 'driver://username:password@hostname/database'");
        }
        return 
self::$CIAR;
    }
}
?>

Now You can test The ActiveRecord library like this

<?
include(“database/ActiveRecordFactory.php”);
$activerecord = ActiveRecordFactory::Factory(“mysql://user:password@localhost/test”);
$activerecord = ActiveRecordFactory::Factory();

$activerecord->select(“name”);
$activerecord->where(“id=”,”10″);
$activerecord->orwhere(“id=”,”19″);
print_r($activerecord->get(“users”)->result_array());

$activerecord->select(“name”);
$activerecord->where(“id=”,”10″);
$activerecord->orwhere(“id=”,”19″);
echo $activerecord->get(“users”)->num_rows();

$activerecord->insert(“users”,array(“name”=>”CodeIgniter”,”pass”=>”CI Rocks”));
?>

You can download the complete example from here http://hasin.javapark.net/ActiveRecord.zip

Prelude to foundation: Its time to go for a better PHP Framework

I remember those old days when I had to write everything by myself. I wrote huge libraries to work with MySQL. Then I learned PostgreSQL and SQLite but didn’t rewrote my old library to work with those, I was running short of time. So I forsake the opportunity to write a db library which works with them. What I did was plain code relevant to database specific portions. Oh ya, that was a long time ago.

Soon after that I came to know adoDB which made my dream come true. I was so much happy getting my all db specific works done in a much more smarter way. I get rid of database portability issues. I was very happy that time.

I learned smarty soon after I realize that my codes are getting ugly with all the inline HTMLs and PHPs. Nothing could be smarter than separating the presentation logic from the business layer. I am a big smarty fan since that time. It saves my sleep for many nights.

But again I am recurrently suffering from maintainability issues. I was not surprised to find that my code is becoming huge unmanageable giant and it takes huge time for refactoring the application. I was very sad those days. Oh what a disaster that was.

When working with my team members located remote places, I fall into a deep shit. How can we manage and track the changes done by us? Even I was getting strange code in my routine which I bet was not written by me!! It was a terrific job (more…)

Vulnerable bug in CodeIgniter which took us hours to fix our corrupted database

We use codeigniter internally to develop our web solutions in somewhere in… net limited. Day before yesterday we suffered a terrible situation for an internal bug in code igniter which corrupted data inside some tables of our application database and then it tooks hours to find the origin of that bug, to fix it and to repair the corrupted data. Let me explain what happened.

Lets guess that we have one table named “users” with the following field

1. user_id
2. username
3. password
4. email

At some point, if you want to update the password field of this table, for a particular user, what will you write in your code?


$data = array("password"=>$new_password);
$this->db->where("user_id",$user_id);
$this->db->update("users", $data);

CodeIgniter’s ActiveRecord creates the query like the following

UPDATE users set password='{$new_password}’ where user_id='{$user_id}’;

Well, it’s ok and the quesry seems pretty fine. Now what should happen if you pass a valid user id to this code? Password of only that user will be updated. But what will happen when the passed $user_id is null?? Thats the most pathetic part that Codeigniter ActiveRecord plays. Instead of generating the following query,

UPDATE users set password='{$new_password}’ where user_id=”;

CodeIgniter’s ORM actually generates the following

UPDATE users set password='{$new_password}’ where user_id;

You find the difference of the above two queries right? one contains “where user_id=” ” and another contains just “where user_id” . Now if your backend database is MySQL and this query executes? You know what the hell will happen? It will replace all the user’s password with this new password instead of failing as MySQL count the “where user_id” part equals to false and returns all users. But If your Database is PostgreSQL, it fails, you are lucky.

So day before yesterday we suffered this problem against our commercial application which corrupts our user profile data. We immediate fixed the issue from our backup db (well, we lost 3 data) and then we started to find out what actually went wrong and found this vulnerable bug in CI.

So we suggest the CodeIgniter team to fix the issue immediately and change their ORM code so that it creates the query like the following if the value of passed argument is null. because it will fail to execute in all db. Otherwise the fellow user’s of code igniter, prepare for the dooms day.

UPDATE users set password='{$new_password}’ where user_id=”;

Just PHP will give you nothing… unless you upgrade yourself

I have been working with PHP for more than 3yrs (I believe still I am beginner in this category) – I was present in several interview board. Which things disappointed me most is the “lack of eagerness” to learn what comes new. Sometime developers thinks that learning Only PHP will help them to get lucrative jobs!! OMG

Specially in BD most of the time PHP developers plays multiple roles in the companies, they are developer, they are template designers, they are HTML coders, they are DBA, they are PMs….what the heck. Only few companies have different people for these roles.

How far you can go just learning PHP (RAW code, in ancient style, that means PHP+HTML together, yak!!)? You have to have knowledge in CSS, JS, Frameworks, Multiple DBS

When it comes the question of CSS, you should maintain a list of websites where from you can get updates. Dont learn the CSS from book, but goto websites and see what is happening… If you are still using Tables to design (more…)