Category: jQuery

বোয়ার নিয়ে কথাবার্তা

bower

বোয়ার (Bower) হল ফ্রন্ট এন্ড ডেভেলপমেন্টের সময় যেসব জাভাস্ক্রিপ্ট ফাইল বা সিএসএস ফাইল লাগে সেগুলো ম্যানেজ করার জন্য টুইটার টিমের তৈরী করা একটা প্যাকেজ ম্যানেজার টুল। বোয়ার দিয়ে খুব সহজেই অ্যাপ্লিকেশনের জন্য প্রয়োজনীয় জেএস বা সিএসএস ফাইল অ্যাড/রিমুভ করা যায়, আপগ্রেড করা যায়। এই কাজের জন্য রয়েছে বোয়ারের বিশাল প্যাকেজ রিপোজিটরি যেখানে আপনি স্ক্রিপ্ট সার্চ করতে পারবেন খুব সহজেই। এই আর্টিকেলে আমরা দেখব কিভাবে বোয়ার ব্যবহার করতে হয় 🙂

বোয়ার ইনস্টল করা
বোয়ার ইনস্টল করার জন্য আমাদের কম্পিউটারে নোডজেএস এবং এনপিএম টুল ইনস্টল করা থাকতে হবে। নোড এবং এনপিএম ইনস্টল করার জন্য আপনারা http://nodejs.org/ থেকে ইনস্টলার টি ডাউনলোড করে চালান, একইসাথে নোড এবং এনপিএম ইনস্টল হয়ে যাবে

নোড এবং এনপিএম ঠিক মত ইনস্টল হয়েছে কিনা সেটা বোঝার জন্য আপনার কমান্ড লাইন/টার্মিনাল ওপেন করে কমান্ড দিন node -v এবং npm –v । একটু খেয়াল রাখবেন যে একটিতে -v এবং আরেকটি কমান্ডে –v ব্যবহার করা হয়েছে। । সবকিছু ঠিকঠাক থাকলে আপনারা টার্মিনালে নোড এবং এনপিএমের ভার্সন নাম্বার দেখতে পারবেন। আর কোন এরর পেলে আবার নোড অথবা এনপিএম ইনস্টল করুন অথবা ওদের সাইটে গিয়ে ট্রাবলশুটিং সেকশন দেখতে পারেন
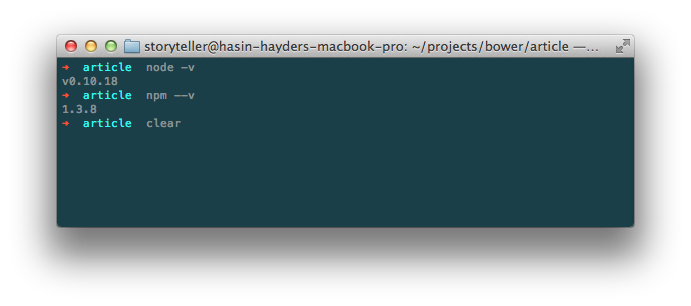
node-npm

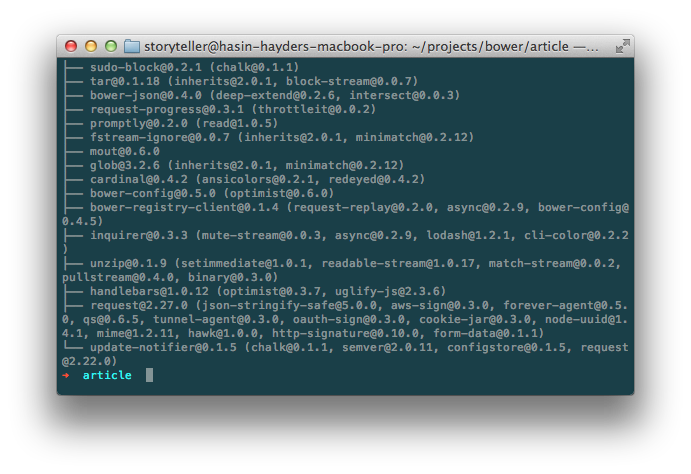
এবার বোয়ার ইনস্টল করার পালা, আর সেটা করার জন্য আপনার টার্মিনালে কমান্ড দিন npm install -g bower। কিছুক্ষনের মধ্যেই দেখতে পাবেন কনসোলে লেখা উঠেছে যে বোয়ার ইনস্টলেশন সাকসেসফুল হয়েছে। সহজ না?
bower-install

এবার চলুন দেখি কিভাবে আমরা বোয়ার ব্যবহার করব

বোয়ার ব্যবহার করা
প্রথমে টার্মিনাল ওপেন করে আপনার প্রজেক্ট ডিরেক্টরীতে প্রবেশ করুন, অথবা নতুন একটি ফোল্ডার তৈরী করে সেখানে প্রবেশ করুন। আমরা ধরে নিব আমাদের প্রজেক্টের জন্য নিচের তিনটি ফাইল লাগবে

  • জেকোয়েরী
  • ম্যাগনিফিক পপআপ
  • বুটস্ট্র‍্যাপ সিএসএস

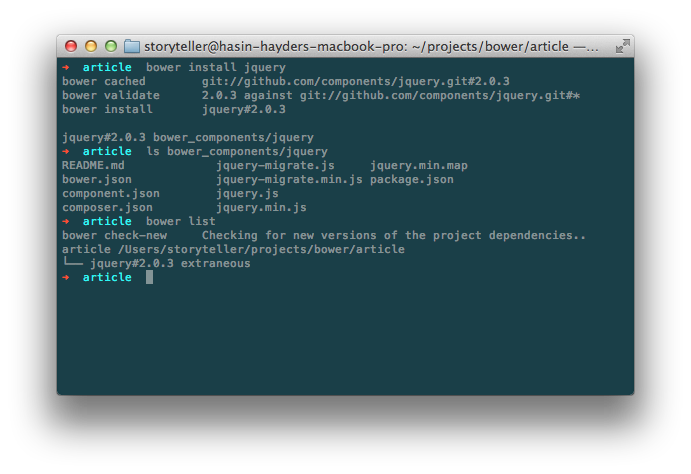
আমরা টার্মিনালে এসে প্রথমে জেকোয়েরী ইনস্টল করার জন্য কমান্ড দিব bower install jquery। কিছুক্ষনের মাঝেই বোয়ার আপনাকে জানিয়ে দেবে যে জেকোয়েরী ইনস্টল করা সফল হয়েছে। আপনি আপনার প্রজেক্ট ডিরেক্টরীতে দেখবেন bower_components নামে নতুন একটি ফোল্ডার তৈরী হয়েছে, যার মাঝে জেকোয়েরী নামের একটা ফোল্ডারে jquery.js রয়েছে।

এছাড়াও আপনি bower list কমান্ড দিলে দেখবেন বোয়ার খুব সুন্দর করে ইনস্টল করা স্ক্রিপ্ট এবং তাদের ভার্সন নম্বর দেখিয়ে দেবে।
bower-jquery

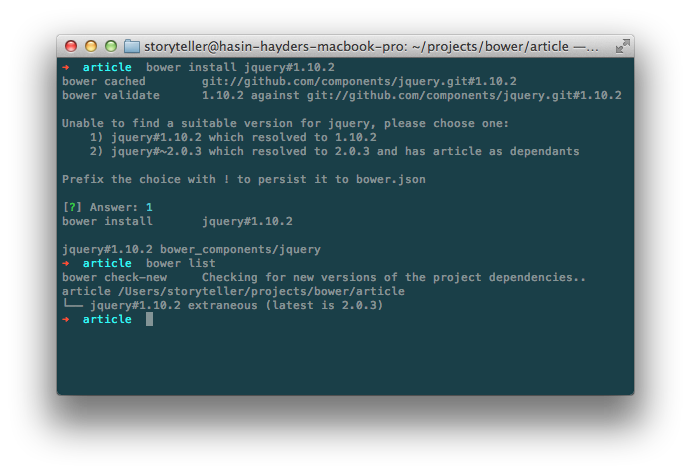
খেয়াল করলে দেখবেন যে বোয়ার ডিফল্ট ভাবে প্যাকেজের বর্তমান ভার্সন ইনস্টল করেছে। কিন্তু আপনার যদি অন্য কোন ভার্সন দরকার হয় তাহলে কি করবেন? ধরুন আপনের দরকার জেকোয়েরীর ১.১০.২ ভার্সন। বোয়ারে যেকোন প্যাকেজ ইনস্টল করে দেয়ার সময় তার ভার্সন নম্বরও উল্লেখ করে দেয়া যায়। যেমন এই ক্ষেত্রে আমরা টার্মিনালে কমান্ড দেব bower install jquery#1.10.2, তাহলে বোয়ার তার ইন্টারঅ্যাকটিভ প্রম্পটের মাধ্যমে গাইড করবে ১.১০.২ ভার্সন ইনস্টল করে নেয়ার জন্য। নিচের স্ক্রিনশটটি দেখলে এটা আরও পরিষ্কার হতে পারে
bower-jquery-1.10.2

বোয়ারে প্যাকেজ সার্চ করা
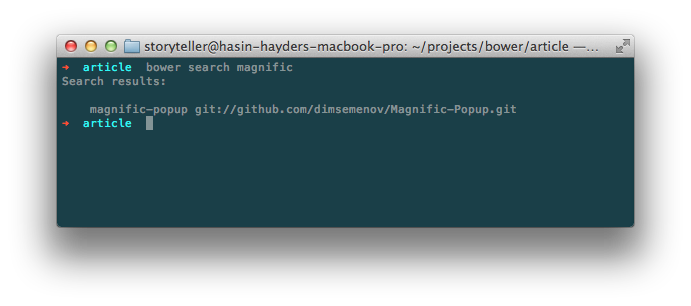
কোন প্যাকেজ বা স্ক্রিপ্ট বোয়ারের রিপোজিটরীতে আছে কিনা সেটা জানতে হলে bower search কমান্ড দিলেই বোয়ার সেই প্যাকেজের বিষয়ে বিস্তারিত তথ্য দেখাবে। যেমন আমরা যদি magnigic popup জাভাস্ক্রিপ্ট প্যাকেজ ইনস্টল করার আগে চেক করে নিতে চাই যে এই নামে আসলেই কোন প্যাকেজ আছে কিনা তাহলে আমরা টার্মিনালে কমান্ড দিব bower search magnific
bower-magnific

বোয়ার দেখাচ্ছে যে magnific-popup নামে একটা প্যাকেজ আছে। সেটা ইনস্টল করতে হলে আমরা আগের মতই কমান্ড দিব bower install magnific-popup। ঠিক মত ইনস্টল হয়েছে কিনা সেটা চেক করার জন্য আমরা bower_components ফোল্ডারে দেখতে পারি অথবা bower list কমান্ড দিয়ে দেখতে পারি ।

প্যাকেজ আনইনস্টল করা
বোয়ারের মাধ্যমে কোন প্যাকেজ আনইনস্টল করা খুবই সহজ। শুধু install এর বদলে uninstall কমান্ড দিন, ব্যাস হয়ে গেল।

প্যাকেজ লিস্ট সংরক্ষন করা
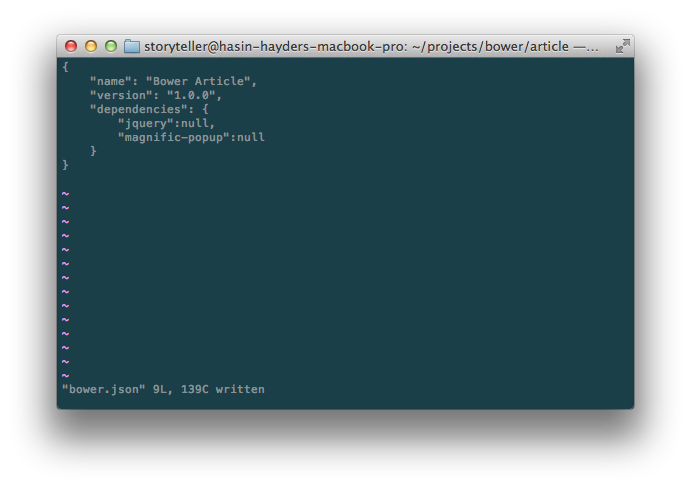
এইযে আমরা এইসব প্যাকেজ ইনস্টল করলাম, এগুলো আমরা একটা লিস্ট হিসেবে সংরক্ষন করতে পারি যাতে পরবর্তীতে আপডেট করতে হলে বা ইনস্টল করতে হলে এক এক করে করতে না হয়। এজন্য অ্যাপ্লিকেশনের কারেন্ট ডিরেক্টরীতে (যেখান থেকে আমরা bower কমান্ড চালাব) একটি ফাইল তৈরী করি bower.json নামে। যেকোন টেক্সট এডিটর দিয়ে এই ফাইল এডিট করা যাবে (তবে ওয়ার্ড প্রসেসর দিয়ে নয়)। যেমন আমাদের আজকের প্রজেক্টের জন্য আমরা নিচের মত করে bower.json ফাইল লিখব, যেখানে dependencies সেকশনে আমাদের যাবতীয় প্যাকেজের লিস্ট লিখে রাখা হবে
bower-json

বোঝার সুবিধার্থে আমি এখানে আবার লিখে দিলাম
[sourcecode language=”javascript”]
{
"name": "Bower Article",
"version": "1.0.0",
"dependencies": {
"jquery":null,
"magnific-popup":null
}
}
[/sourcecode]

এরপর থেকে আমরা অ্যাপ্লিকেশন ডিরেক্টরীতে এই bower.json ফাইল কপি করে কমান্ড দিব bower install। ব্যাস তাহলেই বোয়ার এই bower.json ফাইল থেকে ডিপেন্ডেন্সী লিস্ট পরে এক এক করে সেগুলো ইনস্টল করে ফেলবে

আমরা যদি কোন প্যাকেজের কোন পার্টিকুলার ভার্সন ইনস্টল করতে চাই তাহলে null এর বদলে সেই ভার্সন নম্বর লিখে দিব, আর লেটেস্ট ভার্সন চাইলে null লিখব। যেমন যদি আমরা জেকোয়েরীর ১.১০.১ ভার্সন চাই তাহলে আমাদের bower.json ফাইল হবে নিচের মত

[sourcecode language=”javascript”]
{
"name": "Bower Article",
"version": "1.0.0",
"dependencies": {
"jquery":"1.10.1",
"magnific-popup":null
}
}
[/sourcecode]
এরপর আমরা অ্যাপ্লিকেশন ডিরেক্টরীতে কমান্ড দিব bower install, ব্যাস!

প্যাকেজ লিস্টে নতুন প্যাকেজ বা ডিপেন্ডেন্সী যোগ করা
আমরা তো ইতোমধ্যেই bower.json ফাইলে দুইটি প্যাকেজ যোগ করেছি। এখন আমরা চাই নতুন একটি প্যাকেজ bootstrap ইনস্টল করতে। সেক্ষেত্রে আমরা দুই ভাবে করতে পারি

১. আমরা ম্যানুয়ালী bower.json ফাইল এডিট করে bootstrap কে একটা নতুন ডিপেন্ডেন্সী হিসেবে যোগ করে, সেই bower.json ফাইল সেভ করে টার্মিনালে কমান্ড দিতে পারি bower install। আমরা দেখব যে বোয়ার স্বয়ংক্রীয় ভাবে bootstrap ইনস্টল করে ফেলছে

অথবা

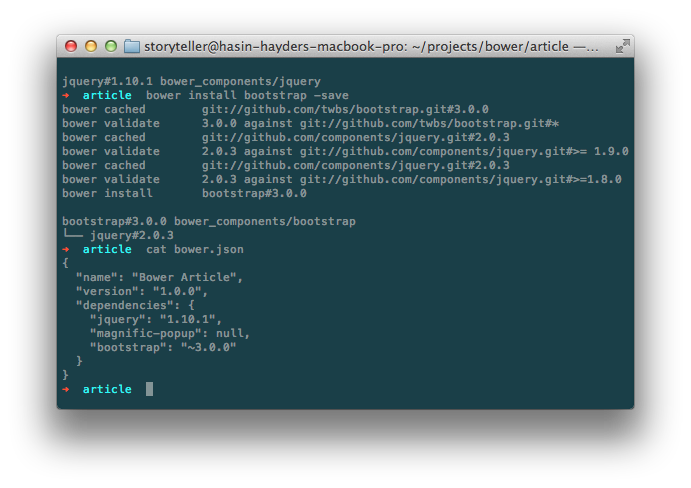
২. আমরা bower.json ফাইল ম্যানুয়ালী এডিট না করে বরং টার্মিনালে সরাসরি কমান্ড দিতে পারি bower install bootstrap -save । খেয়াল করুন এখানে একটা অতিরিক্ত প্যারামিটার/স্যুইচ যোগ করা হয়েছে -save নামে। এর ফলে বোয়ার দুইটি কাজ করবে। প্রথমত বোয়ার bootstrap ইনস্টল করবে, দ্বিতীয়ত বোয়ার নিজেই bower.json ফাইল এডিট করে bootstrap কে ডিপেন্ডেন্সী সেক্শনে যোগ করে ফেলবে। আমরা bower install bootstrap -save এই কমান্ড দেয়ার পর bower.json ফাইল চেক করলে দেখব এটা নিচের মত কনটেন্ট দেখাচ্ছে 🙂
bower-auto-update

বোয়ার কম্পোনেন্ট নিজের পছন্দমত ডিরেক্টরীতে ইনস্টল করা
আমরা এতক্ষন দেখেছি যে বোয়ার ডিফল্টভাবে bower_components নামের ডিরেক্টরীতে সব স্ক্রিপ্ট ইনস্টল করছে। কিন্তু আমরা যদি চাই যে আমাদের সব ইনস্টল করা স্ক্রিপ্ট গুলো bower_components এর বদলে “scripts/vendor” ডিরেক্টরীতে ইনস্টল হবে, তাহলে অ্যাপ্লিকেশন ডিরেক্টরীতে নিচের মত করে .bowerrc ফাইল তৈরী করুন (খেয়াল রাখবেন নামের শুরুতে একটি . রয়েছে)। সেই .bowerrc ফাইলে নিচের মত করে নিজের পছন্দের ডিরেক্টরী উল্লেখ করে দিন
[sourcecode language=”javascript”]
{
"directory":"scripts/vendor/"
}
[/sourcecode]
এরপর আমরা অ্যাপ্লিকেশন ডিরেক্টরীতে কমান্ড দিব bower install, ব্যাস! বোয়ার নিজেই scripts/vendor ফোল্ডার তৈরী (আগে থেকে তৈরী করা না থাকলে) করে তার ভেতরে সব স্ক্রিপ্ট ইনস্টল করে ফেলবে

উপসংহার
অ্যাপ্লিকেশনে স্মার্ট ভাবে প্যাকেজ ম্যানেজ করতে বোয়ারের জুড়ি নেই। সময় বাঁচানোর জন্য এইসব টুল তৈরী হচ্ছে দিন কে দিন, এবং স্মার্ট ডেভেলপাররা সেগুলো ব্যবহার করে নিজেদের সময় যেমন বাঁচাচ্ছে পাশাপাশি তাদের প্রজেক্ট ম্যানেজমেন্ট করছে অত্যন্ত সহজভাবে। আগে বোয়ার ব্যবহার করে না থাকলে আজকে থেকেই শুরু করে দিন 🙂

এর পরের আর্টিকেলে আমরা দেখব কিভাবে আমরা রিকোয়ারজেএস (ReuireJS) ব্যবহার করে আমাদের অ্যাপ্লিকেশনে স্বয়ংক্রীয়ভাবে আমাদের জাভাস্ক্রিপ্ট ফাইল লোড করতে পারি, এবং সেখনেও বোয়ার আমাদের কিভাবে সাহায্য করে।

এই সিরিজের সব শেষের আর্টিকেলে আমরা দেখব টাস্ক ম্যানেজার গ্রান্টের (Grunt) ব্যবহার যার মাধ্যমে আমরা আমাদের অ্যাপ্লিকেশনের যাবতীয় কাজ অটোমেট করে আরও স্মার্টভাবে ডেভেলপ করতে পারব।
Getting comfy with PhpStorm – one of the best IDEs so far!

Beside the frequently asked question “Which Framework is best?” this one is the top in category – “Which one is the best IDE”. People asks this question in morning, afternoon and evening. Every-time, everywhere. I am a big time fan of Netbeans and I left it a few days after it’s release of 6.7. It was so good, heavenly, yummy but I had to leave this old pal because of it’s extreme hunger to the available resources. There was only one thing that time which could compete with the resource hungry netbeans – that is FireFox. But hey, FF is not your IDE after all. Anyway, back to my point – I left Netbeans and started using PhpStorm. I have a company license and I am glad that I made this move. I am not going to preach PhpStorm in rest of this article, but what I will do is sharing my experience with PhpStorm 🙂

1. PhpStorm is fast: Not like a Bugatti Veyron beside your old 4 wheelers, but it’s fast. I was told that 64 bit version is even faster but that was not true in my macbook pro running snow leopard. rather I found that 64 bit version is slightly sluggish and more resource extensive. Whatever, when you make a jump from Netbeans to PhpStorm, you will really feel the speed of everything and if you keep an eye over your system memory, you will surely say “wow!”.

2. The best Javascript and X/HTML Intellisense: I am a javascript developer for almost 8 years by now. I have tried eclipse, some standalone components which could also run as eclipse plugin and Aptana. Aptana was good – I was using aptana mostly because of it’s auto-completion capability of javascript. But I really HATE eclipse. Why? – I will write a separate blog post on that. Now Netbeans has some capability of intellisense for Javascript but when it comes to jQuery (remember, I left NB at it’s 6.7th release) it was frustrating. PhpStorm really is beautiful for this. Just amazing! The format, the auto suggestion, the code completion everything works just perfect. This is one of the main reason why I am sticking with PhpStorm

3. Version Controlling: Ya ya I know, NB got that too. I am not a Netbeans hater, rather I love it. I love how amazingly it changed my world of coding by charging me nothing – zip, zilch nada! So it is merely a selling point for making a move from NB to PhpStorm – but the thing is, support for different VCS in PhpStorm is as good as like the other parts of it. It has fantastic support for Git and Svn, beautiful tools for merging and fixing the conflicts, refactoring and what not. I was feeling at home and to be honest, migrating from NB to PhpStorm didnt feel like I came to the land of aliens just for this. Without integrated support for VCS it would be impossible for me to stay with PhpStorm.

4. Less hungry: Though Steve Jobs said to stay hungry and foolish but please note that he said it only for humans, not to IDEs :P, lol! Ok, so PhpStorm is less hungry to CPU and Memory than NB. I just wish Firefox will be a performer like this one day 🙂 (different story again, sorry I am distracted with too many things at once)

5. Less Costly and a Friendly company: Phpstorm is a developer friendly company. I am using the licensed copy of Zend Studio since 2005 (I got that for free because of being a ZCE and because of winnign some competitions over time) but heck! Zend Studio is costly. That’s fine, Zend Studio is the PHP company and knows inside out of making a PHP IDE. But trust me, PhpStorm is not an alien thing at all – you will not feel “vim” with this excellent tool. PhpStorm can help you code PHP, HTML, CSS and JS with maximum comfort. Yet, it costs much less than other similar IDEs with similar feature set. And what did I mean by “Developer Friendly”? PhpStorm team listens to you. Most of the time you mail them for a discount, they give you some sort of discount without expecting anything from you (I love you, PhpStorm team for this). Even Elite in the class Zend Studio gives some discount some time. But try the same with Elite of the Elites like Coda. They wont take their time to say “Go, fuck yourself!” – I hate Coda, seriously! So rude!

Anyway – that’s a long story. I am very happy with PhpStorm and has recently upgraded my IDE from 2.x to 3.x with their one year full update support (even with major versions :D, Zend you should really think about that with Zend Studio) and living happily ever after. Love you PhpStorm, I really do!.

Get your 30 days trial version of PhpStorm from http://www.jetbrains.com/phpstorm and feel a whole different level of satisfaction 🙂 And surely, dont forget to check NetBeans too, that’s a beautiful piece of tool.

jQuery Mouse Direction Plugin

jQuery provides support for standard JS mouse events as well as some custom ones. In jQuery it’s easy to capture whether mouse point has entered in the boundary of an object or left from (mouseenter, mouseleave) or something else happened (like click, dblclick etc). But you are in trouble if you need to capture the direction of your mouse. And it would be fantastic if there was a plugin which can fire custom mouse-direction event on any elements which you can then listen to and bind a listener routine.

I wrote this small plugin (jQuery MouseDirection Plugin) this afternoon to trigger eight custom event for any visible element in the DOM structure. Here is the source code. This plugin registers eight custom directional event like up,down,left,right,top-left,top-right,bottom-left, bottom-right and one more generic event called “mousedirection” where you can capture the direction of the mouse using event object’s “direction” parameters (like event.direction)

[sourcecode language=”javascript”]
/**
* jQuery Mouse Direction Plugin
* @version: 1.1
* @author Hasin Hayder [[email protected] | http://hasin.me]
*/
(function ($) {
var options = {};
var oldx = 0;
var oldy = 0;
var direction="";
$.mousedirection = function (opts) {
var defaults = {
};
options = $.extend(defaults, opts);
$(document).bind("mousemove", function (e) {
var activeElement = e.target || e.srcElement;
if (e.pageX > oldx && e.pageY > oldy) {
direction="bottom-right";
}
else if (e.pageX > oldx && e.pageY < oldy) {
direction="top-right";
}
else if (e.pageX < oldx && e.pageY < oldy) {
direction="top-left";
}
else if (e.pageX < oldx && e.pageY > oldy) {
direction="bottom-left";
}
else if (e.pageX > oldx && e.pageY == oldy) {
direction="right";
}
else if (e.pageX == oldx && e.pageY > oldy) {
direction="down";
}
else if (e.pageX == oldx && e.pageY < oldy) {
direction="up";
}
else if (e.pageX < oldx && e.pageY == oldy) {
direction="left";
}
$(activeElement).trigger(direction);
$(activeElement).trigger({type:"mousedirection",direction:direction});
oldx=e.pageX;
oldy=e.pageY;
});
}
})(jQuery)
[/sourcecode]

An here is how you can use it

[sourcecode language=”html”]
<head>
<title>jQuery Mouse Direction Plugin Demo</title>
<meta http-equiv="Content-Type" content="text/html; charset=utf-8"/>
<script src="http://code.jquery.com/jquery-latest.js" type="text/javascript" charset="utf-8"></script>
<script src="jquery.mousedirection.js" type="text/javascript" charset="utf-8"></script>
<style type="text/css">
.container {
height: 150px;
margin: 20px;
padding: 20px;
width: 300px;
border: 1px solid #888;
}
</style>
<body>
<div class="container">
Move your mouse over this box
</div>
<script type=’text/javascript’>
$(function () {
$.mousedirection();
$(".container").bind("mousedirection", function (e) {
$(this).html("Mouse Direction: <b>"+e.direction+"</b>");
});
});
</script>
</body>
[/sourcecode]

To save from the overwork of running a check whether the mouse has entered on the supplied DOM elements (via selectors) I have located the active element under the mouse pointer and triggered the event only on that object – this was a huge performance boost 🙂

Download the complete plugin with the example.html from the link below

Download jQuery Mouse Direction Plugin

🙂 Enjoy!

Working with Facebook events using Graph API, JS-SDK and PHP-SDK – part 1

Graph API from Facebook is a very interesting project based on open graph protocol. Facebook is gradually setting Graph API as the standard and deprecating the use of their old REST based APIs. To start working with Graph API doesnt need an extensive knowledge on how Facebook API works but its always good to have a sound knowledge on that. Graph API uses oAuth based authentication mechanism and using the auth token, they can identify who is making the API calls. I have been working on Facebook events using Graph API for last couple of days and I will be sharing my experience in this series of two or three posts where I am going to cover the following topics

1. Authenticating a user
2. How to create a Facebook Event with picture
3. How to post on Events Wall
4. How to manage users
5. How PHP SDK can be a life saver in some cases 🙂

Authenticating a user
Its very important that you know how to authenticate an user against Facebook and ask for appropriate permissions to be granted. To work with public events in Facebook, you need to ask for “create_event” permission from your visitors. Otherwise, in case of private events, you need to be granted permission for “user_events” and “friend_events”. For now, lets consider that we will be creating public events and we will ask for only “create_event” permission.

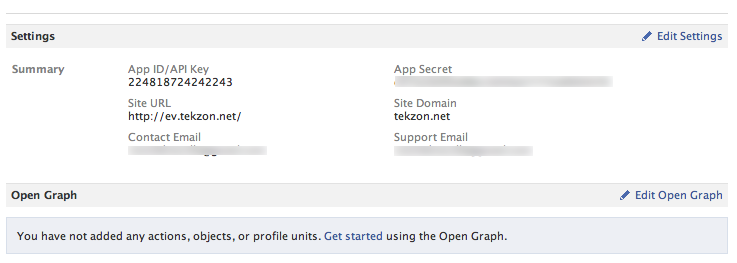
Lets create a new application in Facebook which will point to our working url. The following screenshot will show you which informations are necessary to create such an app. Once you are done, save the API_KEY/APP_ID and SECRET_KEY safe in somewhere for later use.

Facebook App Properties

Now you are done with creating a Facebook app, its time to code 🙂 The following codeblock will prompt any visitor to log in with Facebook and grant the application some permissions. We are using our JS-SDK. We are also saving the auth token. You will soon find out why that would be necessary.

[sourcecode language=”javascript”]
<!html>
<head>
<title>My Facebook Event App</title>
<script src=’http://ajax.googleapis.com/ajax/libs/jquery/1.6.4/jquery.min.js’></script>
</head>
<body>
Welcome to our New Facebook App <span id=’fbinfo’><fb:name uid=’loggedinuser’ useyou=’false’></fb:name></span>
<div id=’fb-root’></div>
<script type="text/javascript" src="http://connect.facebook.net/en_US/all.js"></script>
<script type=’text/javascript’>

var fbuserid, fbtoken;
var appid = "224818724242243";
var loggedin = false;
$(document).ready(function() {
//loginFB();
});

FB.init({appId: appid, status: true, cookie: true, xfbml: true});
FB.Event.subscribe(‘auth.sessionChange’, function(response) {
if (response.session) {
var session = FB.getSession();
fbtoken = session.access_token;
fbuserid = session.uid;
}
});

FB.getLoginStatus(function(response) {
if (response.session) {
var session = FB.getSession();
fbtoken = session.access_token;
fbuserid = session.uid;
}
else{
loginFB();
}
});

function loginFB() {
FB.login(function(response) {
if (response.session) {
var session = FB.getSession();
fbtoken = session.access_token;
fbuserid = session.uid;
}
}, {perms:’create_event’});
}

function logoutFB() {
FB.logout(function(response) {
// user is now logged out
});
}

</script>
</body>
</html>
[/sourcecode]

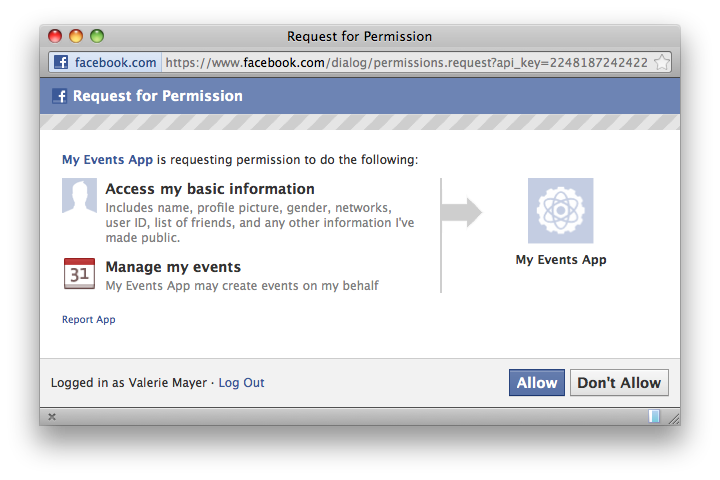
Now when you visit your application url, for example http://ev.tekzon.net in our case, you will be prompted an authentication windows like this

Authentication Dialog

So now users are successfully authenticated to our new Facebook application, lets move to the next part

Creating a Facebook event using JS-SDK
To create a Facebook event, we need to pass the following parameters to “/me/events” graph url.

  • name: Name of the event
  • start_time: Start time of the event in UNIX timestamp format, or in “mm/dd/yyyy H:i” format 🙂
  • end_time: End time of the event in UNIX timestamp format, or in “mm/dd/yyyy H:i” format 🙂
  • location: Location of the event, as a string
  • description: Description of the event
  • picture: Profile picture for the event, we can not use that with JS SDK.
  • privacy: either “OPEN” or “PRIVATE”, we will use “OPEN” in this example

So, here is a Javascript function which can create this event. In the following codeblock you will find a wrapper javasript function “createEvent()” to create this event and an example function to use that createEvent() function

[sourcecode language=”javascript”]
function createEvent(name, startTime, endTime, location, description) {
var eventData = {
"access_token": fbtoken,
"start_time" : startTime,
"end_time":endTime,
"location" : location,
"name" : name,
"description":description,
"privacy":"OPEN"
}
FB.api("/me/events",’post’,eventData,function(response){
if(response.id){
alert("We have successfully created a Facebook event with ID: "+response.id);
}
})
}

function createMyEvent(){
var name = "My Amazing Event";
var startTime = "10/29/2011 12:00 PM";
var endTime = "10/29/2011 06:00 PM";
var location = "Dhaka";
var description = "It will be freaking awesome";
createEvent(name, startTime,endTime, location, description);
}
[/sourcecode]

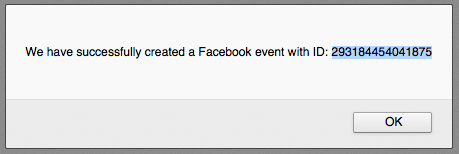
Now once you invoke this “createMyEvent()” function, it will show you the event id of your newly created event, if successful. Lets see how that would look like.

Successfully created a new event

Ok, we can see that the event id of our newly created event is “253320941378247” – we can check it out in Facebook by going to http://facebook.com/events/253320941378247 – Meanwhile we can also check this same event using open graph protocol by going to http://graph.facebook.com/253320941378247

Ok, so now we know how to create a Facebook Event using JS-SDK and Graph API. But there is a major problem in creating a Faceboko event using JS-SDK and that is, you cannot attach any Profile Picture with this event. And you have to use a server side SDK (we will be using PHP-SDK in the following example) to do that. Lets see how can we create a Facebook event with a profile picture.

Creating a Facebook event with Profile Picture
We need to post the event parameters (use Ajax) to our server side script. Lets assume that the image file we are planning to use as the Profile Picture for our Facebook event resides in “/path/to/my/image.jpg”.

Here is a very important information for you and that is such an image’s minimum width MUST BE 100px – There is no documentation on that, and apparently I had to waste almost 4 hours to find what is the problem with my code. I just wish Facebook API documentation were better mentioning such things which may lead developers to waste huge time.

Ok, in the following codeblock, we will be using a new javascript function “createMyEventWithPHP()” which will post the event data to our server side php script event.php – Before that, download the PHP-SDK of Facebook from http://github.com/facebook/php-sdk, unzip and place in the same path where you are keeping this “events.php”

[sourcecode language=”javascript”]
function createEventWithPHP(name, startTime, endTime, location, description) {
var eventData = {
"access_token": fbtoken,
"start_time" : startTime,
"end_time":endTime,
"location" : location,
"name" : name,
"description":description,
"privacy":"OPEN"
}
$.post("/events.php",eventData,function(response){
if(response){
alert("We have successfully created a Facebook event with ID: "+response);
}
})
}
[/sourcecode]

And here is the source code of our events.php

[sourcecode language=”php”]
<?php
include_once("facebook-php-sdk/src/facebook.php");

define("FACEBOOOK_API_KEY","224818724242243");
define("FACEBOOK_SECRET_KEY","d57acde94xxxxc3d50a2x2yya9004476");

$name = $_POST[‘name’];
$token = $_POST[‘access_token’];
$startTime = $_POST[‘start_time’];
$endTime = $_POST[‘end_time’];
$location = $_POST[‘location’];
$description = $_POST[‘description’];

$fileName = "./me2.jpg"; //profile picture of the event

$fb = new Facebook(array(
‘appId’ => FACEBOOOK_API_KEY,
‘secret’ => FACEBOOK_SECRET_KEY,
‘cookie’ => false,
‘fileUpload’ => true // this is important !
));

$fb->setAccessToken($token);

$data = array("name"=>$name,
"access_token"=>$token,
"start_time"=>$startTime,
"end_time"=>$endTime,
"location"=>$location,
"description"=>$description,
basename($fileName) => ‘@’.$fileName
);
try{
$result = $fb->api("/me/events","post",$data);
$facebookEventId = $result[‘id’];
echo $facebookEventId;
}catch( Exception $e){
echo "0";
}
?>
[/sourcecode]

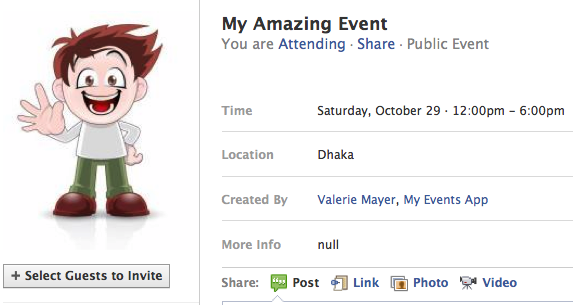
When we will invoke createEventWithPHP() javascript function, it will post all the event data to our PHP script. Then PHP script will create that event with Facebook PHP-SDK and print the newly created event id. Say for example, this newly created event id is 129312137169841, so we can go to http://facebook.com/events/129312137169841 and see how it looks with the profile picture

Facebook event with profile picture

So thats for today, folks. I will be coming back with more of Facebook Events and Graph API in my next part. Stay Tuned.

Shameless Promotion 🙂 : By the way, if you are looking for a beautiful Admin Panel Theme for your PHP based projects/web-applications, you may want to check out Chameleon Circuit, which is developed by our Themio Team 🙂

Chameleon Circuit - Full Featured Admin Theme from Themio