Category: Javascript

বোয়ার নিয়ে কথাবার্তা

bower

বোয়ার (Bower) হল ফ্রন্ট এন্ড ডেভেলপমেন্টের সময় যেসব জাভাস্ক্রিপ্ট ফাইল বা সিএসএস ফাইল লাগে সেগুলো ম্যানেজ করার জন্য টুইটার টিমের তৈরী করা একটা প্যাকেজ ম্যানেজার টুল। বোয়ার দিয়ে খুব সহজেই অ্যাপ্লিকেশনের জন্য প্রয়োজনীয় জেএস বা সিএসএস ফাইল অ্যাড/রিমুভ করা যায়, আপগ্রেড করা যায়। এই কাজের জন্য রয়েছে বোয়ারের বিশাল প্যাকেজ রিপোজিটরি যেখানে আপনি স্ক্রিপ্ট সার্চ করতে পারবেন খুব সহজেই। এই আর্টিকেলে আমরা দেখব কিভাবে বোয়ার ব্যবহার করতে হয় 🙂

বোয়ার ইনস্টল করা
বোয়ার ইনস্টল করার জন্য আমাদের কম্পিউটারে নোডজেএস এবং এনপিএম টুল ইনস্টল করা থাকতে হবে। নোড এবং এনপিএম ইনস্টল করার জন্য আপনারা http://nodejs.org/ থেকে ইনস্টলার টি ডাউনলোড করে চালান, একইসাথে নোড এবং এনপিএম ইনস্টল হয়ে যাবে

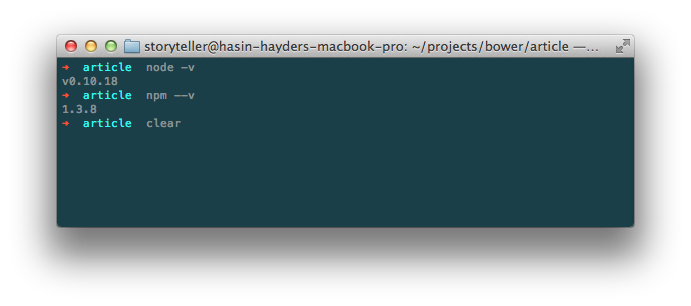
নোড এবং এনপিএম ঠিক মত ইনস্টল হয়েছে কিনা সেটা বোঝার জন্য আপনার কমান্ড লাইন/টার্মিনাল ওপেন করে কমান্ড দিন node -v এবং npm –v । একটু খেয়াল রাখবেন যে একটিতে -v এবং আরেকটি কমান্ডে –v ব্যবহার করা হয়েছে। । সবকিছু ঠিকঠাক থাকলে আপনারা টার্মিনালে নোড এবং এনপিএমের ভার্সন নাম্বার দেখতে পারবেন। আর কোন এরর পেলে আবার নোড অথবা এনপিএম ইনস্টল করুন অথবা ওদের সাইটে গিয়ে ট্রাবলশুটিং সেকশন দেখতে পারেন
node-npm

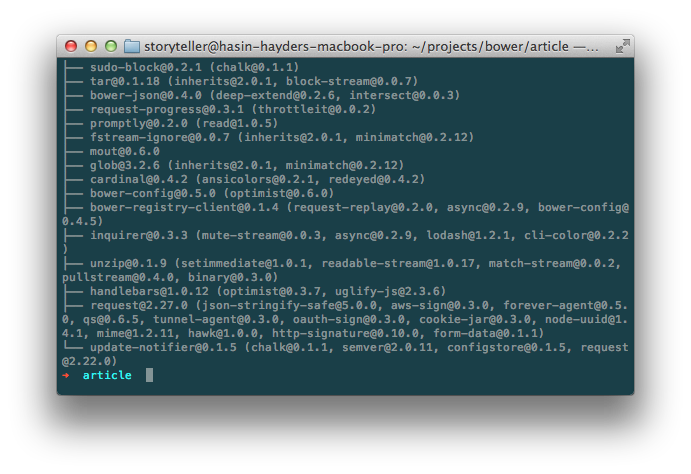
এবার বোয়ার ইনস্টল করার পালা, আর সেটা করার জন্য আপনার টার্মিনালে কমান্ড দিন npm install -g bower। কিছুক্ষনের মধ্যেই দেখতে পাবেন কনসোলে লেখা উঠেছে যে বোয়ার ইনস্টলেশন সাকসেসফুল হয়েছে। সহজ না?
bower-install

এবার চলুন দেখি কিভাবে আমরা বোয়ার ব্যবহার করব

বোয়ার ব্যবহার করা
প্রথমে টার্মিনাল ওপেন করে আপনার প্রজেক্ট ডিরেক্টরীতে প্রবেশ করুন, অথবা নতুন একটি ফোল্ডার তৈরী করে সেখানে প্রবেশ করুন। আমরা ধরে নিব আমাদের প্রজেক্টের জন্য নিচের তিনটি ফাইল লাগবে

  • জেকোয়েরী
  • ম্যাগনিফিক পপআপ
  • বুটস্ট্র‍্যাপ সিএসএস

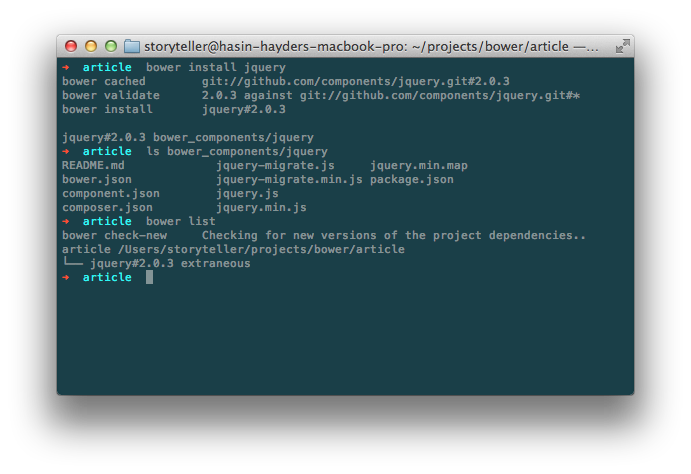
আমরা টার্মিনালে এসে প্রথমে জেকোয়েরী ইনস্টল করার জন্য কমান্ড দিব bower install jquery। কিছুক্ষনের মাঝেই বোয়ার আপনাকে জানিয়ে দেবে যে জেকোয়েরী ইনস্টল করা সফল হয়েছে। আপনি আপনার প্রজেক্ট ডিরেক্টরীতে দেখবেন bower_components নামে নতুন একটি ফোল্ডার তৈরী হয়েছে, যার মাঝে জেকোয়েরী নামের একটা ফোল্ডারে jquery.js রয়েছে।

এছাড়াও আপনি bower list কমান্ড দিলে দেখবেন বোয়ার খুব সুন্দর করে ইনস্টল করা স্ক্রিপ্ট এবং তাদের ভার্সন নম্বর দেখিয়ে দেবে।
bower-jquery

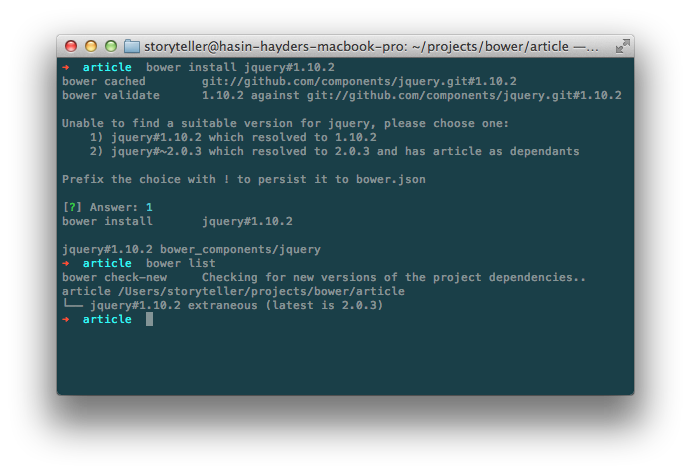
খেয়াল করলে দেখবেন যে বোয়ার ডিফল্ট ভাবে প্যাকেজের বর্তমান ভার্সন ইনস্টল করেছে। কিন্তু আপনার যদি অন্য কোন ভার্সন দরকার হয় তাহলে কি করবেন? ধরুন আপনের দরকার জেকোয়েরীর ১.১০.২ ভার্সন। বোয়ারে যেকোন প্যাকেজ ইনস্টল করে দেয়ার সময় তার ভার্সন নম্বরও উল্লেখ করে দেয়া যায়। যেমন এই ক্ষেত্রে আমরা টার্মিনালে কমান্ড দেব bower install jquery#1.10.2, তাহলে বোয়ার তার ইন্টারঅ্যাকটিভ প্রম্পটের মাধ্যমে গাইড করবে ১.১০.২ ভার্সন ইনস্টল করে নেয়ার জন্য। নিচের স্ক্রিনশটটি দেখলে এটা আরও পরিষ্কার হতে পারে
bower-jquery-1.10.2

বোয়ারে প্যাকেজ সার্চ করা
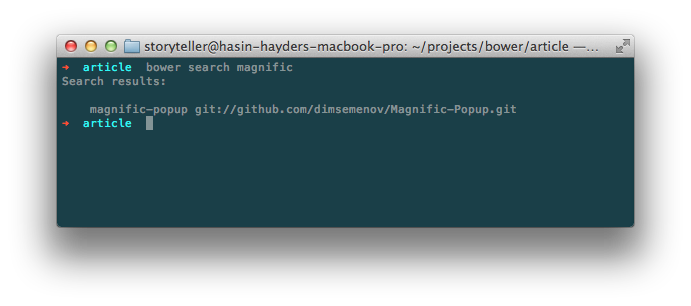
কোন প্যাকেজ বা স্ক্রিপ্ট বোয়ারের রিপোজিটরীতে আছে কিনা সেটা জানতে হলে bower search কমান্ড দিলেই বোয়ার সেই প্যাকেজের বিষয়ে বিস্তারিত তথ্য দেখাবে। যেমন আমরা যদি magnigic popup জাভাস্ক্রিপ্ট প্যাকেজ ইনস্টল করার আগে চেক করে নিতে চাই যে এই নামে আসলেই কোন প্যাকেজ আছে কিনা তাহলে আমরা টার্মিনালে কমান্ড দিব bower search magnific
bower-magnific

বোয়ার দেখাচ্ছে যে magnific-popup নামে একটা প্যাকেজ আছে। সেটা ইনস্টল করতে হলে আমরা আগের মতই কমান্ড দিব bower install magnific-popup। ঠিক মত ইনস্টল হয়েছে কিনা সেটা চেক করার জন্য আমরা bower_components ফোল্ডারে দেখতে পারি অথবা bower list কমান্ড দিয়ে দেখতে পারি ।

প্যাকেজ আনইনস্টল করা
বোয়ারের মাধ্যমে কোন প্যাকেজ আনইনস্টল করা খুবই সহজ। শুধু install এর বদলে uninstall কমান্ড দিন, ব্যাস হয়ে গেল।

প্যাকেজ লিস্ট সংরক্ষন করা
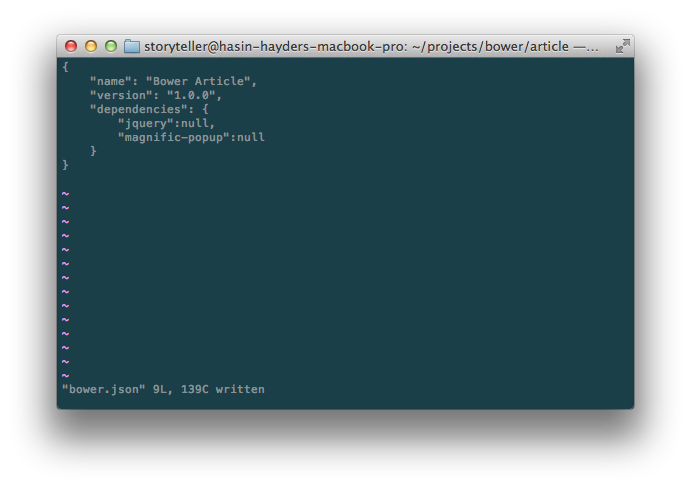
এইযে আমরা এইসব প্যাকেজ ইনস্টল করলাম, এগুলো আমরা একটা লিস্ট হিসেবে সংরক্ষন করতে পারি যাতে পরবর্তীতে আপডেট করতে হলে বা ইনস্টল করতে হলে এক এক করে করতে না হয়। এজন্য অ্যাপ্লিকেশনের কারেন্ট ডিরেক্টরীতে (যেখান থেকে আমরা bower কমান্ড চালাব) একটি ফাইল তৈরী করি bower.json নামে। যেকোন টেক্সট এডিটর দিয়ে এই ফাইল এডিট করা যাবে (তবে ওয়ার্ড প্রসেসর দিয়ে নয়)। যেমন আমাদের আজকের প্রজেক্টের জন্য আমরা নিচের মত করে bower.json ফাইল লিখব, যেখানে dependencies সেকশনে আমাদের যাবতীয় প্যাকেজের লিস্ট লিখে রাখা হবে
bower-json

বোঝার সুবিধার্থে আমি এখানে আবার লিখে দিলাম
[sourcecode language=”javascript”]
{
"name": "Bower Article",
"version": "1.0.0",
"dependencies": {
"jquery":null,
"magnific-popup":null
}
}
[/sourcecode]

এরপর থেকে আমরা অ্যাপ্লিকেশন ডিরেক্টরীতে এই bower.json ফাইল কপি করে কমান্ড দিব bower install। ব্যাস তাহলেই বোয়ার এই bower.json ফাইল থেকে ডিপেন্ডেন্সী লিস্ট পরে এক এক করে সেগুলো ইনস্টল করে ফেলবে

আমরা যদি কোন প্যাকেজের কোন পার্টিকুলার ভার্সন ইনস্টল করতে চাই তাহলে null এর বদলে সেই ভার্সন নম্বর লিখে দিব, আর লেটেস্ট ভার্সন চাইলে null লিখব। যেমন যদি আমরা জেকোয়েরীর ১.১০.১ ভার্সন চাই তাহলে আমাদের bower.json ফাইল হবে নিচের মত

[sourcecode language=”javascript”]
{
"name": "Bower Article",
"version": "1.0.0",
"dependencies": {
"jquery":"1.10.1",
"magnific-popup":null
}
}
[/sourcecode]
এরপর আমরা অ্যাপ্লিকেশন ডিরেক্টরীতে কমান্ড দিব bower install, ব্যাস!

প্যাকেজ লিস্টে নতুন প্যাকেজ বা ডিপেন্ডেন্সী যোগ করা
আমরা তো ইতোমধ্যেই bower.json ফাইলে দুইটি প্যাকেজ যোগ করেছি। এখন আমরা চাই নতুন একটি প্যাকেজ bootstrap ইনস্টল করতে। সেক্ষেত্রে আমরা দুই ভাবে করতে পারি

১. আমরা ম্যানুয়ালী bower.json ফাইল এডিট করে bootstrap কে একটা নতুন ডিপেন্ডেন্সী হিসেবে যোগ করে, সেই bower.json ফাইল সেভ করে টার্মিনালে কমান্ড দিতে পারি bower install। আমরা দেখব যে বোয়ার স্বয়ংক্রীয় ভাবে bootstrap ইনস্টল করে ফেলছে

অথবা

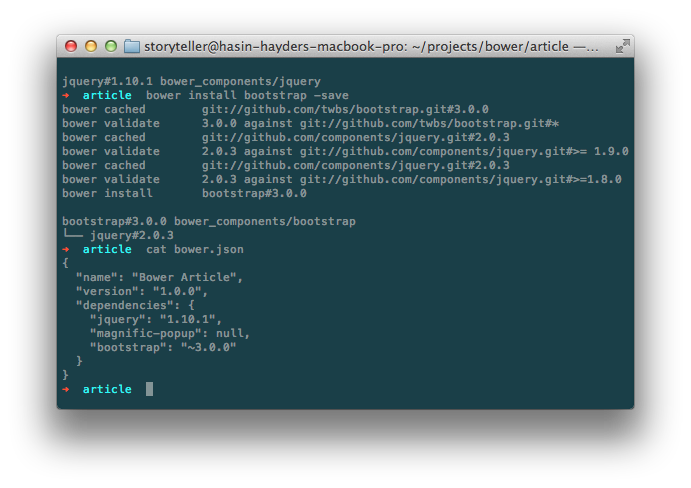
২. আমরা bower.json ফাইল ম্যানুয়ালী এডিট না করে বরং টার্মিনালে সরাসরি কমান্ড দিতে পারি bower install bootstrap -save । খেয়াল করুন এখানে একটা অতিরিক্ত প্যারামিটার/স্যুইচ যোগ করা হয়েছে -save নামে। এর ফলে বোয়ার দুইটি কাজ করবে। প্রথমত বোয়ার bootstrap ইনস্টল করবে, দ্বিতীয়ত বোয়ার নিজেই bower.json ফাইল এডিট করে bootstrap কে ডিপেন্ডেন্সী সেক্শনে যোগ করে ফেলবে। আমরা bower install bootstrap -save এই কমান্ড দেয়ার পর bower.json ফাইল চেক করলে দেখব এটা নিচের মত কনটেন্ট দেখাচ্ছে 🙂
bower-auto-update

বোয়ার কম্পোনেন্ট নিজের পছন্দমত ডিরেক্টরীতে ইনস্টল করা
আমরা এতক্ষন দেখেছি যে বোয়ার ডিফল্টভাবে bower_components নামের ডিরেক্টরীতে সব স্ক্রিপ্ট ইনস্টল করছে। কিন্তু আমরা যদি চাই যে আমাদের সব ইনস্টল করা স্ক্রিপ্ট গুলো bower_components এর বদলে “scripts/vendor” ডিরেক্টরীতে ইনস্টল হবে, তাহলে অ্যাপ্লিকেশন ডিরেক্টরীতে নিচের মত করে .bowerrc ফাইল তৈরী করুন (খেয়াল রাখবেন নামের শুরুতে একটি . রয়েছে)। সেই .bowerrc ফাইলে নিচের মত করে নিজের পছন্দের ডিরেক্টরী উল্লেখ করে দিন
[sourcecode language=”javascript”]
{
"directory":"scripts/vendor/"
}
[/sourcecode]
এরপর আমরা অ্যাপ্লিকেশন ডিরেক্টরীতে কমান্ড দিব bower install, ব্যাস! বোয়ার নিজেই scripts/vendor ফোল্ডার তৈরী (আগে থেকে তৈরী করা না থাকলে) করে তার ভেতরে সব স্ক্রিপ্ট ইনস্টল করে ফেলবে

উপসংহার
অ্যাপ্লিকেশনে স্মার্ট ভাবে প্যাকেজ ম্যানেজ করতে বোয়ারের জুড়ি নেই। সময় বাঁচানোর জন্য এইসব টুল তৈরী হচ্ছে দিন কে দিন, এবং স্মার্ট ডেভেলপাররা সেগুলো ব্যবহার করে নিজেদের সময় যেমন বাঁচাচ্ছে পাশাপাশি তাদের প্রজেক্ট ম্যানেজমেন্ট করছে অত্যন্ত সহজভাবে। আগে বোয়ার ব্যবহার করে না থাকলে আজকে থেকেই শুরু করে দিন 🙂

এর পরের আর্টিকেলে আমরা দেখব কিভাবে আমরা রিকোয়ারজেএস (ReuireJS) ব্যবহার করে আমাদের অ্যাপ্লিকেশনে স্বয়ংক্রীয়ভাবে আমাদের জাভাস্ক্রিপ্ট ফাইল লোড করতে পারি, এবং সেখনেও বোয়ার আমাদের কিভাবে সাহায্য করে।

এই সিরিজের সব শেষের আর্টিকেলে আমরা দেখব টাস্ক ম্যানেজার গ্রান্টের (Grunt) ব্যবহার যার মাধ্যমে আমরা আমাদের অ্যাপ্লিকেশনের যাবতীয় কাজ অটোমেট করে আরও স্মার্টভাবে ডেভেলপ করতে পারব।

Breakpoint JS – load external javascript for different browser breakpoints

idea

Live Demo: http://hasinhayder.github.io/BreakPoint/

Breakpoint helps you to define multiple breakpoint ranges and load external javascript files when someone resize their browser window to those breakpoints. Beside loading external scripts, Breakpoint also triggers an event whenever browser width falls in any of those predefined breakpoint ranges.

Using Breakpoint
Using BreakPoint is pretty simple. Include jQuery in your web application and then include jquery.breakpoint.js. Now you can define multiple breakpoint ranges and initialize like this

[sourcecode language=”javascript”]
$(document).ready(function(){
$.BreakPoint({
breakpoints:{
mobile:{max:480,load:true},
default:{min:480,max:1024, load:true},
wide:{min:1024,max:1200,load:true},
superwide:{min:1200,load:true},
}
});
});
[/sourcecode]

In the example above, we have defined four different breakpoints. The first one mobile will be used whenever browser is resized from 0px to 480 pixel (all inclusive). The next breakpoint, default will be used whenever browser is resized between 480px to 1024px (all inclusive), and so on.

Now, whenever a breakpoint is reached, BreakPoint jQuery Plugin will load an external javascript file with the same name of the breakpoint. For example, when browser is resized to 400px it will fall under mobile and now an external file named mobile.js will be loaded and executed.

By default BreakPoint will look for external javascript files in the js/ folder in the current path. But you can change this by passing a parameter named prefix, like this

[sourcecode language=”javascript”]
$(document).ready(function(){
$.BreakPoint({
prefix:"scripts/",
breakpoints:{
mobile:{max:480,load:true},
default:{min:480,max:1024, load:true},
wide:{min:1024,max:1200,load:true},
superwide:{min:1200,load:true},
}
});
});
[/sourcecode]

Now BreakPoint will load external js files from the scripts/ folder.

Breakpoint Parameters
prefix: By default, prefix is set to js/ but you can change it to anything you want.
breakpoints: for each breakpoints, there are three paramaters you can pass which are “min”, “max” and “load”. By default min is set to 0, max is set to 9999 and load is set to false. The load parameter is an important one if you want to load external javascript files whenever a breakpoint is reached. If load is set to true, external files will be loaded, otherwise not.

BreakPoint Events
Whenever a breakpoint is reached, BreakPoint plugin will trigger a window event named breakpoint. The event object will have an attribute named breakpoint which will contain the name of the breakpoint that has been reached. Here is an example how you can add an event listener to this breakpoint event

[sourcecode language=”javascript”]
$(document).ready(function(){
$(window).bind("breakpoint",function(e){
if(console)
console.log(e.breakpoint);
});
});
[/sourcecode]

That’s mainly it. Enjoy! Check out the live demo at http://hasinhayder.github.io/BreakPoint/

The Badass List of Essential jQuery Plugins

banner

Check it out here: http://hasinhayder.github.io/essential-jquery-plugins/

I have started curating this list for last couple of weeks and the purpose is to create an one stop place where you can look for the essential jQuery plugin for your project and look no where else. Honestly, sometime it’s really hard to find the perfect plugin in this overwhelming world of jQuery plugins.

I hope you will find it useful. If you want to contribute, you can open an issue and tell me a missing plugin and I will be happy enough to look at it. If it’s worth to be in the list, it will be added back there, no worry. You can also fork this github repo and add the missing plugin in the readme.md file in markdown format and send me a pull request.

So enjoy this badass list of essential jQuery Plugins which is continuously growing.

An Animated Responsive grid with Filtering feature

This is a followup of my previous post, where we had created a beautiful responsive grid with barely 6 lines of javascript code. But this time, we have added filtering feature in it, and added category/tag selector which triggers the filtering. For filtering we have used MixItUp library in this example.

Have a look at the live demo at http://hasinhayder.github.io/ResponsiveGalleryWithFiltering. Resize the browser window and see how the grid items adapt to the new width. Select categories from the dropdown list in the top right corner to see how the filtering works.

Positioning the dropdown list was managed using media queries which you can see at the bottom of the <style> block.

One more thing to note here, a very important note perhaps. If you have used MixItUp before then you probably already know that every time mixitup refreshes the list, it actually removes the old list items and redraws them in the container. This phenomenon removes any events attached to the list items. To fix it up, you need to attach event listeners using $.delegate() method, as done in the example. However, lets have a look at that

[sourcecode language=”javascript”]
$(".grid ul").delegate("li","click",function(){
var src = $(this).find("img").attr("src");
alert(src);
});
[/sourcecode]

Enjoy!

Detecting if a DOM element has visible scrollbar.

Webkit browsers, specially in Mac osx hides the scrollbar intelligently when not in use. This feature improves the look-n-feel. But for the designers, sometime this can be a pain because they may need to alter the designs based on the visibility of scrollbar.

Here goes two simple jQuery plugin which can detect the visibility of scrollbar for a given DOM element

For Horizontal Scrollbar
[sourcecode language=”javascript”]
(function($) {
$.fn.hasHorizontalScrollBar = function() {
return this.get(0) ? this.get(0).scrollWidth > this.innerWidth() : false;
}
})(jQuery);
[/sourcecode]

For Vertical Scrollbar
[sourcecode language=”javascript”]
(function($) {
$.fn.hasVerticalScrollBar = function() {
return this.get(0) ? this.get(0).scrollHeight > this.innerheight() : false;
}
})(jQuery);
[/sourcecode]

You can later use it like this
[sourcecode language=”javascript”]
if($("#element").hasVerticalScrollbar()){
//do whatever you’d like to
}
[/sourcecode]

Source & Idea: This SO Discussion 🙂

LazyMouse jQuery Plugin – detect mouse inactivity easily :)

LazyMouse

Before jumping into the details, let me hear you asking “WHY?”. To be honest, not all of you will need to detect the mouse inactivity in your web applications. But sometime, it’s useful to do something different after a certain period of inactivity either to grab attention of the viewer, or to help him by improving the UX. For example, hide the sidebar and top navigation when user is reading the content, to emphasis his reading experience. Or show an animation – just do whatever during your user’s mouse is inactive for some time.

And to detect mouse inactivity easily, here comes the LazyMouse jQuery plugin which attaches two new events to the bodyelement, one is mouse.active and another one is mouse.inactive . You can just add two listeners for those events and do whatever you want to do 🙂

Using jQuery LazyMouse is pretty simple. Initialize it like this
[sourcecode language=”javascript”]
$(document).ready(function(){
$.LazyMouse();
})
[/sourcecode]

You can also specify the inactivity threshold in milliseconds, like this

[sourcecode language=”javascript”]
$(document).ready(function(){
$.LazyMouse({
delay:2000 //2 seconds threshold
});
})
[/sourcecode]

Once initialized, as we have mentioned earlier, the body element will be triggered with two new events. Lets add a listener to those, like this

[sourcecode language=”javascript”]
$(document).ready(function(){
$("body").bind("mouse.active",function(){
console.log("Mouse Active");
});
$("body").bind("mouse.inactive",function(){
console.log("Mouse Inctive");
});
})
[/sourcecode]

The events are propagated using jQuery Debounce, and therefore it is rate limited for good. See the live demo at http://hasinhayder.github.io/LazyMouse, and fork the github repo at http://github.com/hasinhayder/LazyMouse

Enjoy 🙂

An awesome animated responsive grid in a few lines of javascript and css3 goodness

Screen Shot 2013-08-15 at 4.36.33 AM

Responsive grid is a pain to many people, because sometime they have to achieve the desired effects either using complex plugins, css layout styling with the help of media queries. And here comes a nifty solution which works perfectly well in all devices. The responsiveness is done using a few lines of Javascript which listens to window resize event. But to save the browser from refreshing the layout, it uses debounce technique which only fires after the resizing is done.

The trick is pretty neat. All you got to do is tell it a minimum width of the grid items. Then, once resized, it divides the window width by that minimum, extract the integer part and displays that many items in a row by setting a width (in percentage) for each of them.

[sourcecode language=”javascript”]
var minWidth = 250;
$(document).ready(function(){
$(window).resize($.debounce(250,function(){
var w = $(window).width();
var numberOfItems = parseInt(w/minWidth);
var itemWidthinPercentage = 100/numberOfItems;
$(".grid ul li").css({width:itemWidthinPercentage+"%"});
}));
});
[/sourcecode]

See the working grid at http://hasinhayder.github.io/responsivegrid and resize the window to check out how it fits perfectly.

The animation is done using the following css3 transition for each list item
[sourcecode language=”css”]
-webkit-transition:all 0.2s ease;
-moz-transition:all 0.2s ease;
-o-transition:all 0.2s ease;
-ms-transition:all 0.2s ease;
transition:all 0.2s ease;
[/sourcecode]

Checkout the demo and fork the github repo to customize it anyway you’d like to 🙂

CSS3 Storyline Animation using jQuery Transit Library

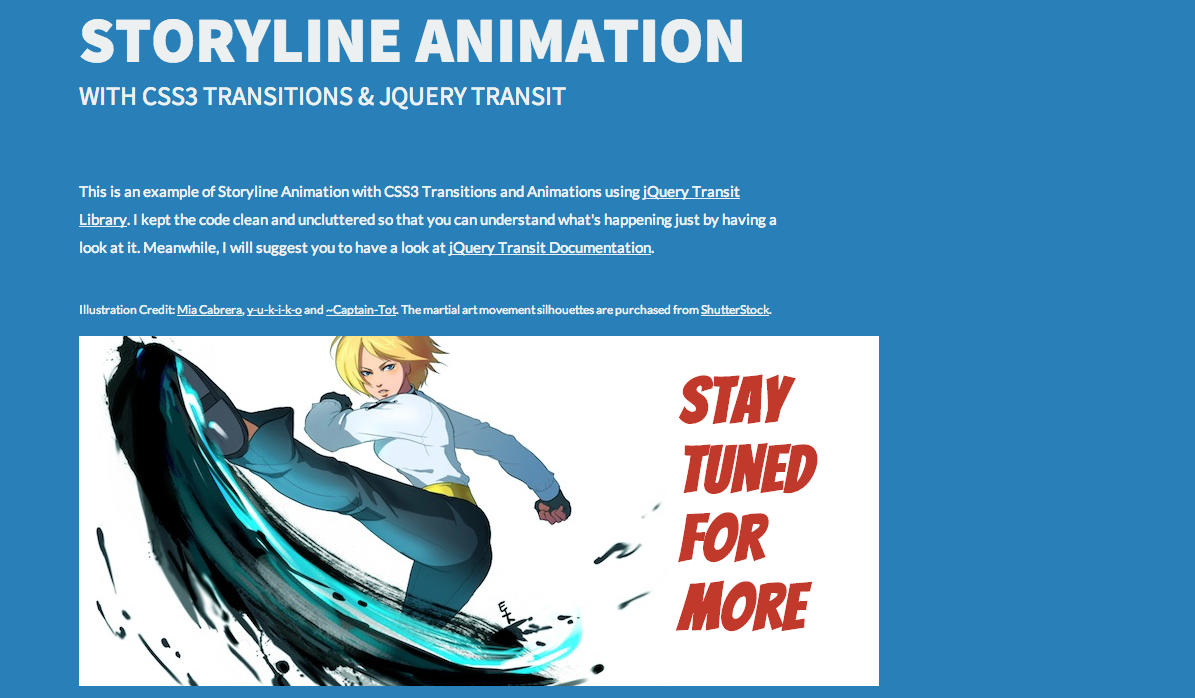
I have been learning CSS3 animations and transitions for last few days, and I found this awesome jQuery library “Transit” which can be used to replace CSS3 @KeyFrame animations. I am not a big fan of KeyFrame animations because it’s tough to write and you need to calculate a lot of things and express them in percentage of total time. Which makes it even harder to write. I mean for something small, it is more than awesome – but as soon you start writing something big, where each elements are chained to each other, you will find it pretty tough.

So, here goes the CSS3 Storyline Animation using jQuery Transit library. There are many sliders in the market who uses animations like this – so if you are good, you can even make a animation designer app using Transit.

Screen Shot 2013-07-23 at 9.01.23 PM

Github URL: https://github.com/hasinhayder/CSS3-Storyline-Animation

Live Demo: http://bit.ly/CSS3Storyline

Utopia – our new admin panel theme is ready to grab

Last week, we have released a new admin panel theme from themio. This new theme, “Utopia” comes packed with lots of beautifully crafted UI elements and it is built on top of popular twitter bootstrap framework. So you will be getting all the features of twitter bootstrap plus the extras.

Check Utopia in Themeforest: Click here

Utopia comes with two themes white and dark which will suit your need in different situations. The collapsible sidebar and widgets, data tables, conversations tables, pricing tables and numbers of galleries with image effect will make it a perfect choice for the backend of your web applications

Screenshots

Dashoboard comes with a glimpse of beautifully crafted UI elements that comes with Utopia. The collapsible and
responsive
sidebar, data tables, legends, weather controls, data tables, news feed ticker and many more

Dashboard

(more…)