Category: Javascript

Picking up random elements from DOM using jQuery

tumblr_n1zv0cTukw1tubinno1_1280

Selecting a group of DOM elements is super duper easy these days using CSS selectors, or a particular element via their ID. But what about picking up a random element from these group of elements? In this article I am going to show you how to do it by extending jQuery

Let’s consider that we have the following markup. Now we will pick a random button and change it’s value

[sourcecode language=”html”]
<div class="container">
<button>1</button>
<button>2</button>
<button>3</button>
<button>4</button>
<button>5</button>
</div>
[/sourcecode]

Let’s extend jQuery and add a random() function to it

[sourcecode language=”javascript”]
$.fn.random = function() {
return this.eq(Math.floor(Math.random() * this.length));
}
[/sourcecode]

Now we can pick up a random button and change it’s value quite easily.

[sourcecode language=”javascript”]
$(".container button").random().html("Click Me");
[/sourcecode]

That was easy, eh? Hope you’ll like it.

Delegating Events Instead of Direct Binding in DOM

tumblr_n1rr53o21A1tubinno1_1280

When it comes to attaching event listeners, be it a particular element in the DOM, or a group of elements via CSS selectors, most of us bind the event listener directly to the elements. Direct binding is fine when you’re doing for a PARTICULAR element, but it may create problems for a group of elements if you’re not taking extra care while event binding. To understand the issue, let’s have a look at the following code block (Here’s a live example)

[sourcecode language=”html”]
<!– index.html –>
<div class="container" style="margin-bottom:50px;"></div>
<input type="button" value="Add More Buttons" id="addmore" />
[/sourcecode]

And we added the following javascript (depends on jQuery)

[sourcecode language=”javascript”]
;(function($){
$(document).ready(function(){
$("#addmore").on("click",function(){

var l = $(".container button").length+1;
$("<button/>").html("Click Me "+l).appendTo($(".container"));
$(".container button").on("click",function(){
alert("Clicked");
});

});
});
})(jQuery);
[/sourcecode]

Now if you add more and more buttons, you can see that it repeatedly attaching events. See the effect in the following animation

dom-1

To avoid these repeated bindings, you can modify your code like this and detach all the event listeners which were attached previously to these buttons.

[sourcecode language=”javascript”]
$(".container button").off("click");
$(".container button").on("click",function(){
alert("Clicked");
});
[/sourcecode]

This is boring, lengthy and sometime risky because you have to manually detach events everytime a new DOM element which satisfies your CSS selector rule adds in the container. And if you forgot to do that, chances are higher to break something somewhere.

Now, to save from this pain, jQuery had introduced event delegation which doesn’t bind the event listener to the dom elements but it delegates the event from their parent. This way, you will never have to worry about detaching previous attached event listeners anymore. Let’s have a look at our final code block, and here is a live example too

[sourcecode language=”javascript”]
;(function($){
$(document).ready(function(){

//event delegation
$(".container").on("click","button",function(){
alert("Clicked");
});

$("#addmore").on("click",function(){

var l = $(".container button").length+1;
$("<button/>").html("Click Me "+l).appendTo($(".container"));

});
});
})(jQuery);
[/sourcecode]

In the above example see how we have delegated the click event to every “button” in the container div. Once the delegation is done, it doesn’t matter whenever a new dom element (in this case, a “button”) inserts in the container. It will always capture the “click” event because the parent div “.container” will delegate that event to it properly. All you have to do is select a parent element, and then delegate the event to childrens (via CSS selector) belonging to it. It’s the same .on() method, just takes an extra parameter in the middle which represents the CSS selector to which the event will be delegated.

[sourcecode language=”javascript”]
//event delegation
$(".container").on("click","button",function(){
alert("Clicked");
});
[/sourcecode]

By using event delegation in jQuery for a group of DOM elements, you can avoid risks, keep your code cleaner and save yourself from some overkill every time. Hope you’ve liked this article 🙂

How to enable some useful text formatting options in TinyMCE in WordPress

tumblr_na06t4fnlI1tubinno1_1280

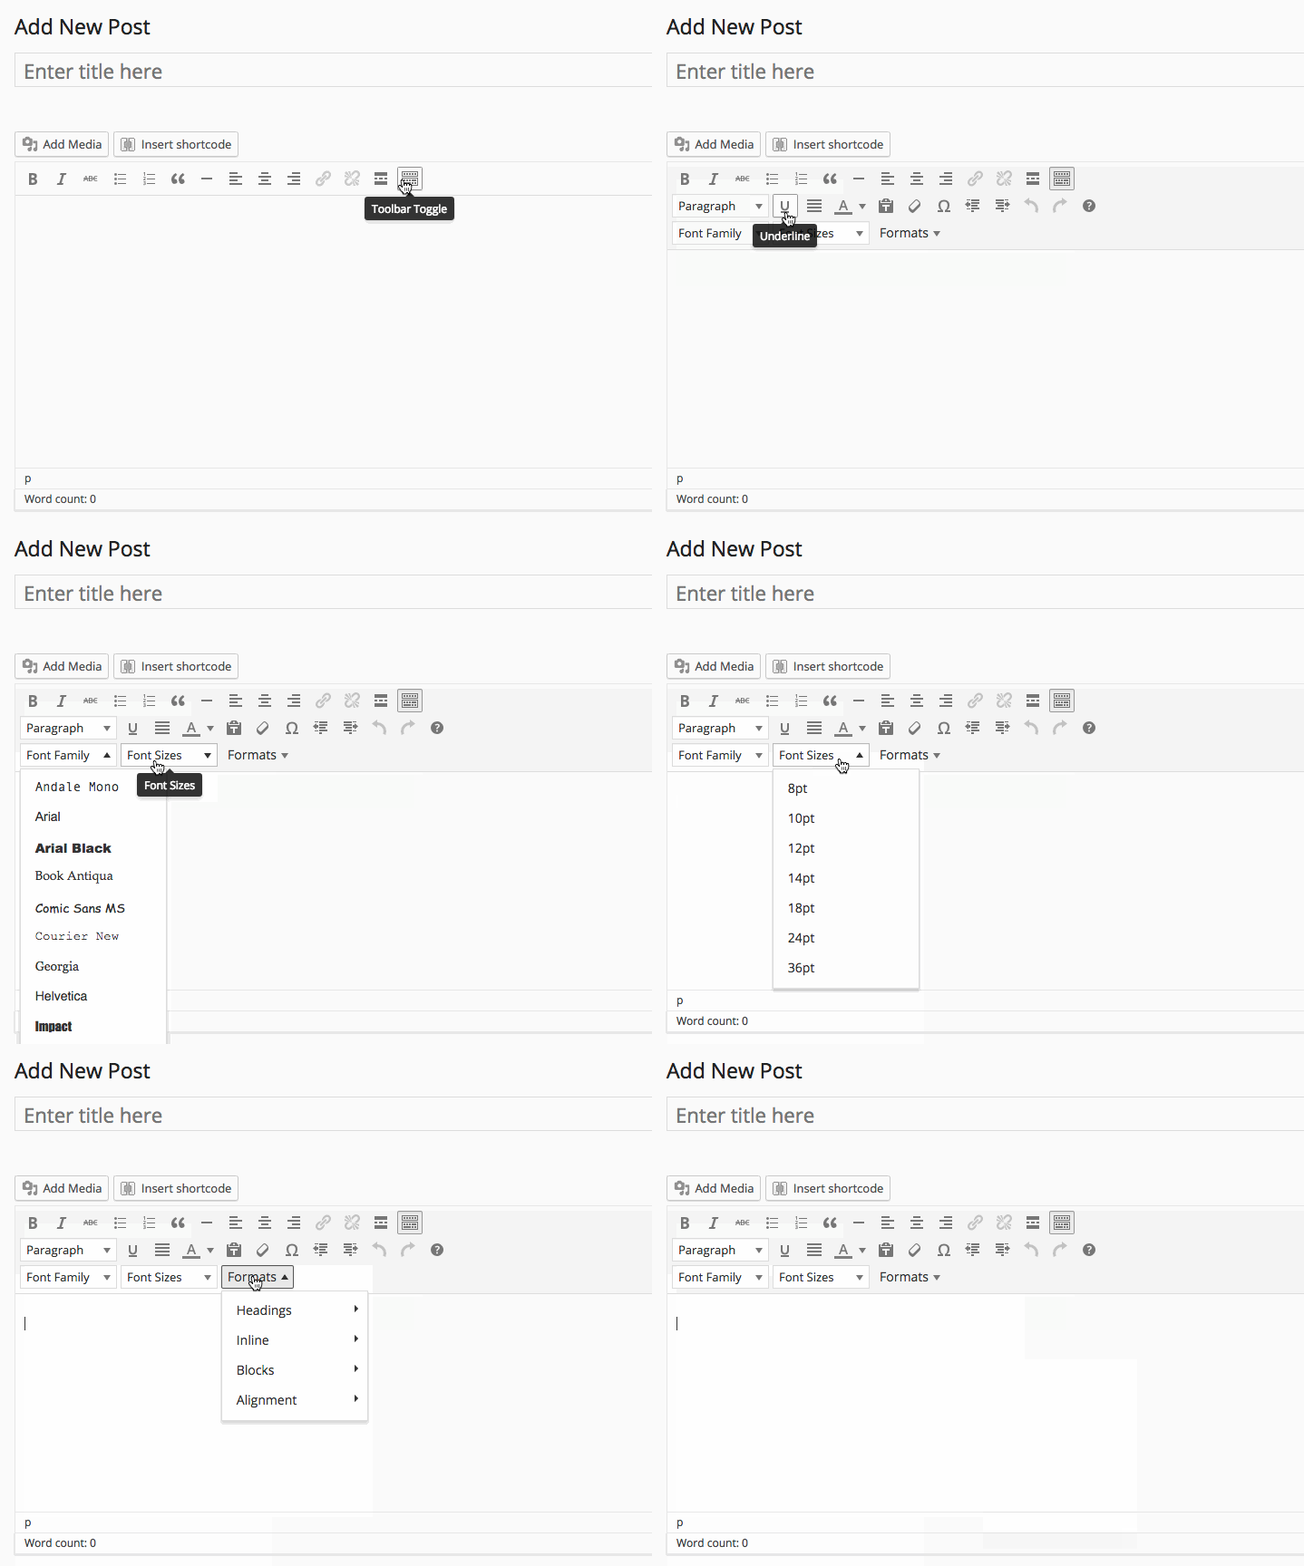
Most of the time default TinyMCE editor in WordPress is pretty adequate for everyday text formatting. However, there are a lot of extra formatting options which are hidden out of the box. Enabling these options will give you extra formatting features that will be useful for many of us. In this article, I will show you how to enable these hidden formatting options in TinyMCE. Just add the following code block in your theme’s functions.php file

[sourcecode language=”php”]
function tinymce_enable_more_buttons($buttons)
{
$buttons[1] = ‘fontselect’;
$buttons[2] = ‘fontsizeselect’;
$buttons[3] = ‘styleselect’;
return $buttons;
}

add_filter("mce_buttons_3", "tinymce_enable_more_buttons");
[/sourcecode]

Now you can see these extra options in the editor as shown in the animation below.

format

Hope you liked this article.

Passing data from PHP to the enqueued scripts in WordPress

tumblr_nau9zqjZay1tubinno1_1280

Enqueueing scripts, while being as one of the most common tasks for WordPress theme and plugin developers, has a very nice companion feature that can be used to pass data to it. These data will then be available in the native scope of those scripts. In this short article, I am going to show you how to to this

Remember the first parameter of wp_enqueue_script() function? It’s called ‘handle’, and works as a reference point. We need this handle to send some data to it with the help of wp_localize_script() function. Let’s have a look at the following example.

[sourcecode language=”php”]
add_action("wp_enqueue_scripts","my_scripts_loader");

function my_scripts_loader(){
$data = array("home"=>site_url());

wp_enqueue_script("myscript","path/to/my/script.js");
wp_localize_script( "myscript", "blog", $data );

}
[/sourcecode]

wp_localize_script() takes the handle of the script file, a variable name and an array. Finally, wp_localize_script converts that array into a JSON object and makes available in the local scope of that javascript file via that variable name. So, from the example above you can write the following code in your script.js and it will show you your blog URL, which was actually passed to it using wp_localize_script function

[sourcecode language=”javascript”]
alert(blog.home);
[/sourcecode]

This feature is pretty handy for developing themes and plugins, to pass data from your PHP scripts to the external javascript files. Hope you’ve enjoyed this article.

Fetch WordPress media files using BackboneJS

WordPress uses BackboneJS and Underscores in the admin panel. Though codex has a rich set of documentation on different WordPress topics, it lacks instructions of using these BackboneJS models in your code. So here’s a small snippet which shows you how to fetch an attachment from your WordPress blog using these models

First of all, you will have to enqueue media scripts via wp_enqueue_scripts or admin_enqueue_scripts hook. This will load all the necessary media js scripts needed for this task.

[sourcecode language=”php”]
wp_enqueue_media();
[/sourcecode]

And then, from your front end code you can access the attachments like this

https://gist.github.com/hasinhayder/eb62a4c02bf4134f5939

Hope you liked it 🙂

গাল্প দিয়ে এক মিনিটে ওয়েব সার্ভার তৈরী করা

Screen Shot 2014-07-04 at 5.58.23 PM
গাল্প মূলত নোডজেএস এর উপরে বানানো একটি টাস্ক অটোমেশন টুল, যেটা দিয়ে আপনারা অনেক সহজেই বিভিন্ন বোরিং এবং একঘেয়ে কাজ অটোমেট করে ফেলতে পারবেন। এটা দিয়ে একদিকে যেমন অনেক সময় বাঁচানো যায় আরেকদিকে প্রজেক্টের টাস্ক গুলো অটোমেট করার মাধ্যমে অনেক স্মার্ট ভাবে ম্যানেজ করা যায়। গাল্প আসার আগে বেশির ভাগ লোকজন গ্রান্ট দিয়ে টাস্ক অটোমেশনের কাজ সারতো। কিন্তু গ্রান্ট এর লার্নিং কার্ভ অনেক স্টিপ, অর্থাৎ আয়ত্ত্ব করতে বেশ ভালো সময় লাগে। অন্যদিকে গাল্প একেবারেই ছোট্ট এবং শেখাও খুব সহজ, পাশাপাশি গাল্প অনেক ফাস্ট। তো চলুন আজকে আমরা দেখি কিভাবে আমরা গাল্পের সাহায্যে একটা ওয়েব সার্ভার তৈরী করে আমাদের স্ট্যাটিক কনটেন্ট সার্ভ করতে পারি। এটা স্ট্যাটিক সাইট ডেভেলপমেন্টের সময় খুব কাজে লাগে, আলাদা ভাবে ভার্চুয়াল হোস্ট তৈরী করার সময় টুকুও বাঁচানো যায়।

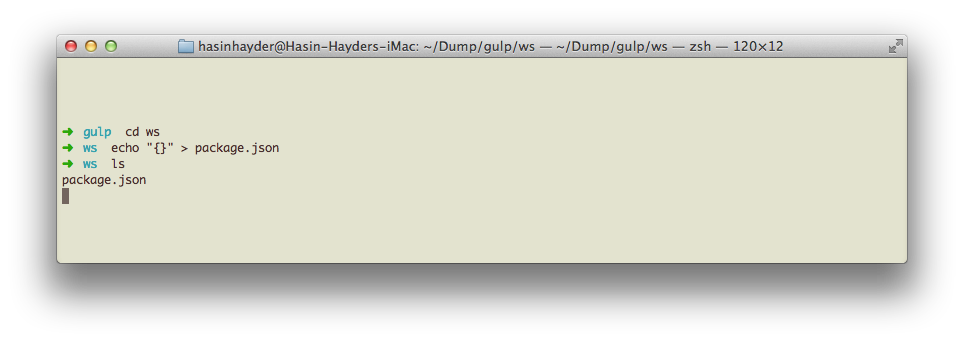
প্রথমে একটি আলাদা ফোল্ডার তৈরী করুন অথবা আপনার প্রজেক্টের ফোল্ডারে আসুন, এবার নিচের মত করে টার্মিনালে কমান্ড লিখুন অথবা package.json নামে একটি ফাইল তৈরী করুন যার কনটেন্ট হবে {}

Screen Shot 2014-07-04 at 5.37.03 PM

আপনার যদি নোডজেএস ইনস্টল না করা থাকে তাহলে http://nodejs.org/ এখানে গিয়ে নোডজেএস নামিয়ে ইনস্টল করে ফেলুন।

Screen Shot 2014-07-04 at 5.39.46 PM


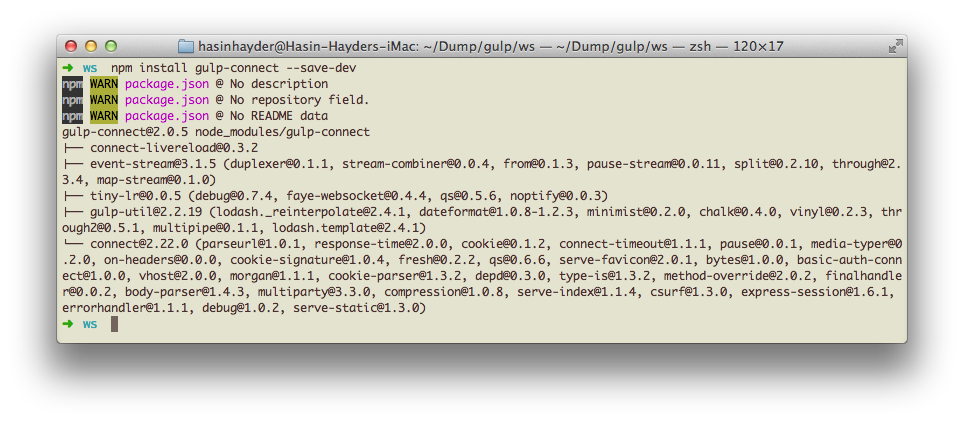
এবার টার্মিনালে কমান্ড দিন নিচের মত করে। ওয়েব সার্ভার তৈরীর জন্য আমাদের গাল্পের বেজ প্যাকেজ এবং gulp-connect নামক প্যাকেজটি লাগবে।

[sourcecode language=”shell”]
npm install gulp –save-dev
npm install gulp-connect –save-dev
[/sourcecode]

কিছুক্ষনের মাঝেই দেখবেন যে গাল্প এবং গাল্প কানেক্ট ইনস্টল হয়ে গেছে।

Screen Shot 2014-07-04 at 5.44.20 PM

এবার এই ফোল্ডারেই একটা নতুন ফাইল তৈরী করুন gulpfile.js যার কনটেন্ট হবে নিচের মত, পোর্ট নাম্বারের জায়গায় আপনার পছন্দ মত পোর্ট নাম্বার দিতে পারেন।

[sourcecode language=”javascript”]
var gulp = require("gulp"),
connect = require("gulp-connect");

gulp.task("server",function(){
connect.server({
port:8081
});
});

gulp.task("default",["server"]);
[/sourcecode]

এবার একটা index.html ফাইল তৈরী করুন, নিচের মত – অথবা আপনার যা ইচ্ছা তাই লিখুন

[sourcecode language=”html”]
<!DOCTYPE html>
<html>
<head>
<title>Hello World</title>
</head>
<body>
<h1>Hello World</h1>
</body>
</html>
[/sourcecode]

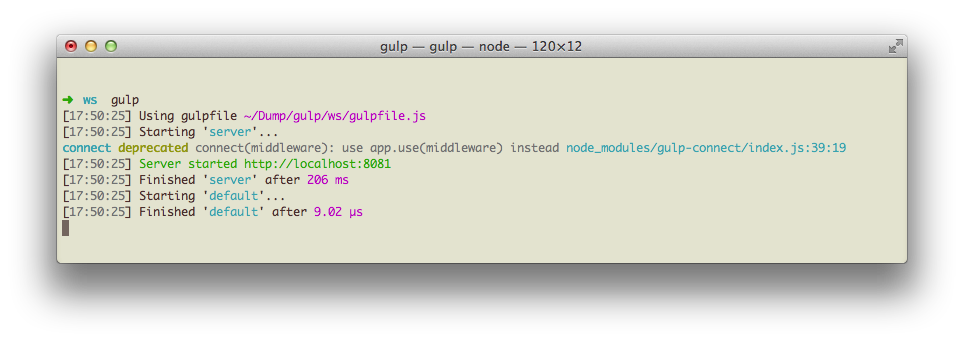
এবার টার্মিনালে কমান্ড দিন gulp, কমান্ড দেয়া হলে আপনার ব্রাউজারে ব্রাউজ করুন http:/localhost:8081 ( অথবা gulpfile.js এ যেই পোর্ট নম্বর দিয়েছিলেন, সেটা)

Screen Shot 2014-07-04 at 5.51.38 PM

ব্রাউজারে আপনার ইনডেক্স ফাইলটি (index.html) চলে এসেছে। অনেক সহজ, তাই না?

ওহ এখানে উল্লেখ্য যে আপনি প্রজেক্টে যদি গিট ( git ) ব্যবহার করেন, তাহলে এই নোডজেএস এর ফাইলগুলো গিটইগনোর (.gitignore) ফাইলের মাধ্যমে গিটে কমিট বা পুশ হওয়া থেকে বিরত রাখতে পারেন। এজন্য আপনার ফোল্ডারে/প্রজেক্ট-রুটে একটা ফাইল তৈরী করুন .gitignore নামে যার কনটেন্ট হবে নিচের মত

[sourcecode language=”html”]
node_modules
gulpfile.js
package.json
[/sourcecode]

আশাকরি গাল্প নিয়ে এই আর্টিকেলটি আপনাদের ভালো লেগেছে। পরবর্তীতে গাল্পের লাইভ-রিলোড, সিএসএস প্রি প্রসেসর এবং মিনিফাই প্যাকেজ গুলো নিয়ে আলোচনা করার ইচ্ছা থাকলো।

BucketAdmin – Our new dashboard for your next web application

01_bucketmin_preview.__large_preview

If you are a fan of beautiful dashboards and admin panels, then BucketAdmin might be a good choice for you with plenty of carefully selected javascript controls and plugins. Beside that, BucketAdmin’s documentation and clean structure will help you to implement it without a lot of pain. Purchase BucketAdmin today for $21 only from http://bit.ly/1e9TtGP.

Here is a collection of a few cool features of BucketAdmin

BucketAdmin Features

Improving UX in the WordPress Admin Panel with Interactive Meta Boxes

Our goal is simple today, we want to add interactivity to our boring metaboxes. Instead of showing lots and lots of irrelevant input boxes at once, we will properly group them into different metaboxe containers and then display the required one based on the action of another one.

We will create a custom post called “profession”, then we will let our user choose from two pre defined professions, for example “photographer” and “programmer”. Based on his choice we will display another set of metaboxes to get the details of that profession.

Step 1: Register the custom post
Here is a simple custom post register script, add the following snippet in your functions.php

[sourcecode language=”php”]
add_action( ‘init’, ‘mytheme_custom_post_profession’ );
function mytheme_custom_post_profession() {

$labels = array(
‘name’ => _x( ‘Professions’, ‘profession’ ),
‘singular_name’ => _x( ‘Profession’, ‘profession’ ),
‘add_new’ => _x( ‘Add New’, ‘profession’ ),
‘all_items’ => _x( ‘Professions’, ‘profession’ ),
‘add_new_item’ => _x( ‘Add New Profession’, ‘profession’ ),
‘edit_item’ => _x( ‘Edit Profession’, ‘profession’ ),
‘new_item’ => _x( ‘New Profession’, ‘profession’ ),
‘view_item’ => _x( ‘View Profession’, ‘profession’ ),
‘search_items’ => _x( ‘Search Professions’, ‘profession’ ),
‘not_found’ => _x( ‘No professions found’, ‘profession’ ),
‘not_found_in_trash’ => _x( ‘No professions found in Trash’, ‘profession’ ),
‘parent_item_colon’ => _x( ‘Parent Profession:’, ‘profession’ ),
‘menu_name’ => _x( ‘Professions’, ‘profession’ ),
);

$args = array(
‘labels’ => $labels,
‘hierarchical’ => false,
‘public’ => true,
‘show_ui’ => true,
‘show_in_menu’ => true,
‘supports’ => array( ‘title’, ‘thumbnail’),
);

register_post_type( ‘profession’, $args );
}
[/sourcecode]

Step 2: Add the necessary libraries in your theme/plugin
Creating metaboxes is a tedious and boring task. So we will take help of one of the fantastic metabox libraries out there. We will be using Custom-Metabox-Framework which is also widely known as “CMB”. It will make our code a lot less cluttered. So download (or checkout) the library, unzip and rename the folder as “cmb” and place it inside your theme folder. Now add the following code in your functions.php

[sourcecode language=”php”]
add_action( ‘init’, ‘mytheme_initialize_cmb_meta_boxes’ );
function mytheme_initialize_cmb_meta_boxes() {
if ( !class_exists( ‘cmb_Meta_Box’ ) ) {
require_once( ‘cmb/init.php’ );
}
}
[/sourcecode]

Step 3: Create some metaboxes for this profession custom post
Now we have all the necessary tools available, lets create three metaboxes and attach them with only this “profession” type custom post.

[sourcecode language=”php”]
function mytheme_profession_metaboxes( $meta_boxes ) {
$prefix = ‘_mytheme_’; // Prefix for all fields
$meta_boxes[] = array(
‘id’ => ‘profession_details’,
‘title’ => ‘Profession Details’,
‘pages’ => array(‘profession’), // post type
‘context’ => ‘normal’,
‘priority’ => ‘high’,
‘show_names’ => true, // Show field names on the left
‘fields’ => array(

array(
‘name’ => ‘Your Name’,
‘id’ => $prefix . ‘name’,
‘type’ => ‘text’
),
array(
‘name’ => ‘Profession Type’,
‘id’ => $prefix . ‘profession_type’,
‘type’ => ‘select’,
‘options’=>array(
array("name"=>"Select a Profession","value"=>0),
array("name"=>"Photographer","value"=>1),
array("name"=>"Programmer","value"=>2),
)
),
),
);

$meta_boxes[] = array(
‘id’ => ‘profession_photographer’,
‘title’ => ‘Some details of your <b>photography</b> job’,
‘pages’ => array(‘profession’), // post type
‘context’ => ‘normal’,
‘priority’ => ‘high’,
‘show_names’ => true, // Show field names on the left
‘fields’ => array(
array(
‘name’ => "Your Camera",
‘id’ => $prefix . ‘photography_camera’,
‘type’ => ‘text_medium’
),
array(
‘name’ =>"Your primary interest is",
‘desc’ => ‘Landscape/Portrait/Street/Lifestyle’,
‘id’ => $prefix . ‘photography_interest’,
‘type’ => ‘text_medium’
),
),
);

$meta_boxes[] = array(
‘id’ => ‘profession_programmer’,
‘title’ => ‘Some details of your <b>programming</b> job’,
‘pages’ => array(‘profession’), // post type
‘context’ => ‘normal’,
‘priority’ => ‘high’,
‘show_names’ => true, // Show field names on the left
‘fields’ => array(
array(
‘name’ => "Your Favorite IDE",
‘id’ => $prefix . ‘programming_ide’,
‘type’ => ‘text_medium’
),
array(
‘name’ =>"Your primary language",
‘desc’ => ‘C/PHP/Java/Python/Javascript’,
‘id’ => $prefix . ‘programming_lang’,
‘type’ => ‘text_medium’
),
),
);

return $meta_boxes;
}

add_filter( ‘cmb_meta_boxes’, ‘mytheme_profession_metaboxes’ );
[/sourcecode]

At this point, if we click on “New Profession” from our WordPress admin panel, we will see the editor screen like this. Please notice that we have already disable the “editor” field while registering this custom post (using the “supports” attribute)
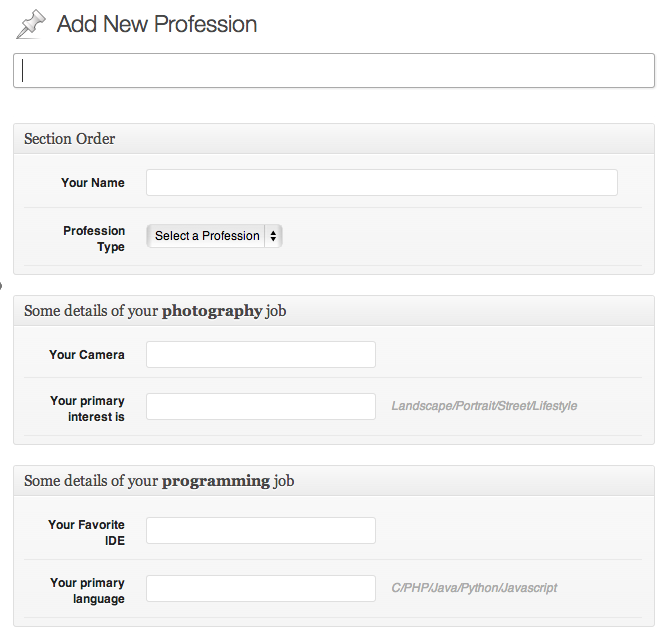
The Profession Screen

Uh, oh! that looks very confusing for people of both professions. I mean asking the photographer about their favorite language and ide is utter nonsense, and vice versa. So How can we make sure that only photographers will see the second metabox container, and programmers will see the third metabox container? Lets do this!

Step 4: The Magical Ingredient: Adding the interactivity using Javascript
We need to add some javascript at this point to improve the user experience at this point. Create a new javascript file inside the “js” folder inside your theme folder. Name the file as “profession-admin.js”. Now we need to make sure that this file is loaded properly in the admin panel.

[sourcecode language=”php”]
function mytheme_admin_load_scripts($hook) {
if( $hook != ‘post.php’ && $hook != ‘post-new.php’ )
return;

wp_enqueue_script( ‘custom-js’, get_template_directory_uri()."/js/profession-admin.js" );
}
add_action(‘admin_enqueue_scripts’, ‘mytheme_admin_load_scripts’);
[/sourcecode]

Now open the js/profession-admin.js and add the following code. Please keep in mind that jQuery is loaded in wordpress admin panel by default, and it works in no-conflict mode. So we want code like this if we want to use our favorite $ as a reference to the jQuery object.

[sourcecode language=”javascript”]
(function($){
$(document).ready(function(){
$("#profession_photographer").hide();
$("#profession_programmer").hide();

//lets add the interactivity by adding an event listener
$("#_mytheme_profession_type").bind("change",function(){
if ($(this).val()==1){
// photographer
$("#profession_photographer").show();
$("#profession_programmer").hide();
}else if ($(this).val()==2){
//programmer
$("#profession_photographer").hide();
$("#profession_programmer").show();
} else {
//still confused, hasn’t selected any
$("#profession_photographer").hide();
$("#profession_programmer").hide();
}
});

//make sure that these metaboxes appear properly in profession edit screen
if($("#_mytheme_profession_type").val()==1) //photographer
$("#profession_photographer").show();
else if ($("#_mytheme_profession_type").val()==2) //programmer
$("#profession_programmer").show();

})
})(jQuery);
[/sourcecode]

At this moment, when you click on the “New Profession” you will see like this.
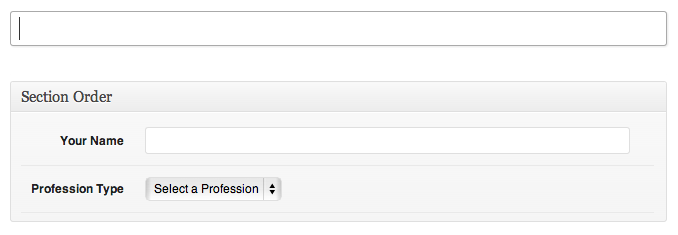
Improved Profession Screen

And if you select a profession, the appropriate metabox will be displayed instantly.
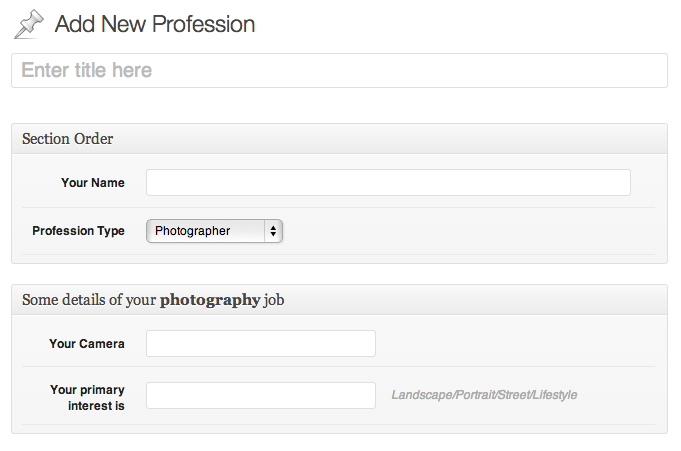
Photography

That looks good eh? So what did our javascript do? Lets have a look at the things it does

  • It passes the jQuery object to our function as $
  • It hides all the secondary metaboxes related to the professions
  • It registers a new event listener that monitors the change event in our profession select box
  • It displays the appropiate metabox when someone picks a profession
  • It also displays the correct metabox when someone edits a profession

So that’s mainly it. We have made our profession screen look much better. And we are now collecting details about the particular profession without confusing people from other professions. And most of all, it is much friendlier than before 🙂

I hope you have enjoyed this article and already started planning to implement it in your next wordpress project. Have fun!

Shameless Plug
If you are looking for a fantastic NGinx+PHP-fpm based WordPress hosting with Solid Performance, give WPonFIRE a try. You will never be disappoint at all. And if you want a 25% discount coupon for life, let me know in the comment and I will arrange you one.

WPonFIRE Premium WordPress Hosting for Everyone

Playing with Parse.com API

Screen Shot 2013-10-23 at 9.29.51 PM

I’ve started using Parse.com API not more than a week ago, and I already fall in love with it. The first thing that hit me was “whoa, no extra work for storing objects in my database” and that’s really it. Saving data was never easier. Parse.com’s javascript API, the documentation is very good and it will help you to start your project in no time. Beside diving into the details, let me highlight another cool feature of Parse.com API. It’s the user management. Sign up someone, or let someone sign in, validate their email? Everything is there!

’nuff said, how to start?
Go to https://parse.com/apps, register a new application and copy the application key and javascript key.

Now open your html file, add the Parse.com’s js library
[sourcecode language=”html”]
<script type="text/javascript" src="http://www.parsecdn.com/js/parse-1.2.12.min.js"></script>
[/sourcecode]

and now initialize your Parse.com application
[sourcecode language=”javascript”]
Parse.initialize("Application ID", "Javascript Key");
[/sourcecode]

That’s it. Now you are ready to play with the rest of this article.

Sign me up, pronto!
One of the most tedious, boring work while developing an application is to deal with registration, email validation, ACL and taking care of the signing in process. With Parse.com API this is pretty straight forward. To sign up a new new user, all you gotta do is the following one!

[sourcecode language=”javascript”]
var user = new Parse.User();
user.set("username", "ElMacho");
user.set("password", "chicken");
user.set("email", "[email protected]");

user.signUp(null, {
success: function(user) {
// Everything’s done!
console.log(user.id);
},
error: function(user, error) {
alert("Error: " + error.code + " " + error.message);
}
});
[/sourcecode]

Your user is signed up! If you need to validate user’s email then log into your Parse.com dashboard and from your application’s settings section turn on the email validation. It’s simple.

Alright, let me in!
Alright, your users have signed up .Now let them get in. It’s simple to write a sign in script with Parse API

[sourcecode language=”javascript”]
Parse.User.logIn("ElMacho", "chicken", {
success: function(user) {
console.log(user.get("email"));
},
error: function(user, error) {
console.log("you shall not pass!");
}
});
[/sourcecode]

But hey, does an user have to login everytime? No, not at all. The logged in user’s state is saved in browser. So before attempting to sign in him/her again, you can check if he is already logged-in.

[sourcecode language=”javascript”]
var loggedInUser = Parse.User.current();
if(!loggedInUser){
//off you go, perform a log in
} else {
console.log(loggedInUser.get("email"));
}
[/sourcecode]

easy, eh?

Interesting, how can I deal with data?
Okay, enough with signing up and signing in. Lets save some data. Say, for example, we want to store user’s favorite books in Parse.com’s datastore. We will also retrieve the list later.

To save some data in Parse.com, we need to write code like this
[sourcecode language=”javascript”]
var user = Parse.User.current();
var Book = Parse.Object.extend("favoritebooks");
var b1 = new Book({"name":"King Solomon’s Mine","user":user});
b1.save();

var b2 = new Book({"name":"Return of She","user":user});
b2.save();
[/sourcecode]

While saving an object you can also take care of the error or success state.

[sourcecode language=”javascript”]
var b1 = new Book({"name":"King Solomon’s Mine","user":user});
b1.save(null, {
success:function(b){
console.log("successfully saved")
},
error:function(b,error){
console.log(error.message);
}
});

[/sourcecode]

You can save as many Books/data as you want, and link them up with the current user. Linking like this is useful for retrieving them in future. As we have a few saved records, lets pull them and see if they are really saved.

[sourcecode language=”javascript”]
var Book = Parse.Object.extend("favoritebooks");
var q = new Parse.Query(Book);
q.equalTo("user",user);
q.find({
success: function(results){
for(i in results){
var book = results[i];
console.log(book.get("name"));
}
}
});
[/sourcecode]

Once it runs, you can see that it outputs currently logged in user’s favorite books. Pretty neat, eh?

like equalTo, there are a dozen of useful constraints which you can use with your query. You can get the complete list at https://parse.com/docs/js_guide#queries-constraints . Parse.com’s documentation is pretty solid, and you will find almost everything over there.

It’s dinner time, log me out!
Simple, just call Parse.User.logOut() and you are done!

So is it just about user management and saving data?
No!, not at all!. But saving data and managing credentials + ACL are one of the coolest features that you can do with Parse.com API. Beside these object storage, you can host your application (ExpressJS based), you can run your code in the cloud (Background Job, Cloud Code), take care of the push notifications and even upload and store binary files.

In overall, Parse.com’s API is super cool. Give it a try today, you will love it for sure. And by the way, there is a super handy data browser in your application dashboard, use that!

Manipulating browser URL using Javascript without refreshing the page

In modern browsers, one of the most interesting feature is that you can change the browser url without refreshing the page. During this process you can store the state of the history so that you can pull the necessary data when someone hits the back-button in the browser and then take necessary action based on that. It’s not as complicated as it may sound now. Let’s write some code to see how it works.

[sourcecode language=”javascript”]
var stateObject = {};
var title = "Wow Title";
var newUrl = "/my/awesome/url";
history.pushState(stateObject,title,newUrl);
[/sourcecode]

History objects pushState() method takes three parameter as you can see in the above example. First one, a json object, is very important. Because this is where you will be storing arbitrary data related to the current url. Second parameter will be the title of the document, and third one is the new url. You will see your browser’s address bar is updated with the new url, but the page was not refreshed 🙂

Let’s see another example where we will be storing some arbitrary data against each url.

[sourcecode language=”javascript”]
for(i=0;i<5;i++){
var stateObject = {id: i};
var title = "Wow Title "+i;
var newUrl = "/my/awesome/url/"+i;
history.pushState(stateObject,title,newUrl);
}
[/sourcecode]

Now run and hit the browser back button to see how the url is being changed. For each time the url is changed, it is storing a history state object with the value “id”. But how can retrieve the history state and do something based on that. We need to add an event listener for “popstate” event which is fired everytime the history object’s state is changed.

[sourcecode language=”javascript”]
for(i=0;i<5;i++){
var stateObject = {id: i};
var title = "Wow Title "+i;
var newUrl = "/my/awesome/url/"+i;
history.pushState(stateObject,title,newUrl);
alert(i);
}

window.addEventListener(‘popstate’, function(event) {
readState(event.state);
});

function readState(data){
alert(data.id);
}
[/sourcecode]

Now you can see whenever you hit the back button, a “popstate” event is fired. Our event listener then retrieves the history state object which was associated with that url and prompt the value of “id”.

It’s easy and pretty interesting, eh?