Category: idea

Starting a new startup?

I’ve seen many people asking me how to start a startup. Some even asking “should I start one?”, and some more you should not ask to anyone, like “How do I know that I am ready for starting my own startup”. I try to help them as much as I can with my limited experience I had so far in last 6-7 years, specially from one of the third world countries like Bangladesh. In this article I will try to summarize my experience and I hope that it will help to to make your own decision.

One important thing before starting a startup is that you really need to be a good team player. Usually there are very few “one man only” style startups. If you want one of that type, dont worry, team work is not something until you start looking for VC funding or until having a couple of marketing guys in your team. But keeping in mind that most statups have two or three members, I want to emphasize that team work is really very important thing. You need to be well communicative with your team members, show them respect to their decision and you need to be similar minded. You can’t really start a startup on helping girls to get their kithecn recipes out of the box while your team members want to make one for car lovers. So this is very important that despite of your personal feelings and interest, you must be a good team focusing on one single subject.

Secondly, not really a rocket science but kinda tough, you need an idea. You need a good idea that actually solves other peoples problem. When we started Leevio, our first target was to increase our brand value by making a product that people will actually use. Most of the people I see around, desperately looking to start their startup, are lacking one good idea, but where to get one? Listen, you dont need to spend weeks after weeks and months after months to get a good idea. You dont need a “better” idea from the beginning. Just look at peoples hanging beside you, see how they are doing annoying and repeating tasks in not-such-an-easy way. Try to simplify their everyday life. Think from their perspective and soon you will find that an idea is not such hard to find. So dont waste time, get a good idea that will help people to simplify some of their everyday tasks and boom, go. Gradually you can improve your idea and maybe you can scrap if you get a better one. But too much scrap and start game is bad for your startup. Whatever you get, start with that.

Another important thing in running a startup is that you must keep your ego aside. Thats why I said that you need similar minded people in your team which actually help your team leaning towards the same target. If your team members keep brawling about decisions every now and then, well, good luck with your startup that is never-to-see-the-light. Distribute the roles wisely. In a startup you will be suffering from limited money, limited resources and guess what, you have to run along with that. So be very wise in hiring for your team members. Hire some people that can do whatever they are good at, really well. And in a startup world, its not unexpected that you all have to do multi tasking. So sometime we get people who are good at HTML as well as in Photoshop, or one DBA who has moderately good skill in system administration. From my point, you really need these three types of people in your team

  • An architect, who can layout the project plan better
  • A DBA or someone who understands Database really well. Doesnt matter if it’s N/RDBMS or whatever
  • Designer, at least someone who can design in XHTML
  • System admin
  • Developers who will write the code together

While setting up Leevio, One of us had to play the role of architect and system admin. We together played quite a good role as laying out our DB schema. And then, we distributed our tasks into small parts and started coding. We didnt have a designer in our time. So sometime we outsourced some tasks, and sometime, surprisingly and luckily one of us was good in designing in XHTML and we did some basic ground work with his limited skill.

For today, I will try to end this article focusing on one more important thing. Tell me what is that? Furniture? nope! You are now motivated enough to start even getting a mattress and a decent laptop. Food? nope! who cares if you are even eating or not. Well, I’m just kidding and it’s really important that you always consume healthy foods.

The thing I want to mention here is “Money“. You, no matter if it’s an one man startup or three, need money to run it. You need some savings to run for couple of months. It’s not bad to plan for six months ahead of time so that you can pay your team. And it’s very rare that your startup will help you earning immediately after launch. So backup money is really helpful for these early days. When you start looking for seed money or angel funding, go to your friends and relatives first. Because those are the people who trust you and expect least than a commercial VC. Dont take money unless you really need that and whats more important is be wise in spending that. You dont need a dual quad core xeon server from the first day when your sartup is in incubator. You dont need Aeron Chairs. So try to spend as little as possible and always prepare for the bad days ahead. There’s nothing bad in being prepared. And keep a little saving so that you can restart even if your startup fails.

Thats all for now. I will come back with more articles regarding this very soon and I hope those will really help.
Convert your reception area into an Interactive Kiosk with this nice little iPad App

My Friend Michal has developed a really cool app LoungePad for turning your reception area into an interactive Kiosk. You should really check out this app. Very interesting one.

If you have a Dental / Medical / Cosmetic Practice, Hair / Beauty Salon or even a Health spa, then Loungepad will allow you to turn your iPad into an innovative waiting room/reception area kiosk.

GO TO www.loungepad.com TO REGISTER FOR DEMO ACCESS + FREE 30 DAY TRIAL

** IMPORTANT: LOUNGEPAD IS NOT A STANDALONE APP (APART FROM THE DEMO) AND YOU WILL NEED A PC OR APPLE MAC TO INITALLY SETUP THE SYSTEM AND UPLOAD YOUR FILES **

WHAT CAN LOUNGEPAD DO FOR YOU AND YOUR BUSINESS?
– Markets your services whilst your customer is waiting in your reception area and keeps them entertained.
– Saves staff admin hours by automating all form-filling tasks.
– Tracks what your customer is interested in.
– Formatted and branded to have the look and feel of your business.

LOUNGEPAD ADMIN SECTION (SERVER SIDE)
– Setup your LoungePad on our server
– Choose layout from 4 pre-defined templates and then configure to make your own
– Configure background colour/image, text size/colour, upload your logo
– Select pre-defined icons, change their colour or upload your own icon designs
– Setup and save multiple layouts, and then downloaded to your iPad
– Preview your setup just as if it is on your iPad, allowing you to tweaks & changes

SELECTABLE FEATURES:
Setup as little or as many features as you need on our server then just download to your iPad.

a. UPLOAD VIDEOS and IMAGES
– Upload and store your MP4 videos.
– Upload your photos (jpeg and png) e.g. ‘Before and After’ pictures for Dentists or different hairstyle for your salon.

b. QUESTIONNAIRES and SURVEYS
– Create simple or complex survey and questionnaires such as medical or dental patient questionnaires or a hotel guest survey. Even use your created forms as a standalone feature. Create:
Simple Text Areas** Calendar**Radio Buttons** Check boxes**Yes/No answers** Drop down lists
– Survey/Questionnaire answers are emailed to you or multiple email addresses.
– A ‘CSV’ file is attached with each email allowing data to be imported into a database.
– Data stored on our server for up to 30 days allowing you to download all information in one go and then export to Excel or a database.

c. BROCHURES / PRICE LISTS
– Upload brochures and price lists (pdf format). Any ‘PDF’ document can be uploaded allowing users to see your brochure, price lists or even special offers.

d. WEBLINKS
– Create and direct users to your own website or websites that you choose, without customers leaving LoungePad.

e. UPLOAD YOUR HTML FILE
– Create/design an external HTML page (yourpage.html) and upload it to LoungePad e.g. upload a mini web page specifically designed for your Loungepad and incorporate linked images and videos from other websites or your own existing website.

F. ‘JOIN OUR MAILING LIST Feature
– Quickly setup and collect user name, address and emails and save it on LoungePad server for you to download as a CSV file. Generate Customer/client Loyalty.

G. STATISTICS
– Track what has been looked at on your LoungePad and for how long.
– Use statistics to Improve customer experience and more importantly improve your in-house marketing technique.

LOUNGEPAD – IPad ADMIN AREA
– Change the look and feel of your LoungePad at anytime by downloading any of your pre-configured setups, keeping your LoungePad looking fresh and new.

FREE 30 DAY TRIAL of full system (server side and iPad) +DEMO ACCESS
– Download Loungepad
– Go to www.loungepad.com to register
– Access to Demo site will also be provided

Box.net widget in MiproApps – why did it require special care…

In MiproApps, our Visual Facebook Fanpage Desiger from Leevio, everything is built on top of a scalable plugin based architecture. Every plugin manages it’s data using a central plugin manager. Most of these data are isolated from each other, stored and served by the plugin manager without any special coding required from plugin developers. That makes everything simple. As storage and serving is fully managed by Plugin Manager, it helps us to cache, validate and sanitize user data properly from a single place.

But when we decided to add support for box.net, there comes a challenge. We have asked for username and password for box.net account from our users to pull out the data from their shared folders and files. “PASSWORD” – and that is the thing everyone thinks twice before providing to a third party. Everyone cares about their personal data security.

In MiproApps every data collected from user are submitted to storage service via Ajax request. And we simply cant send plain password collected by users in an Ajax request. What we did in this case is we had signed user’s sensitive information using a 128 bit public key (RSA) in client side. The private key is stored securely in our server and that encrypted information is decrypted only in server side. So client application has just the public key.

Box.net widget in Facebook Fanpages powered by MiproApps

There were other challenges as well, while we went to implement this encryption in client side by Javascript and Decryption by PHP. Unfortunately PHPs Mcrypt doesnt support RSA, and Zend Framework doesnt provide any component for that. And there was a trick when you encrypt your data in JS. You must add a null byte at the end of your data, otherwise PHP cant decrypt it.

We have used RSA library (a combination of RSA, BigInt and Barett Library) from Ohdave and used the Crypt_RSA library from PEAR. And it also required us to install bigint PECL extension.

You can see some example code at here and you can use the RSA public/private key pair either by openssl shell command or the RSA key generator from ohdave.

The service layer is working smooth. Plugin developers doesnt need to bother about encryption and decryption. Everything was managed transparently under the hood. And so far we are only developing our plugins, data is secured and safe. Users can add their publicly shared box.net files directly in their facebook fanpage. For a sample output, you can check out my page. You will find the box.net component at the bottom right corner.

Using new PECL Memcached extension for storing session data

Many of you already know that managing session is a critical task for web applications, specially when you want to avoid I/O hop and also a significant load over your database by writing a custom session handler. Beside that, if your application makes use of multiple web servers behind a proxy, then its more than a critical job to share and manage session data among these servers effectively. This is why a central session manager is very important for your application to scale. In this article I am going to show you how you can use the latest Memcached extension (developed by Andrei Zmievski and his team) to isolate the session storage from web servers. I will show you how to compile the extension and use it.

Step1: Install Memcached Server
If you are using Debian its just plain simple
[sourcecode lang=”bash”]
apt-get install memcached
[/sourcecode]

Step 2: Run memcached instances
Lets run two instances of memcached in same machine (well, this article is just for demonstrating you how you can get things done. In the production environment, you can deploy as many memcached instances as you want in different servers in same network)
[sourcecode lang=”bash”]
memcached -d -l 127.0.0.1 -p 11211 -u <username> -m 16
memcached -d -l 127.0.0.1 -p 11212 -u <username> -m 16
[/sourcecode]

Above commands will run two instances of memcached listening on port number 11211 and 11212, same IP 127.0.0.1. Each of them get an allocation of 16 MB of memory (on RAM).

Step 3: Install the PECL Memcached extension.
Lets install the new PECL memcached extension in your web server. This new extension depends on libmemcached. You can grab the latest distribution of libmemcached from https://launchpad.net/libmemcached and compile it in your own machine. Make sure you have the dependencies met.

[sourcecode lang=”bash”]
wget http://launchpad.net/libmemcached/1.0/0.34/+download/libmemcached-0.34.tar.gz
tar -zxvf libmemcached-0.34.tar.gz
cd libmemcached-0.34
./configure
make && make install
[/sourcecode]

Considering everything went fine, lets install the PECL memcached extension
[sourcecode lang=”bash”]
pecl install memcached
[/sourcecode]

If everything goes fine, you should see the output similar like this
[sourcecode]
Build process completed successfully
Installing ‘/usr/lib/php5/20060613/memcached.so’
install ok: channel://pecl.php.net/memcached-1.0.0
configuration option "php_ini" is not set to php.ini location
You should add "extension=memcached.so" to php.ini
[/sourcecode]

Make sure that memcached.so is placed in your PHP extension_dir folder (here /usr/lib/php5/20060613). Add the line “extension=memcached.so” in your php.ini and restart your web server.

To make sure, everything’s done and working – run a phpinfo() and check the output. There should be a “memcached” sesction which will look like the following one.

Memcached PECL Extension

Now we need to make change in our php.ini to register Memcached as a session handler and set the necessary properties there. Open your php.ini and add the following two lines. If you find any similar line un-commented, comment them out first.

[sourcecode lang=”php”]
session.save_handler=memcached
session.save_path="127.0.0.1:11211, 127.0.0.1:11212"
[/sourcecode]

Restart your web server. And …… you are done! 🙂 – Now all your session data will be saved and served from these memcached servers. No matter whenever you need to extend your setup by adding extra web servers, all user data and session data will remain valid and served from a central location. No I/O issue, no huge write load on DB servers.

jQuery:hooking form submit and making it ajax request

modern javascript frameworks are big blessings to every front end developer. they made our life so much easier so that we can sleep more and become fat day by day 😀 – i am a big fan of jQuery and mootools.

in this post i am going to show you how you can hook a normal form submission process, regardless of it’s method GET or POST, and convert it into an ajax request. the whole process will work dynamically. it will parse form input elements, make a JSON array from them and make an ajax request to the appropriate action url. after that, it will invoke the user supplied callback function.

problem 1: parsing form elements was a small challenge. you can do it in various way (by traversing or serialize or using css selectors). i choose to use serializer routines. jQuery has builtin support for two types of serializing , one is $(form).serialize() and another is $(form).serializeArray(). lets have a look at the output of both of them for the following form

[sourcecode lang=”html”]
<form id="f1" action=’some target’ method=’POST’>
<input type ="textbox" id=’username’ name =’username’ value=’me’/>
<input type ="checkbox" value=1 id=’guests’ name =’guests’/>
</form>
[/sourcecode]

now lets check the output by both serialize() and serializeArray() method

[sourcecode lang=”javascript”]
alert ($(‘#f1’).serialize());
//output is "username=me&guests=1"

alert($(‘#f1’).serializeArray()
//output is [{object},{object}]
[/sourcecode]

are you scared seeing this [object] output of serializeArray()? well dont panic. serializeArray() returns a JSON structure. you can still investigate using toSource() method

[sourcecode lang=”javascript”]
alert($(‘#f1’).serializeArray().toSource()
//output is [{"username":"me"},{"guests":"1"}]
[/sourcecode]

but that will not be usable to send in our AJAX request. we need a JSON array key/value pair (or you can use the output of serialize() function too to send as data in ajax request, the serilizeForm part is completely optional )

lets create a new function called serializeForm which will create JSON key/value pair out of serializeArray() and do the rest of the work.

[sourcecode language=”javascript”]
$.fn.serializeForm = function()
{
data = {};
url = this.attr("action");
items = this.serializeArray();
$.each(items,function(i,item)
{
data[item[‘name’]]=item[‘value’];
}
);
return data;
}
[/sourcecode]

now lets hook the normal submit process of the form using the following hook

[sourcecode lang=”javascript”]
function submitHook(form, callback)
{
$(form).submit(function(e){
items = {};
items = $(form).serializeForm();
url = $(form).attr("action");
if(""==url)
{
alert("Cannot submit form. No action specified");
return false;
}
callback = callback?callback:function(){};
$.post(url,items,callback);
return false;
});
}
[/sourcecode]

now you can just hook the form simply by this

[sourcecode lang=”javascript”]
ourCallback = function (data)
{
alert(data);
}

submitHook($(‘#f1’),ourCallback);
[/sourcecode]

happy jQuerying 🙂

Using Google WorldMap visualization component in your applications

Its really hard to find a good flash based world map component to use in your web applications. They are either too complex to add or they cost quite a lot. And even sometime if you pay that, its tough to customize the chart as you want it to look like. But you know there is someone called “Uncle G” (i.e google) here who has almost all the components in his Pandora’s box. So lets see how can we use the geomap component from their Visualization Library.

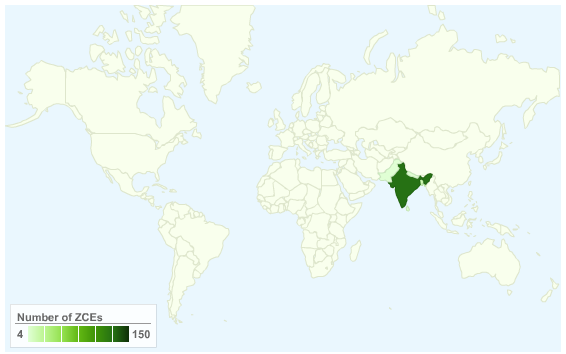
First we need to create a datatable which will act as a data source for this world map, as usual like all other google visualization component.

[source lang=’javascript’]
var data = new google.visualization.DataTable();
data.addRows(5);
data.addColumn(‘string’, ‘Country’);
data.addColumn(‘number’, ‘Number of ZCEs’);
data.setValue(0, 0, ‘Bangladesh’);
data.setValue(0, 1, 19);
data.setValue(1, 0, ‘India’);
data.setValue(1, 1, 150);
data.setValue(2, 0, ‘Pakistan’);
data.setValue(2, 1, 4);
data.setValue(3, 0, ‘Nepal’);
data.setValue(3, 1, 5);
data.setValue(4, 0, ‘Sri Lanka’);
data.setValue(4, 1, 7);
[/source]

now we will initialize the google visualization framework and draw this component using this data source

[source lang=’javascript’]
var geomap = new google.visualization.GeoMap(document.getElementById(‘‘));
geomap.draw(data, null);
[/source]

but wait, we are not done yet – to make sure that everything works properly, we need to wrap all of these code inside a function (for example name this function as drawGeoMap) and we will use that function as a callback to draw this map. and of course, we need to load the google visualization library and geomap component first

so here is the complete code of this
[source lang=’javascript’]


[/source]

you can check the demo at http://sandbox.ofhas.in/geomapv1.php

it will display a world map with highlighted countries like below
Geomap V 1

but wait – lets make ca nifty change and add event listeners to it. we will add event listeners in such a way so that whenever users click on any country in the map, it will take you to zend yellow page corresponding to that country 🙂 that will make it really an useful component :). here is the code

[source lang=’javascript’]


[/source]

check the demo at http://sandbox.ofhas.in/geomapv2.php

now you can click on any country and it will open a new tab with that particular country pre selected – and you can see who are the zend certified engineers from that country. i hope you’ve liked this :). Thanks goes the theam Visualization team at google for creating these awesome components and to make them free for use

For reference – check out geomap reference at google code at http://code.google.com/apis/visualization/documentation/gallery/geomap.html. you can do many other cool things like displaying only US states map or Canadian States map with this 🙂

collecting data from streaming APIs in twitter

twitter’s streaming API is still in beta and is a good source of collecting public tweets. but unfortunately not all those methods are instantly usable by third parties (u need to provide written statements and so on). but for testing, three of these streaming APIs are usable by anyone at this moment which are spritzer, track and follow. spritzer streams a tiny part of public tweets to the collecting processes. in this blog post i’ll show you how to collect data from spritzer API.

as it is a stream data, so twitter keeps the HTTP connection “alive” infinitely (until any hiccup, by using Keep Alive). so when you write code, you must take care of that. and i would also suggest to make separate processes for collecting data+writing them (or sending them in queue to be written) – and for analyzing those data. and of course, to minimize the bandwidth consumption, use the json format. and json data is also easier to parse than XML as every tweet is separated by a new line (“\n”) character from twitter 🙂 – so you can read these data line by line, dcode them using json_decode() and do whatever you want

here is how you can create the collector process in php

[sourcecode language=’php’]
< ?php //datacollector.php $fp = fopen("http://username:[email protected]/spritzer.json","r"); while($data = fgets($fp)) { $time = date("YmdH"); if ($newTime!=$time) { @fclose($fp2); $fp2 = fopen("{$time}.txt","a"); } fputs($fp2,$data); $newTime = $time; } ?>
[/sourcecode]

this script will write the data collected hourly from the spritzer streaming API in filen (with names like <YmdH>.txt ). so in the directory where you are runnign this script u will see hourly data files. like 2009062020.txt . there is a special advantage to keep collecting in this way – as the file will remain open for writing (hence LOCKED) you will process files only for previous hours. it will make analyzing the data more hassle free 🙂

now run this script in background via the following command in your terminal
[sourcecode language=’html’]
php datacollector.php &
[/sourcecode]

the reason for appending an “&’ at the end of the command is starting this process in background. so that you dont have to wait for the script to end to get access to your shell back. as it is a streaming data, the script will run infinitely. and it will consume very minimal bandwidth 🙂 you can check yourself.

so i hope it will help those developers who are looking for a solution to collect data from twitter’s streaming API via PHP. If you want to track any specific keywords, use the “track” API instead :). and if you want to follow some particular person use the “follow“. Check out twitter’s documentation of streaming API for more 🙂

expanding short url to original url using PHP and CURL

there are numbers of url shortening services available these days, including the good old tinyurl and something really short like u.nu. now when you get the short url shortened by using any of these services, you dont know where your browser is taking you! so if you are interested to figure out the original url hiding behind these short url, you need to have a little knowledge on how these services actually work. if you go to any of these short urls, they tell your browser “HTTP 30X: Object has moved” HTTP HEADER (optionally, some does it, some doesn’t) and then asks your browser to move to the original url using “Location” in HTTP HEADER. so all you have to do is just get the HTTP HEADER out first (PHP and Curl is pretty good at doing this, heh heh) and then parse the “Location” parameter from it.

lets see how that works in code

[sourcecode lang=”php”]
< ?php $url = "http://tinyurl.com/2dfmty"; $ch = curl_init($url); curl_setopt($ch,CURLOPT_HEADER,true); curl_setopt($ch,CURLOPT_RETURNTRANSFER,true); curl_setopt($ch, CURLOPT_FOLLOWLOCATION,false); $data = curl_exec($ch); $pdata = http_parse_headers($data); echo "Short URL: {$url}
“;
echo “Original URL: {$pdata[‘Location’]}”;

function http_parse_headers( $header )
{
$retVal = array();
$fields = explode(“\r\n”, preg_replace(‘/\x0D\x0A[\x09\x20]+/’, ‘ ‘, $header));
foreach( $fields as $field ) {
if( preg_match(‘/([^:]+): (.+)/m’, $field, $match) ) {
$match[1] = preg_replace(‘/(?< =^|[\x09\x20\x2D])./e', 'strtoupper("")', strtolower(trim($match[1]))); if( isset($retVal[$match[1]]) ) { $retVal[$match[1]] = array($retVal[$match[1]], $match[2]); } else { $retVal[$match[1]] = trim($match[2]); } } } return $retVal; } ?>
[/sourcecode]

now you see that the output of this code is
[sourcecode lang=”HTML”]
Short URL: http://tinyurl.com/2dfmty
Original URL: http://ghill.customer.netspace.net.au/embiggen/
[/sourcecode]

pretty interesting huh? if you analyze the full headers for each of these services you will find that most of them are using PHP in backend with Apache. only http://u.nu is using mod_rails (hence RoR) and bit.ly uses nginx 🙂

have fun in expanding!

using oauth pecl extension to talk to twitter

if you are interested in developing twitter applications, you must have read about twitter API and it’s authentication protocol. your application can fetch user’s private data but it has to authenticate itself as the user for that. so there are two ways to do it

1. asking user to provide his twitter username and password to your application (well, i am not interested to give away my PASSWORD to anyone!!!)
2. let twitter handle the authentication on behalf of you and ask user to grant permission to your application (hmm!! interesting)

now you see that #2 is more safe for your user. and i think most security concerned users will choose this way. so your application have to initiate this type of authentication system using twittter’s supported authentication protocol oAuth (it’s a commonly used authentication protocol used among number of popular service providers like yahoo, google and others)

to implement oauth in php, the best way is to use an existing library. there are now numbers of libraries available for this purpose. following are some of them
1. oauth lib by andy smith
2. oauth library by marc worrell
3. oauth pecl extension by rasmus lerdorf and john jawed and felipe pena

now you see, pecl extensions are written in c and runs pretty faster. so i choose it without thinking much abt it. i have assumed that you know how to install a pecl extension in your php hosting and i am not going to blog detail about that right now. all that can help you right now is shell command “pecl install -f oauth” – you know, nothing talks better than command or code 🙂

after installing oauth extension in my hosting account, i start developing my twitter application. first i have to register my application with twitter. you can create your one by pointing your browser to http://twitter.com/oauth_clients/new. please remember that you have to provide a callback url which twitter use to redirect user of your application after a success/unsuccessful authentication. i will refer to that url as “callback_url” through out this blog post. my applications callback_url is “http://mydomain.tld/auth.php”

after you have done registering your application with twitter, it will give you the following important data.
1. consumer key
2. consumer secret
3. request token url
4. access token url
5. authorize url

you will be going to use all of these in your application. now lets see how oauth works in brief. it initiate the talk using your consumer key and secret key. and then it request the “request token” from the service provider. if u r successful, you have to forward user of your application to the “authorize url” with the “request token”. now the service provider will ask to grant permission to your application from the user. if user grants (or disagree) the permission, the service provider (here, twitter) will forward your user again to the “callback url” of your application with a “new token”. now with the help of this new token and the token grabbed from previous “request token” your application will ask for “access token”. once you have the access token, you can authorize you application as the user itself with same privilege.

lets see how to do it in php with the help of oauth pecl extension. here we are going to initiate the talk, get the token and forward user to the service provider’s authorizing url.

token.php
[sourcecode lang=”php”]
< ?php //token.php $oauth = new OAuth("consumer key","consumer secret",OAUTH_SIG_METHOD_HMACSHA1,OAUTH_AUTH_TYPE_URI); //initiate $request_token_info = $oauth->getRequestToken(“http://twitter.com/oauth/request_token”); //get request token
file_put_contents(“token.txt”,$request_token_info[‘oauth_token_secret’]);//store the oauth token secret of request token
header(‘Location: http://twitter.com/oauth/authorize?oauth_token=’.$request_token_info[‘oauth_token’]);//forward user to authorize url
?>
[/sourcecode]

you see that we are storing the oauth_token_secret of the “request_token” because we need it in our next step to fetch access token. in the example above i am storing it in flat file, but you will have to store it in db/file with proper index to the userid so that you can retrieve it later in our next step.

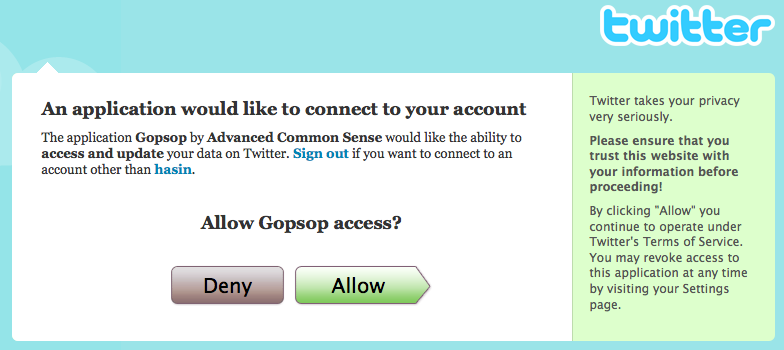
if user visit this page, he will be redirected to twitter authorize url and that may look like the following one with different app name.
picture-26

now lets see how we handle if the user click “allow” or “deny” in the above page.

this is the callback file you specified in settings of your app [auth.php]
[sourcecode lang=”php”]
< ?php //auth.php $oauth = new OAuth("consumer key","consumer secret",OAUTH_SIG_METHOD_HMACSHA1,OAUTH_AUTH_TYPE_URI); //initiate $request_token_secret = file_get_contents("token.txt"); //get the oauth_token_secret of request token we stored previously if(!empty($_GET['oauth_token'])){ $oauth->setToken($_GET[‘oauth_token’],$request_token_secret);//user allowed the app, so u
$access_token_info = $oauth->getAccessToken(‘http://twitter.com/oauth/access_token’);
}
?>
[/sourcecode]

access token is the most important token for your application. there are two object in this token – one is “oauth_token” and “oauth_token_secret”. if you print_r the access token it will look like the following one (actual value is not shown here)

Array (
    [oauth_token] => abcdefg
    [oauth_token_secret] => uvwxyz
)

you have to store this access token for authorizing later as this user (the user that was visiting). using this token you can anytime authorize yourself as that user and fetch user’s data from twitter. so lets see how we can fetch user’s profile data in rss (or json) format. the REST API url to fetch this data is “http://twitter.com/account/verify_credentials.json”. you can find other important REST urls to fetch user’s timeline, public timeline and friends timeline (also update status) in twitter’s documentation of it’s REST API

fetch user’s profile data
[sourcecode lang=”php”]
< ?php //profile.php $oauth = new OAuth("consumer key","consumer secret",OAUTH_SIG_METHOD_HMACSHA1,OAUTH_AUTH_TYPE_URI); //initiate $oauth->setToken($accesstoken[‘oauth_token’],$accesstoken[‘oauth_token_secret’]);
$data = $oauth->fetch(‘http://twitter.com/account/verify_credentials.json’);
if($data){
$response_info = $oauth->getLastResponse();
echo “

";
    print_r(json_decode($response_info));
    echo "

“;
}
[/sourcecode]

the output of this code is the following one (my twitter username is hasin)

[sourcecode lang=”php”]
stdClass Object
(
[time_zone] => Dhaka
[friends_count] => 97
[profile_text_color] => 666666
[description] => Smoking too much PHP
[following] =>
[utc_offset] => 21600
[favourites_count] => 2
[profile_image_url] => http://s3.amazonaws.com/twitter_production/profile_images/84574185/afif_b_normal.jpg
[profile_background_image_url] => http://s3.amazonaws.com/twitter_production/profile_background_images/5565492/777481225666153.jpg
[profile_link_color] => 2FC2EF
[screen_name] => hasin
[profile_sidebar_fill_color] => 252429
[url] => http://hasin.wordpress.com
[name] => hasin
[protected] =>
[status] => stdClass Object
(
[text] => ok, understood how twitter auth works via oauth pecl ext. of #php. thanks to @rasmus for his excellent example
[in_reply_to_user_id] =>
[favorited] =>
[in_reply_to_screen_name] =>
[truncated] =>
[created_at] => Sat May 02 16:08:28 +0000 2009
[id] => 1679349376
[in_reply_to_status_id] =>
[source] => web
)

[profile_sidebar_border_color] => 181A1E
[profile_background_tile] => 1
[notifications] =>
[statuses_count] => 1147
[created_at] => Fri Nov 09 10:40:14 +0000 2007
[profile_background_color] => 1A1B1F
[followers_count] => 265
[location] => Dhaka, Bangladesh
[id] => 10094392
)
[/sourcecode]