Category: git

গাল্প দিয়ে এক মিনিটে ওয়েব সার্ভার তৈরী করা

Screen Shot 2014-07-04 at 5.58.23 PM
গাল্প মূলত নোডজেএস এর উপরে বানানো একটি টাস্ক অটোমেশন টুল, যেটা দিয়ে আপনারা অনেক সহজেই বিভিন্ন বোরিং এবং একঘেয়ে কাজ অটোমেট করে ফেলতে পারবেন। এটা দিয়ে একদিকে যেমন অনেক সময় বাঁচানো যায় আরেকদিকে প্রজেক্টের টাস্ক গুলো অটোমেট করার মাধ্যমে অনেক স্মার্ট ভাবে ম্যানেজ করা যায়। গাল্প আসার আগে বেশির ভাগ লোকজন গ্রান্ট দিয়ে টাস্ক অটোমেশনের কাজ সারতো। কিন্তু গ্রান্ট এর লার্নিং কার্ভ অনেক স্টিপ, অর্থাৎ আয়ত্ত্ব করতে বেশ ভালো সময় লাগে। অন্যদিকে গাল্প একেবারেই ছোট্ট এবং শেখাও খুব সহজ, পাশাপাশি গাল্প অনেক ফাস্ট। তো চলুন আজকে আমরা দেখি কিভাবে আমরা গাল্পের সাহায্যে একটা ওয়েব সার্ভার তৈরী করে আমাদের স্ট্যাটিক কনটেন্ট সার্ভ করতে পারি। এটা স্ট্যাটিক সাইট ডেভেলপমেন্টের সময় খুব কাজে লাগে, আলাদা ভাবে ভার্চুয়াল হোস্ট তৈরী করার সময় টুকুও বাঁচানো যায়।

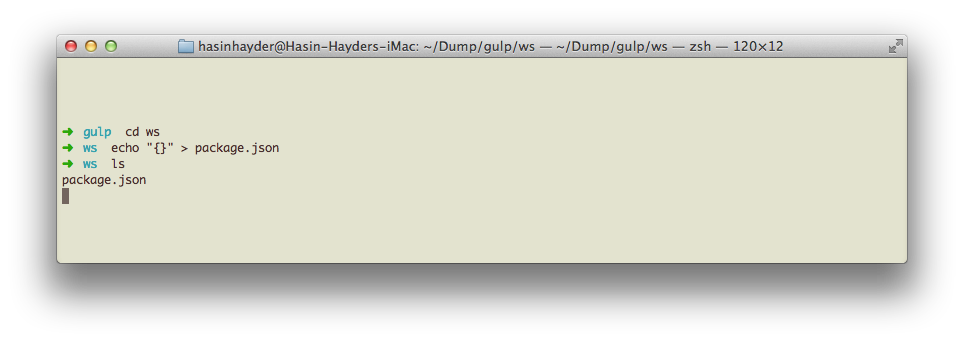
প্রথমে একটি আলাদা ফোল্ডার তৈরী করুন অথবা আপনার প্রজেক্টের ফোল্ডারে আসুন, এবার নিচের মত করে টার্মিনালে কমান্ড লিখুন অথবা package.json নামে একটি ফাইল তৈরী করুন যার কনটেন্ট হবে {}

Screen Shot 2014-07-04 at 5.37.03 PM

আপনার যদি নোডজেএস ইনস্টল না করা থাকে তাহলে http://nodejs.org/ এখানে গিয়ে নোডজেএস নামিয়ে ইনস্টল করে ফেলুন।

Screen Shot 2014-07-04 at 5.39.46 PM


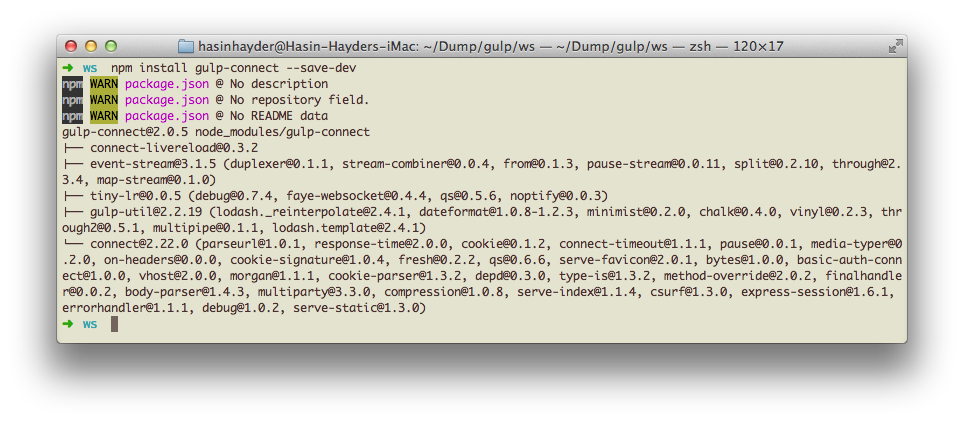
এবার টার্মিনালে কমান্ড দিন নিচের মত করে। ওয়েব সার্ভার তৈরীর জন্য আমাদের গাল্পের বেজ প্যাকেজ এবং gulp-connect নামক প্যাকেজটি লাগবে।

[sourcecode language=”shell”]
npm install gulp –save-dev
npm install gulp-connect –save-dev
[/sourcecode]

কিছুক্ষনের মাঝেই দেখবেন যে গাল্প এবং গাল্প কানেক্ট ইনস্টল হয়ে গেছে।

Screen Shot 2014-07-04 at 5.44.20 PM

এবার এই ফোল্ডারেই একটা নতুন ফাইল তৈরী করুন gulpfile.js যার কনটেন্ট হবে নিচের মত, পোর্ট নাম্বারের জায়গায় আপনার পছন্দ মত পোর্ট নাম্বার দিতে পারেন।

[sourcecode language=”javascript”]
var gulp = require("gulp"),
connect = require("gulp-connect");

gulp.task("server",function(){
connect.server({
port:8081
});
});

gulp.task("default",["server"]);
[/sourcecode]

এবার একটা index.html ফাইল তৈরী করুন, নিচের মত – অথবা আপনার যা ইচ্ছা তাই লিখুন

[sourcecode language=”html”]
<!DOCTYPE html>
<html>
<head>
<title>Hello World</title>
</head>
<body>
<h1>Hello World</h1>
</body>
</html>
[/sourcecode]

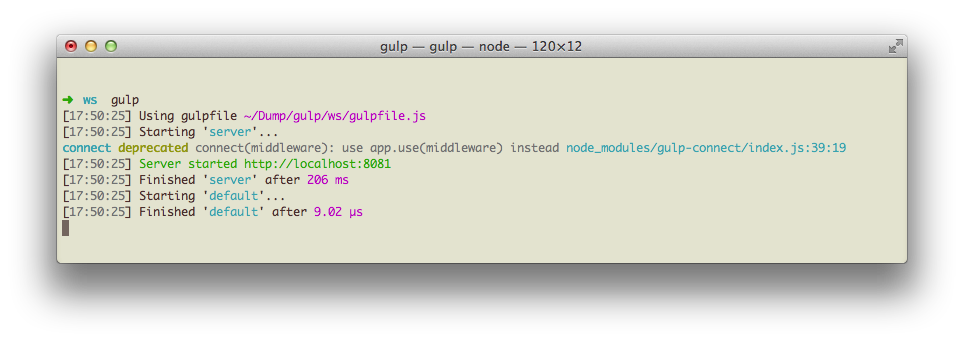
এবার টার্মিনালে কমান্ড দিন gulp, কমান্ড দেয়া হলে আপনার ব্রাউজারে ব্রাউজ করুন http:/localhost:8081 ( অথবা gulpfile.js এ যেই পোর্ট নম্বর দিয়েছিলেন, সেটা)

Screen Shot 2014-07-04 at 5.51.38 PM

ব্রাউজারে আপনার ইনডেক্স ফাইলটি (index.html) চলে এসেছে। অনেক সহজ, তাই না?

ওহ এখানে উল্লেখ্য যে আপনি প্রজেক্টে যদি গিট ( git ) ব্যবহার করেন, তাহলে এই নোডজেএস এর ফাইলগুলো গিটইগনোর (.gitignore) ফাইলের মাধ্যমে গিটে কমিট বা পুশ হওয়া থেকে বিরত রাখতে পারেন। এজন্য আপনার ফোল্ডারে/প্রজেক্ট-রুটে একটা ফাইল তৈরী করুন .gitignore নামে যার কনটেন্ট হবে নিচের মত

[sourcecode language=”html”]
node_modules
gulpfile.js
package.json
[/sourcecode]

আশাকরি গাল্প নিয়ে এই আর্টিকেলটি আপনাদের ভালো লেগেছে। পরবর্তীতে গাল্পের লাইভ-রিলোড, সিএসএস প্রি প্রসেসর এবং মিনিফাই প্যাকেজ গুলো নিয়ে আলোচনা করার ইচ্ছা থাকলো।

Remote deploy your project using git's server side hooks

6Icr9fARMmTjTHqTzK8z_DSC_0123
Git hooks are very useful to perform tasks during different states of the codebase. Sometime you can cancel your commit if jshint throws some error on your javascript files, or you can deploy your current working directory somewhere in the server. In this article we will be discussing how to deploy code using git’s server side hooks.

Step 1: Add a git repository somewhere in your server
Create a blank git repository somewhere in your server. For example, see the following code

[sourcecode language=”shell”]
cd /path/to/your/folder
git –bare init myrepo.git
[/sourcecode]

You will see that a new directory named myrepo.git has been created. Inside that folder you will find a few other folders named “hooks”, “branches” and so on. However, sometime, this command may give you unexpected result by creating those child folders outside the myrepo.git. In that case the following commands are helpful

[sourcecode language=”shell”]
cd /path/to/your/folder
mkdir myrepo.git
cd myrepo.git
git –bare init
[/sourcecode]

Now everything will be inside this myrepo.git folder. Lets move to the next step.

Step 2: Add this newly created git repo as a remote to your current project
This part is easy, just follow these commands from inside your current project. We are going to add the repository we created in step 1 as a remote named “server”

[sourcecode language=”shell”]
cd /your/current/project/directory
git remote add server ssh://user@serveraddress/path/to/your/folder/myrepo.git
[/sourcecode]

Once added, you can push to this git repo like you did with origin, like
[sourcecode language=”shell”]
git commit -am "Some Commit Message"
git push server master
# (or simply git push server)
[/sourcecode]

You may want to add your local machine’s public key in the ~/.ssh/authorized_keys file so that you won’t have to input username and password every time you push your code.

Step 3: Add the git hook
To deploy your code after a push, we need to deal with post-receive hook. Log into your remote server and go to the repository that we had created in step 1 (i.e /path/to/your/folder/myrepo.git). Now go to the hooks directory and create a file named post-receive. If you want to deploy your code to a directory accessible by web server, for example /usr/share/nginx/www/myproject then the code of post-receive will be like this

[sourcecode language=”shell”]
#!/bin/bash
export GIT_WORK_TREE=/usr/share/nginx/www/myproject
git checkout -f
[/sourcecode]

The code above will checkout current HEAD of master branch inside the directory specified by GIT_WORK_TREE. But sometime, you may have another project which is cloned from your git repo. In those directories, instead of checking out, we will do a git pull. So our post-receive file’s code will be like this

[sourcecode language=”shell”]
#!/bin/bash
cd /usr/share/nginx/www/myproject
unset GIT_DIR
git pull
[/sourcecode]

remember to unset GIT_DIR which is very important for a git pull from post-receive hook.

Step 4: Give the executable permission to this post-receive hook
In this last step, just give executable permission to this post-receive file and you’re done
[sourcecode language=”shell”]
chmod +x /path/to/your/folder/myrepo.git/hooks/post-receive
[/sourcecode]

That’s mainly it 🙂 Now whenever you push your code from local machine to this remote git repository, your code will be deployed instantly.

I hope you’ve enjoyed this article and I would love to hear your comments.

ডেভেলপমেন্টের সময় গিট ব্যবহারের সহজ ওয়ার্ক-ফ্লো

আজকালকার দিনে ভার্সন কন্ট্রোল টুল বা ভিসিএস ব্যবহার করে না এরকম টিমের দেখা পাওয়া একটু মুশকিল। ভার্সন কন্ট্রোল টুল এত উপকারী যে দেখা যায় বেশীর ভাগ ডেভেলপার একা কাজ করলেও বা সিংগেল ম্যান প্রজেক্ট হলেও সোর্স কোড সফলভাবে ম্যানেজ করার জন্য কোন না কোন টুল ব্যবহার করে থাকে। বর্তমানে জনপ্রিয়তার দিক দিয়ে ভার্সন কন্ট্রোল টুল গুলোর মাঝে গিট (git), সাবভার্সন (svn), মারকুরিয়াল, বাজার ইত্যাদি বেশি প্রচলিত। কেউ কেউ মাইক্রোসফটের ভিজ্যুয়াল সোর্স সেফ ও ব্যবহার করে থাকে। আজকের এই আর্টিকেলে আমি ভার্সন কন্ট্রোল টুল কেন ব্যবহার করা লাগে বা সুবিধা কি সেগুলো নিয়ে আলোচনা না করে বরং একটা স্পেসিফিক বিষয় নিয়ে বলবো, আর সেটা হল ডেভেলপমেন্টের সময় গিট ব্যবহার করে কিভাবে একটা নির্দিষ্ট ওয়ার্কফ্লো ফলো করে আমাদের ডেভেলপমেন্ট সাইকেল আরও সহজ করতে পারি বা আরও প্রোডাক্টিভ ভাবে সোর্স কোড ম্যানেজ করতে পারি।

০. আমরা ধরে নেই আমরা একটা ছোট দল, যেখানে নদু_ডেভ, যদু_ডেভ এবং গেদু_ডেভ ডেভেলপার হিসেবে কাজ করছে। এই দলের লিড বা কোড মেইনটেইনার হিসেবে কাজ করছে হালুম_লিড।
১. প্রজেক্টে গিট ব্যবহার করা হচ্ছে শুরু থেকেই। গিটে develop এবং master নামে দুটো ব্রাঞ্চ আছে
২. নদু, গেদু এবং যদু প্রজেক্টের develop ব্রাঞ্চ নিয়ে কাজ করছে। তাদের যার যার টাস্ক তারা এই develop ব্রাঞ্চে কমিট (git commit) দিবে এবং পুশ করবে। এছাড়াও তাদের নিজেদের কোড অন্যদের সাথে হালনাগাদ রাখার জন্য তারা সবসময় develop ব্রাঞ্চ থেকে পুল (git pull) নিবে। পুশ (git push) দেয়ার সময়ে তারা খেয়াল রাখবে যেন ব্রোকেন বা ইন-কমপ্লিট কোন কোড পুশ না হয়ে যায়।
৩. এখন মনে করি হালুম_লিড প্রজেক্টের একটা ফিচার নিয়ে নদুকে কাজ করতে দিয়েছে, ফিচার টার নাম “সহজ_ফিচার”। একই সাথে গেদুকে দেয়া হয়েছে অপেক্ষাকৃত ঝামেলার “মাঝারী_ফিচার”। যদুও পেয়েছে “ঝামেলা_ফিচার” তার ভাগে।
৪. যেহেতু অপেক্ষাকৃত সহজ এবং ছোট কাজ, নদু সরাসরি develop ব্রাঞ্চেই কাজ করতে পারে। কাজ শেষে সে কমিট এবং পুশ করবে develop ব্রাঞ্চে।
৫. একটু সময় বেশী লাগবে এবং পরীক্ষা নিরিক্ষা বেশী করা লাগবে দেখে গেদু তার মেশিনে develop ব্রাঞ্চ থেকে নতুন একটা ব্রাঞ্চ করে নিবে – ধরে নেই তার নাম “মাঝারী_ব্রাঞ্চ”। যদুও একই ভাবে কাজ করার সময় সরাসরি develop ব্রাঞ্চে কাজ না করে develop ব্রাঞ্চ থেকে নিজের মেশিনে একটা নতুন ব্রাঞ্চ করে নিবে “ঝামেলা_ব্রাঞ্চ” নামে। এই দুটি ব্রাঞ্চে তারা কমিট দিবে কিন্তু তারা কেউ এই ব্রাঞ্চদুটো পুশ করবে না।
৬. গেদুর কাজ হয়ে গেলে সে develop ব্রাঞ্চের সাথে তার মাঝারী_ব্রাঞ্চ মার্জ (git merge) করে দিবে। এক্ষেত্রে মার্জ করার আগে সে ড্রাই রান করে দেখে নিতে পারে যে কোন কনফ্লিক্ট হতে পারে কিনা। মার্জ করার পরে কনফ্লিক্ট হলে সে কনফ্লিক্ট রিসলভ (conflict resolve) করে আবার develop ব্রাঞ্চ কমিট এবং পুশ দিবে।
৭. যদুও তার কাজ হয়ে গেলে সে তার ঝামেলা_ব্রাঞ্চ একই ভাবে ডেভেলপ ব্রাঞ্চের সাথে মার্জ করে দিবে।
৮. develop ব্রাঞ্চের সাথে সফল ভাবে মার্জ হয়ে গেলে যদু এবং গেদু তাদের লোকাল ব্রাঞ্চ দুটো ডিলেট করে দিবে, কারন সেগুলোর আর প্রয়োজন নেই
৯. হালুম_লিড এখন চেক করবে যে develop ব্রাঞ্চের সব কিছু ঠিক আছে কিনা। যদি ঠিক থাকে তাহলে সে develop ব্রাঞ্চ master ব্রাঞ্চের সাথে মার্জ করে দিবে। এই মাস্টার ব্রাঞ্চে মার্জ কখনোই নদু_ডেভ, গেদু_ডেভ বা যদু_ডেভ করবে না।
১০. প্রোডাকশন সার্ভারে ডেপ্লয় করার সময় এলে হালুম_লিড দেখবে যে master ব্রাঞ্চের সব কোড ঠিকমত টেস্ট (ইউনিট টেস্ট) পাশ করছে কিনা। যদি টেস্ট পাশের হার অ্যাক্সেপ্টেবল হয় তাহলে সে সার্ভারে কোড ডেপ্লয় করে দিবে

এই হল মোটামুটি গিট নিয়ে কাজের ওয়ার্ক-ফ্লো। ১০ নম্বর পয়েন্ট টা অবশ্য গিটের সাথে সম্পর্কিত না, তাও উল্লেখ করলাম আর কি

Install and Run Symfony 2.3.6 projects in OpenShift instances in just one minute with this boilerplate repository

Okay, I have written an article 2 days ago where I went through every details. But today. I have created a blank symfony container with all the necessary deploy hook and mods so that you can get your symfony 2 project up and running in an openshift container within a minute, fully automated, seriously!

Github Repo: https://github.com/hasinhayder/openshift-symfony-2.3.0

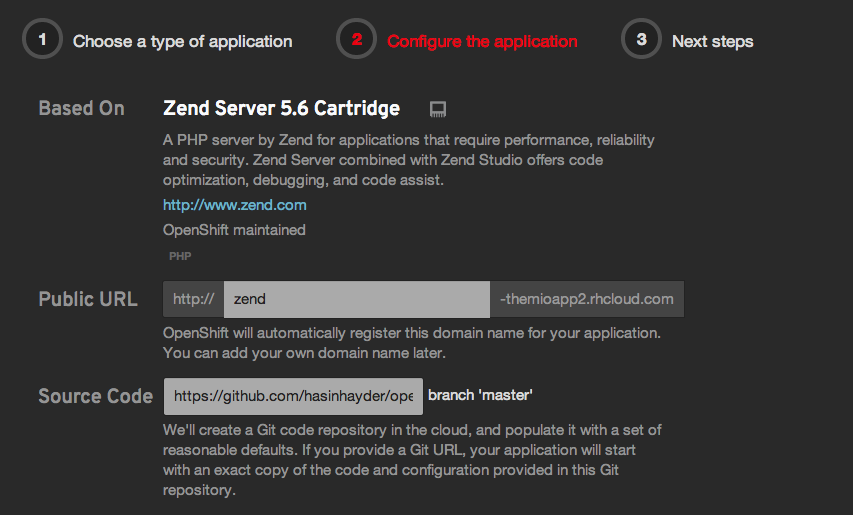
Just create a new ZendServer 5.6 or PHP 5.3 gear from your OpenShift control panel and while creating, supply this git repository’s checkout URL (https://github.com/hasinhayder/openshift-symfony-2.3.0) in the “Source Code” field. That’s it. And oh by the way, don’t forget to add a MySQL cartridge later in this gear. You don’t have to do anything else at all! The deploy script will take care of everything.

howtouseit

Here’s a quicktip just for the first time ssh login. You may not have to do it at all, but if by any chance you cannot connect to mysql database from app/console then all you need to do is clear the cache and you are done 🙂

[sourcecode language=”shell”]
cd $OPENSHIFT_REPO_DIR/php
php app/console clear:cache –env=dev
[/sourcecode]

Now Symfony can be installed in just one minute in your openshift instances. Enjoy!

By the way, if you are wondering how did I manage to load OpenShift MySQL credentials automatically in the container, then open the app/config/config.yml and you will notice that I have imported a new file named “params.php” from the same directory

[sourcecode language=”shell”]
# app/config/config.yml
imports:
– { resource: parameters.yml }
– { resource: security.yml }
– { resource: params.php }
[/sourcecode]

and in the app/config/params.php I have added these lines which injects the database parameters in the container with appropriate value

[sourcecode language=”php”]
<?php
# app/config/params.php
$container->setParameter(‘database_host’, getEnv("OPENSHIFT_MYSQL_DB_HOST"));
$container->setParameter(‘database_port’, getEnv("OPENSHIFT_MYSQL_DB_PORT"));
$container->setParameter(‘database_name’, getEnv("OPENSHIFT_APP_NAME"));
$container->setParameter(‘database_user’, getEnv("OPENSHIFT_MYSQL_DB_USERNAME"));
$container->setParameter(‘database_password’, getEnv("OPENSHIFT_MYSQL_DB_PASSWORD"));
?>
[/sourcecode]

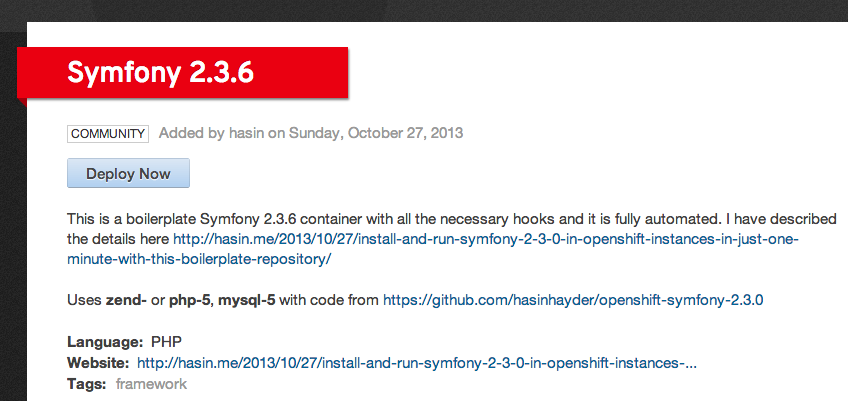
Update: This repo is now a part of OpenShift Quickstarts and you can directly access and instantly deploy it from here https://www.openshift.com/quickstarts/symfony-236, as well as from PHP Section in your OpenShift app control panel

Screen Shot 2013-10-28 at 10.41.08 PM

Running Symfony 2 Applications in OpenShift

Openshift is a fantastic Polyglot PaaS from Redhat, and you can do a lot of things with these containers. The good news is that with free accounts, OpenShift gives three gears for free, forever. Today, in this article I will show you how to install and run your Symfony applications in OpenShift.

After you have created your free account in OpenShift, go to the applications page and create a new “Zend Server 5.6” application. You can choose “PHP 5.3” containers as well, but there are many benefits of choosing ZendServer.

Before we dive into the details, please MAKE SURE that you have added your public key in your openshift settings section. This is very important that you do this.

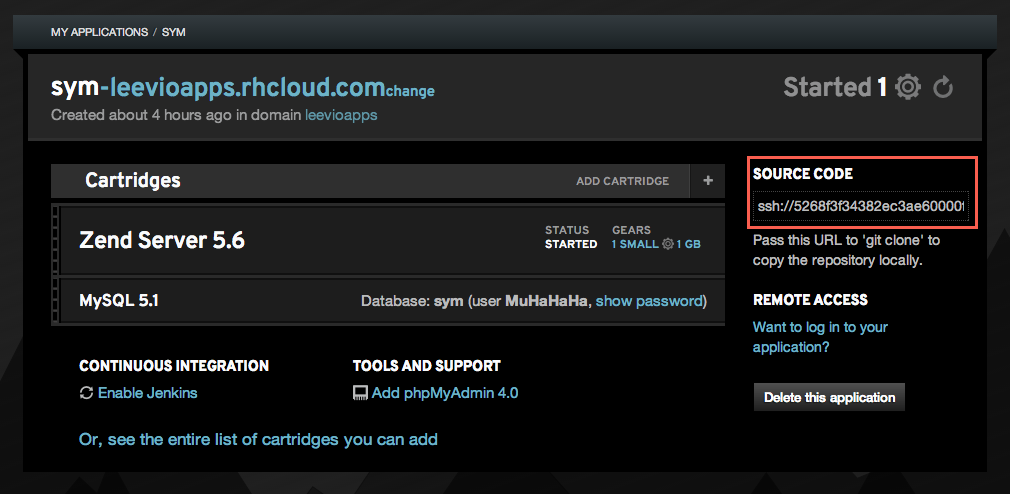
So after creating the new ZendServer 5.6 application and adding our public key in our OpenShift account, this is time to check out from our application’s git repository. OpenShift gives you a private git repository for every application and you can find the url in the right side of your application details.
Screen Shot 2013-10-24 at 8.15.05 PM

Now, follow these steps to check out this git repository and create a blank symfony application inside it’s php directory. You should have composer installed in your machine before this step.

[sourcecode language=”shell”]
git clone ssh://[email protected]/~/git/sym.git/
cd sym/php
rm -fr *.php
composer create-project symfony/framework-standard-edition ./
[/sourcecode]

After it runs, you have a blank symfony project installed inside this php directory. Now you need to add these files and commit in the git repository

[sourcecode language=”shell”]
git add -A
git commit -am "Blank Symfony Project"
git push
[/sourcecode]

OpenShift has an auto deployment feature which will deploy your application code after you push it in the git repo. It makes the deployment a lot easier for everyone.

Now you can visit your openshift container’s url but hey, why there is a blank screen? To find the answer of this question you need to open the .gitignore file. By default it’s content is like this

[sourcecode language=”shell”]
/web/bundles/
/app/bootstrap.php.cache
/app/config/parameters.yml
/app/cache/*
/app/logs/*
/vendor/
!app/cache/.gitkeep
!app/logs/.gitkeep
/build/
/bin/
/composer.phar
[/sourcecode]

Notice those lines “/app/config/parameters.yml” and “/vendor/”? These lines mean that parameters.yml file and everything in the vendor folder will be excluded from your commit. For now, just remove the line where it says about parameters.yml and keep the vendor line as is. So your final .gitignore file will look like this

[sourcecode language=”shell”]
/web/bundles/
/app/bootstrap.php.cache
/app/cache/*
/app/logs/*
/vendor/
!app/cache/.gitkeep
!app/logs/.gitkeep
/build/
/bin/
/composer.phar
[/sourcecode]

Now come to the root of your openshift repo and give this commands in the terminal

[sourcecode language=”shell”]
git add -A
git commit -am "Parameters.yml"
git push
[/sourcecode]

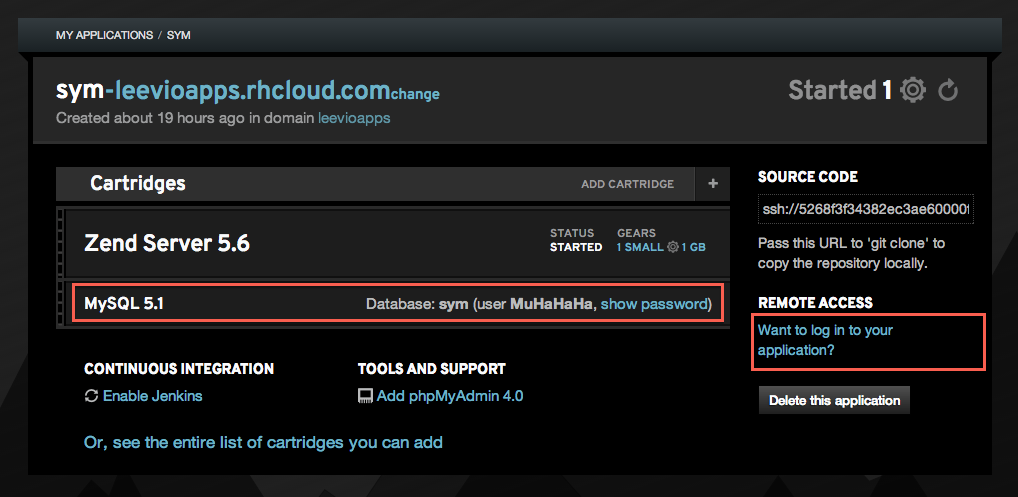
Now we need to setup the database details. To get those credentials, you need to log into your openshift gear. You can find the ssh login details in the right side of your app settings. In the following screenshot, you can get the mysql details (username and password) and ssh login details from the right side “Remote Access” section. Just click on the “Show Password” and “Want to login” links.
Screen Shot 2013-10-25 at 11.24.32 AM

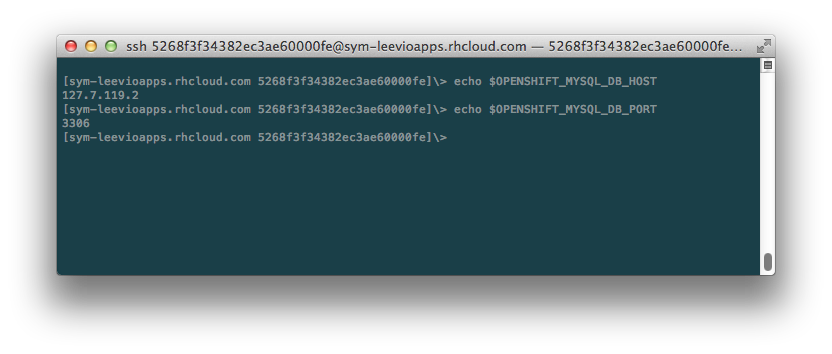
After you get the Remote Access , log into your openshift gear from your terminal. Once you are logged in, type the following commands in the terminal.
Screen Shot 2013-10-25 at 11.29.17 AM

Copy the values of mysql db host and port. Now we have all the data for our symfony app. Open your parameters.yml file and put all the essential data. For my one, it looks like this

[sourcecode language=”shell”]
parameters:
database_driver: pdo_mysql
database_host: 127.7.119.2
database_port: 3306
database_name: symfony
database_user: MuHaHaHa
database_password: "4s89-vh55G6q"
mailer_transport: smtp
mailer_host: 127.0.0.1
mailer_user: null
mailer_password: null
locale: en
secret: WhateverYouLikeTo
[/sourcecode]

Now commit this file and push

[sourcecode language=”shell”]
git commit -am "Parameters"
git push
[/sourcecode]

At this point, we need to write a deploy hook which will do the following things everytime you push your code.

  • It checks if composer is installed in our openshift gear. If not, it installs it
  • It then go to $OPENSHIFT_REOP_DIR/php folder and run composer install command
  • Then it gives write permission to app/cache and app/logs folder

Open your openshift repo, go to the .openshift folder, then go to the action_hooks folder and create a new file named deploy. Inside that file, put the following content

[sourcecode language=”shell”]
#!/bin/bash
# .openshift/action_hooks/deploy

export COMPOSER_HOME="$OPENSHIFT_DATA_DIR/.composer"

if [ ! -f "$OPENSHIFT_DATA_DIR/composer.phar" ]; then
curl -s https://getcomposer.org/installer | /usr/local/zend/bin/php — –install-dir=$OPENSHIFT_DATA_DIR
else
/usr/local/zend/bin/php $OPENSHIFT_DATA_DIR/composer.phar self-update
fi

unset GIT_DIR
cd $OPENSHIFT_REPO_DIR/php
/usr/local/zend/bin/php $OPENSHIFT_DATA_DIR/composer.phar install

chmod -R 0777 $OPENSHIFT_REPO_DIR/php/app/cache
chmod -R 0777 $OPENSHIFT_REPO_DIR/php/app/logs
[/sourcecode]

As a sidenote, if you are using regular PHP 5.3 containers instead of ZendServer 5.6, then replace “/usr/local/zend/bin/php” with “/usr/bin/php” in the deploy script above.

Save this file and give it executable permission by following command from your terminal

[sourcecode language=”shell”]
chmod +x deploy
[/sourcecode]

Now come to the root of your openshift repo and commit this deploy file. OpenShift supports different git hooks and you can check out https://www.openshift.com/developers/deploying-and-building-applications to know more about those.

[sourcecode language=”shell”]
git add -A
git commit -am "Deploy Hook"
git push
[/sourcecode]

You will notice some magical things happening at this point. After you push, you will notice in your terminal that composer is being installed in your openshift gear, and then it runs the composer install in appropriate directory.

Now visit your optnshift url (url/web/app_dev.php). Strange! now it is showing a strange error that we don’t have access to this app_dev.php. To fix this, open our app_dev.php (openshift repo/php/web/app_dev.php) and comment out line #12 to #18, I mean comment the following lines in your app_dev.php.

[sourcecode language=”php”]
//php/web/app_dev.php
if (isset($_SERVER[‘HTTP_CLIENT_IP’])
|| isset($_SERVER[‘HTTP_X_FORWARDED_FOR’])
|| !in_array(@$_SERVER[‘REMOTE_ADDR’], array(‘127.0.0.1’, ‘fe80::1’, ‘::1’))
) {
header(‘HTTP/1.0 403 Forbidden’);
exit(‘You are not allowed to access this file. Check ‘.basename(__FILE__).’ for more information.’);
}
[/sourcecode]

Sweet, now visit your openshift gear’s url (url/web/app_dev.php) and you can see that symfony is running smoothly :). But wait a minute – the URL contains the “web” part which looks ugly. All openshift PHP gear’s document root is set to $OPENSHIFT_REPO_DIR/php folder, which is in this case the root of our symfony application. But we don’t want this “web” in the URL. To do that, just create a .htaccess file in the “php” directory in our local openshift repo and put the following content

[sourcecode language=”shell”]
#php/.htaccess
RewriteEngine on
RewriteCond %{HTTP_HOST} ^your-openshift-domain$ [NC,OR]
RewriteCond %{REQUEST_URI} !web/
RewriteRule (.*) /web/$1 [L]
[/sourcecode]

And we are done, visit your openshift URL (url/app_dev.php) and it will working like a charm. So what if we want to set this app_dev.php as the default endpoint for our application? which means that we don’t even need to put “app-dev.php” in our url. To do that, open the .htaccess file from your “web” folder and replace all instance or “app.php” and “app\.php” to “app_dev.php” and “app_dev\.php” respectively. Then save your repo and make a git push and you are done! Tada!!!!

Hope you’ve enjoyed this long article. 🙂

Followup: I have automated the whole process and created a boilerplate Symfony 2.3.0 repository. Now you can get up and running in just one minute. Check out http://hasin.me/2013/10/27/install-and-run-symfony-2-3-0-in-openshift-instances-in-just-one-minute-with-this-boilerplate-repository/

Shameless Plug
Did you check our latest Onepage parallax portfolio template in Themeforest?
01_sonnet_preview.__large_preview

hosting source code and projects for free – compare the available options

when you work as an individual (or even a small team/company), it often requires you to host your project files, source code (using svn/git/mercurial) for free, discuss with people and definitely to use some issue trackers, task list managers. fortunately there are some cool options available out there. some of them comes for free with paid plans as well, some of them have no free plans. some comes with minimal but very essential features and some of them are feature bloated.

i am going to share my comment about some of these applications for you so that you can choose the best that fits for you. and btw, i’m mentioning only those which comes with free plans

spring loops1. springloops : this is my most favorite one. springloops comes with both free and paid plans. free plan is enough to manage a small team because they support unlimited peoples in each project. and even in free account in spring loops, you can create up to three active projects. so whenever you are done on any project – just close that project or suspend and open another one. springloops has excellent deployment support. and it can notify or invoke a callback url once after each commit. and that feature is very very useful if you want to take action after “post commit” (which is called a web hook).

and you can create numbers of accounts with under same email address.

pros: excellent source code browser, deployment, support for subversion, nice todo list, 100 MB of space to host your files and source code, integration with basecamp and unlimited number of peoples
cons: no issue tracker, no support for git

spring loops2. unfuddle : another neat and cool project hosting service which i’ve been using for a long time. unlike springloops unfuddle has also support for git, storage is even higher by 100 MB more. unfuddle has really cool bug tracker, wiki pages, todo list manager and built in support for iCal and rss feed. but the most frustrating thing with unfuddle free plan is that only 1 active project and 2 people is allowed. this is mainly one of the reasons why I am sticking with springloops. and unfuddle also has no support for managing deployments but i really find that a minor issue.

pros: support for both svn and git, 200 MB of storage, todo list, bug tracker, wiki pages and iCal+feed support.
cons: no support for managing deployment, only 1 active project and 2 people is supported in free plan.

spring loops3. beanstalk : beanstalk is another very cute looking subversion hosting solution. beanstalk free plan comes with 100 MB of storage space for hosting your source code, 3 active users ad only 1 repository. btw, beanstalk has web hook suport only for paid plans.

pros: nice interface, daily backup, email/rss notification and guest access, integration with many external project hosting and issue tracking solutions.
cons: only 1 repository, only 3 active people. deployment and web hook only for paid accounts 🙁

spring loops4. goplan : goplan has no support for version controlling and it is more like a project management solution, and it has a very nice interface. goplan supports 3 concurrent projects but 2 people (and i hate that) and 2 collaborators. it gives you 100 MB of storage space. goplan comes with excellent todo list manager, time tracker, discussion board, file versioning and activity stream.

pros: time tracking, discussion board, calendar, plain file storage, todo list
cons: no source code version control (i really wish they will add it)

spring loops5. huddle : huddle is another alternative of goplan (project hosting) with no support for version controlling. but huddle comes with some amazing features like free voice conferencing, whiteboard and editing documents online. huddle is feature rich but i really didn’t like their interface that much. whereas others are focusing on a small audience, huddle tried to be solution for everyone. but i still like the ones who are focusing on small audience, because it helps them to be niche. btw, huddle free plan comes with 1 GB of storage.

pros: task list manager, meeting, discussion, file sharing, online file editing, whiteboard, 1GB of storage space.
cons: no source code version control (i really wish they will add it), and “not so cool” interface

some other solutions you can check out xp-dev, bounty source, assembla (was one of my favorite when they had free plans) and projectlocker, github (free for only open source projects) sourceforge and the google code (sourceforge and google code are only for open source projects)