Author: hasin

How to create a page and assign a page template automatically in WordPress

Sometime your theme depends on a few special pages, and it’s better to create them automatically after theme activation. You could also ask your users to create these pages and assign a few specific page template, but why would you do that if there is a scope of doing it automatically from your theme. Here is a simple snippet to take care of that 🙂

Step 1: Create a page template in your theme (say awesome-page.php) which has the following code
[sourcecode language=”php”]
<?php
/**
* Template Name: Awesome Page
*/
[/sourcecode]

Step 2: Add the following code in your theme’s functions.php file 🙂

[sourcecode language=”php”]
add_action(‘after_setup_theme’, ‘create_pages’);
function create_pages(){
$awesome_page_id = get_option("awesome_page_id");
if (!$awesome_page_id) {
//create a new page and automatically assign the page template
$post1 = array(
‘post_title’ => "Awesome Page!",
‘post_content’ => "",
‘post_status’ => "publish",
‘post_type’ => ‘page’,
);
$postID = wp_insert_post($post1, $error);
update_post_meta($postID, "_wp_page_template", "awesome-page.php");
update_option("awesome_page_id", $postID);
}
}
[/sourcecode]

And you are done!

My $4/year continuous deployment server using webhook and rsync

Anthony Smith is running an interesting project called Low End Spirit where he sells low end servers for $4/year and these servers comes with 128Mb ram and one core of Xeon X3440 cpu @2.53GHz and 500GB bandwidth. And most interesting thing is that they comes with 5 IPv6 addresses in multiple locations. LowEndSpirit is pretty famous for their amazing service.

So I purchased one of these servers a week ago, and converted into a simple continuous integration server and trust me, it’s running just amazing. Here is what I did 🙂

1. I pointed one of my domains to this LowEndSpirit server (Lets call it LES Server) using cloudflare’s free IPv6 to IPv4 proxy, http://forum.lowendspirit.com/viewtopic.php?id=441

2. Once the domain is working, I created one php file in my LES server. This php file is working as the webhook endpoint. Lets assume that this file url is http://example.com/webhook.php so that we can refer to it in the rest of this article. The only thing this webhook.php file is doing is creating a file in the /tmp directory, for example /tmp/hook.txt

3. I created a ssh key using “ssh-keygen -t rsa” command in my LES server, and copied the content of the public key (~/.ssh/id_rsa.pub) generated by this command. Don’t use a passphrase when you create this key. Now I went to bitbucket/github and added this public key as deploy key (Here’s how to set it up in Bitbucket and in Github). This makes sure the readonly access of this key, that is very important from the security pov that you use a deployment key. Now in my LES server I checked out my repository. Lets consider that I checked out at /path/to/my/repo

I have also add the URL of this webhook php file to the bitbucket/github’s hook/webhook section. This makes sure that whenever I push code, bitbucket/github will make and HTTP POST call to this webhook php.

4. Now copy the content of your public key (~/.ssh/id_rsa.pub) in your LES server, and add it in your Remote Project server’s authorized keys file (~/.ssh/authorized_keys). If you are concerned about security then you may also chroot, but that’s not essential. Once this LES server’s public key is added in your Remote Server’s authorized key section, the connection will be smooth.

5. I wrote a simple bash script which checks if there is any file named hook.txt in /tmp directory in my LES server. If it is found then it ‘git pull’ the repository and perform an rsync which updates my project code folder in the remote server, and then remove this /tmp/hook.txt . I saved this shell script to /path/to/shell/script.sh . Here is the content of the bash script. Don’t forget to give it executable permission by “chmod +x /path/to/shell/script.sh” command

[sourcecode language=”shell”]
#!/bin/bash
if [ -f "/tmp/hook.txt" ]; then
rm -f /tmp/hook.txt
cd /path/to/my/repo
git pull
rsync -rltuvh /path/to/my/repo/ [email protected]:/remote/path/of/the/repo/
echo "Done"
fi
[/sourcecode]

6. Now the final step is registering a cronjob. You can register a cronjob by invoking “crontab -e” command in your terminal window. So I went ahead and registered this cron job in my LES server.

[sourcecode language=”shell”]
*/5 * * * * /path/to/shell/script.sh > /tmp/cron.log
[/sourcecode]

It runs every five minutes and if the /tmp/hook.txt is found it update the local repository by “git pull” and rsync only the updated files. My project folder in remote server is instantly updated 🙂

The server and service is running just great. Honestly, that’s a huge service running by a $4/year server 🙂

By the way this is more of a Continuous Deployment in true sense, just fyi!

Fix: Grey sound icon in Mac OS X

Had this strange problem this evening when the sound icon in the menu bar became disabled with a grey icon and didn’t come back even after restarting the machine. After googling for couple of minutes I found this solution and it worked like a charm. Apply the following commands in your terminal

[sourcecode language=”shell”]
sudo chown -R _coreaudiod:admin /Library/Preferences/Audio
[/sourcecode]

The command above will fix the permissions. Now lets fix the dynamic linkers using the following command

[sourcecode language=”shell”]
sudo update_dyld_shared_cache -force
[/sourcecode]

Now restart the coreaudio service

[sourcecode language=”shell”]
sudo killall coreaudiod
[/sourcecode]

Tada! The sound is back 🙂

Installing gearmand, libgearman and pecl gearman extension for php from source in Debian 6 & 7

I had a pretty rough evening today. No, not because the waiter forgot to add sugar in my tea, but because it was so boring to go through the trial and errors of installing gearman daemon and pecl gearman extension for php.

First I tried with the pretty-obvious-awe-fucking-some way.

[sourcecode language=”shell”]
apt-get update
apt-get install gearman
pecl install gearman
[/sourcecode]

In above steps, “apt-get install gearman” ran smoothly. But then “pecl install gearman” failed saying that it doesn’t have libgearman. Eh? so I installed libgearman4 (in Debian Squeezy. It was libgearman6 in Wheezy) and libgearman-dev. But pecl failed again to compile the extension saying that libgearman is missing. Strange! So I googled about this issue and found that it could be a link error where a symbolic link might be required of “/usr/include/libgearman” as “/usr/include/libgearman-1.0″. Still no luck.

So I decided to compile gearmand from the source. And libgearman is also included with that, so it will fix two errors at once. I downloaded the latest gearman package from launchpad and tried to compile it

[sourcecode language=”shell”]
wget https://launchpad.net/gearmand/1.2/1.1.11/+download/gearmand-1.1.11.tar.gz
tar -zxvf gearmand-1.1.11.tar.gz
cd gearmand-1.1.11
./configure
[/sourcecode]

Failure 1:
At this step, configure stopped showing the following error

[sourcecode language=”shell”]
configure: error: cannot find Boost headers version >= 1.39.0
[/sourcecode]

To fix this, I had to install “libboost-all-dev” by following command
[sourcecode language=”shell”]
apt-get install libboost-all-dev
[/sourcecode]

And I tried to compile gearman and it failed again

Failure 2:
At this step, configure stopped showing that it cannot find gperf. That’s fine – I have installed gperf and tried to configure gearman again

[sourcecode language=”shell”]
apt-get install gperf
[/sourcecode]

Failure 3:
Now it failed again, showing that libevent is missing. Hmm! Had to fix it anyway

[sourcecode language=”shell”]
apt-get install libevent-dev
[/sourcecode]

Failure 4:
Heck! Another failure. Now it’s showing that it can’t find libuuid. This part was a little tricky to solve, but finally fixed with the following package

[sourcecode language=”shell”]
apt-get install uuid-dev
[/sourcecode]

Let’s configure again. And sweet that the configure script ran smoothly. Let’s compile using make

Failure 5:
Grrr! At this point the make script failed with a bunch of text, where the following lines were at the top

[sourcecode language=”shell”]
libgearman/backtrace.cc: In function ‘void custom_backtrace()’:
libgearman/backtrace.cc:64:6: sorry, unimplemented: Graphite loop optimizations can only be used if the libcloog-ppl0 package is installed
[/sourcecode]

So it cannot find a library named libcloog-ppl. Let’s fix this problem by

[sourcecode language=”shell”]
apt-get install libcloog-ppl-dev
[/sourcecode]

Now I’ve tried to run the make script, and it was good. So i also ran make install to complete the installation.

[sourcecode language=”shell”]
make
make install
[/sourcecode]

Now gearmand and libgearman both are installed. So I tried to install pecl-gearman with the following extension and voila! it worked. No more missing libgearman anymore.

[sourcecode language=”shell”]
pecl install gearman
[/sourcecode]

Now all I had to do is add the line “extension=gearman.so” in my php.ini .

The process was tedious and boring and took me more time than writing this article. If you have seen “Despicable Me 2” when Lucy and Gru went to ElMacho’s restaurant and were attacked by that crazy chicken and finally Lucy exclaimed “What’s wrong with that chicken!”

I really wanted to say “What’s wrong with this chicken” after gearman was installed at last.

Enjoy!
QuickTip: Turn symfony's web profiler debug bar on or off

Check out your config_dev.yml and you will notice a special section over there

[sourcecode language=”shell”]
web_profiler:
toolbar: true
intercept_redirects: false
[/sourcecode]

You can turn the debug bar on or off anytime by changing the value of toolbar in this web_profiler section.

If you want to turn debug bar off for a specific controller action, you can do so by the following line. This will actually stop the profiler for the current action.

[sourcecode language=”php”]
$this->container->get(‘profiler’)->disable();
[/sourcecode]

Enjoy!

Install and Run Symfony 2.3.6 projects in OpenShift instances in just one minute with this boilerplate repository

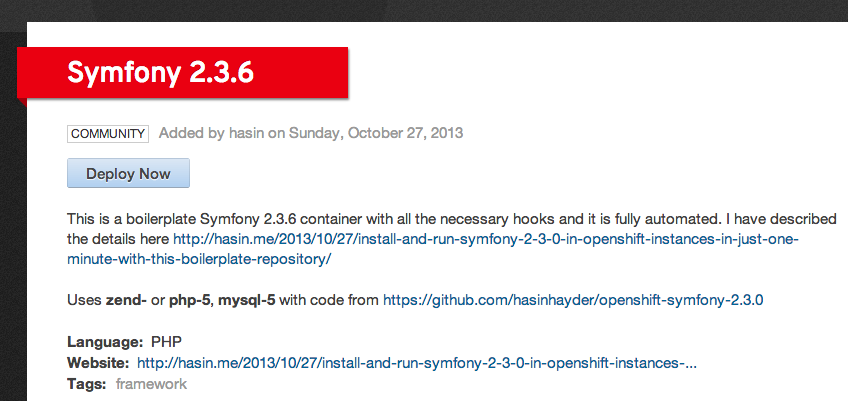
Okay, I have written an article 2 days ago where I went through every details. But today. I have created a blank symfony container with all the necessary deploy hook and mods so that you can get your symfony 2 project up and running in an openshift container within a minute, fully automated, seriously!

Github Repo: https://github.com/hasinhayder/openshift-symfony-2.3.0

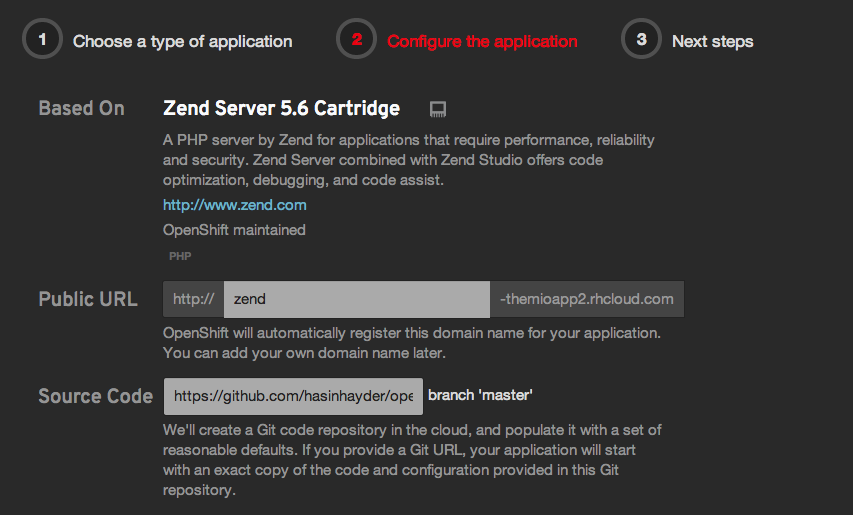
Just create a new ZendServer 5.6 or PHP 5.3 gear from your OpenShift control panel and while creating, supply this git repository’s checkout URL (https://github.com/hasinhayder/openshift-symfony-2.3.0) in the “Source Code” field. That’s it. And oh by the way, don’t forget to add a MySQL cartridge later in this gear. You don’t have to do anything else at all! The deploy script will take care of everything.

howtouseit

Here’s a quicktip just for the first time ssh login. You may not have to do it at all, but if by any chance you cannot connect to mysql database from app/console then all you need to do is clear the cache and you are done 🙂

[sourcecode language=”shell”]
cd $OPENSHIFT_REPO_DIR/php
php app/console clear:cache –env=dev
[/sourcecode]

Now Symfony can be installed in just one minute in your openshift instances. Enjoy!

By the way, if you are wondering how did I manage to load OpenShift MySQL credentials automatically in the container, then open the app/config/config.yml and you will notice that I have imported a new file named “params.php” from the same directory

[sourcecode language=”shell”]
# app/config/config.yml
imports:
– { resource: parameters.yml }
– { resource: security.yml }
– { resource: params.php }
[/sourcecode]

and in the app/config/params.php I have added these lines which injects the database parameters in the container with appropriate value

[sourcecode language=”php”]
<?php
# app/config/params.php
$container->setParameter(‘database_host’, getEnv("OPENSHIFT_MYSQL_DB_HOST"));
$container->setParameter(‘database_port’, getEnv("OPENSHIFT_MYSQL_DB_PORT"));
$container->setParameter(‘database_name’, getEnv("OPENSHIFT_APP_NAME"));
$container->setParameter(‘database_user’, getEnv("OPENSHIFT_MYSQL_DB_USERNAME"));
$container->setParameter(‘database_password’, getEnv("OPENSHIFT_MYSQL_DB_PASSWORD"));
?>
[/sourcecode]

Update: This repo is now a part of OpenShift Quickstarts and you can directly access and instantly deploy it from here https://www.openshift.com/quickstarts/symfony-236, as well as from PHP Section in your OpenShift app control panel

Screen Shot 2013-10-28 at 10.41.08 PM

How to login a user programatically in Symfony2

Sometime, you may need to log in an user manually from code, instead of generic form based log in. To do it, you need to use Two Security component “UsernamePasswordToken” and “InteractiveLoginEvent”. We will also use another exception object “UsernameNotFoundException” if the user is not found.

[sourcecode language=”php”]
use Symfony\Component\Security\Core\Authentication\Token\UsernamePasswordToken;
use Symfony\Component\Security\Http\Event\InteractiveLoginEvent;
use Symfony\Component\Security\Core\Exception\UsernameNotFoundException;
[/sourcecode]

Now from your controller, you can login an user like this

[sourcecode language=”php”]
$em = $this->getDoctrine();
$repo = $em->getRepository("UserBundle:User"); //Entity Repository
$user = $repo->loadUserByUsername($username);
if (!$user) {
throw new UsernameNotFoundException("User not found");
} else {
$token = new UsernamePasswordToken($user, null, "your_firewall_name", $user->getRoles());
$this->get("security.context")->setToken($token); //now the user is logged in

//now dispatch the login event
$request = $this->get("request");
$event = new InteractiveLoginEvent($request, $token);
$this->get("event_dispatcher")->dispatch("security.interactive_login", $event);
}
[/sourcecode]

Dispatching the “security.interactive_login” is important, because then every listeners which are bound to this event will work appropriately. But the actual login happens when you call setToken(…). Also make sure that you pass the correct firewall name which you had defined in your security.yml.

You can also recall the logged in user any time using the following code

[sourcecode language=”php”]
//anywhere
$user = $this->get(‘security.context’)->getToken()->getUser();

//or from a controller
$user = $this->getUser();
[/sourcecode]

That’s it. Hope you will find it handy 🙂

Get a list of Top 10 authors in a WordPress blog, and sort them by firstname and last name

Getting top 10 authors’s list from WordPress is actually pretty simple with a SELECT query. Here is the SQL for that which sorts the list by number of posts of each authors
[sourcecode language=”sql”]
SELECT wp_users.id,
display_name,
user_login,
user_nicename,
count(wp_posts.id) AS number_of_posts
FROM wp_users
JOIN wp_posts
ON wp_posts.post_author = wp_users.id
GROUP BY wp_posts.post_author
ORDER BY number_of_posts DESC
LIMIT 10
[/sourcecode]

And sorting this list by first name is pretty simple as well
[sourcecode language=”sql”]
SELECT *
FROM (SELECT wp_users.id,
display_name,
user_login,
user_nicename,
count(wp_posts.id) AS number_of_posts
FROM wp_users
JOIN wp_posts
ON wp_posts.post_author = wp_users.id
GROUP BY wp_posts.post_author
ORDER BY number_of_posts DESC
LIMIT 10) AS SortedByCount
ORDER BY display_name
[/sourcecode]

However, sorting that list by Lastname is a little tricky, we need to take extra care for display_name and extract the last name from it.
[sourcecode language=”sql”]
SELECT *
FROM (SELECT wp_users.id,
display_name,
user_login,
user_nicename,
count(wp_posts.id) AS number_of_posts,
substring_index(display_name, ‘ ‘, -1) AS lastname
FROM wp_users
JOIN wp_posts
ON wp_posts.post_author = wp_users.id
GROUP BY wp_posts.post_author
ORDER BY number_of_posts DESC
LIMIT 10) AS SortedByCount
ORDER BY lastname
[/sourcecode]

Now all you need to do is run it like this
[sourcecode language=”php”]
$top_authors = $wpdb->get_results($sql, ARRAY_A);
[/sourcecode]

Sweet, eh?

Improving UX in the WordPress Admin Panel with Interactive Meta Boxes

Our goal is simple today, we want to add interactivity to our boring metaboxes. Instead of showing lots and lots of irrelevant input boxes at once, we will properly group them into different metaboxe containers and then display the required one based on the action of another one.

We will create a custom post called “profession”, then we will let our user choose from two pre defined professions, for example “photographer” and “programmer”. Based on his choice we will display another set of metaboxes to get the details of that profession.

Step 1: Register the custom post
Here is a simple custom post register script, add the following snippet in your functions.php

[sourcecode language=”php”]
add_action( ‘init’, ‘mytheme_custom_post_profession’ );
function mytheme_custom_post_profession() {

$labels = array(
‘name’ => _x( ‘Professions’, ‘profession’ ),
‘singular_name’ => _x( ‘Profession’, ‘profession’ ),
‘add_new’ => _x( ‘Add New’, ‘profession’ ),
‘all_items’ => _x( ‘Professions’, ‘profession’ ),
‘add_new_item’ => _x( ‘Add New Profession’, ‘profession’ ),
‘edit_item’ => _x( ‘Edit Profession’, ‘profession’ ),
‘new_item’ => _x( ‘New Profession’, ‘profession’ ),
‘view_item’ => _x( ‘View Profession’, ‘profession’ ),
‘search_items’ => _x( ‘Search Professions’, ‘profession’ ),
‘not_found’ => _x( ‘No professions found’, ‘profession’ ),
‘not_found_in_trash’ => _x( ‘No professions found in Trash’, ‘profession’ ),
‘parent_item_colon’ => _x( ‘Parent Profession:’, ‘profession’ ),
‘menu_name’ => _x( ‘Professions’, ‘profession’ ),
);

$args = array(
‘labels’ => $labels,
‘hierarchical’ => false,
‘public’ => true,
‘show_ui’ => true,
‘show_in_menu’ => true,
‘supports’ => array( ‘title’, ‘thumbnail’),
);

register_post_type( ‘profession’, $args );
}
[/sourcecode]

Step 2: Add the necessary libraries in your theme/plugin
Creating metaboxes is a tedious and boring task. So we will take help of one of the fantastic metabox libraries out there. We will be using Custom-Metabox-Framework which is also widely known as “CMB”. It will make our code a lot less cluttered. So download (or checkout) the library, unzip and rename the folder as “cmb” and place it inside your theme folder. Now add the following code in your functions.php

[sourcecode language=”php”]
add_action( ‘init’, ‘mytheme_initialize_cmb_meta_boxes’ );
function mytheme_initialize_cmb_meta_boxes() {
if ( !class_exists( ‘cmb_Meta_Box’ ) ) {
require_once( ‘cmb/init.php’ );
}
}
[/sourcecode]

Step 3: Create some metaboxes for this profession custom post
Now we have all the necessary tools available, lets create three metaboxes and attach them with only this “profession” type custom post.

[sourcecode language=”php”]
function mytheme_profession_metaboxes( $meta_boxes ) {
$prefix = ‘_mytheme_’; // Prefix for all fields
$meta_boxes[] = array(
‘id’ => ‘profession_details’,
‘title’ => ‘Profession Details’,
‘pages’ => array(‘profession’), // post type
‘context’ => ‘normal’,
‘priority’ => ‘high’,
‘show_names’ => true, // Show field names on the left
‘fields’ => array(

array(
‘name’ => ‘Your Name’,
‘id’ => $prefix . ‘name’,
‘type’ => ‘text’
),
array(
‘name’ => ‘Profession Type’,
‘id’ => $prefix . ‘profession_type’,
‘type’ => ‘select’,
‘options’=>array(
array("name"=>"Select a Profession","value"=>0),
array("name"=>"Photographer","value"=>1),
array("name"=>"Programmer","value"=>2),
)
),
),
);

$meta_boxes[] = array(
‘id’ => ‘profession_photographer’,
‘title’ => ‘Some details of your <b>photography</b> job’,
‘pages’ => array(‘profession’), // post type
‘context’ => ‘normal’,
‘priority’ => ‘high’,
‘show_names’ => true, // Show field names on the left
‘fields’ => array(
array(
‘name’ => "Your Camera",
‘id’ => $prefix . ‘photography_camera’,
‘type’ => ‘text_medium’
),
array(
‘name’ =>"Your primary interest is",
‘desc’ => ‘Landscape/Portrait/Street/Lifestyle’,
‘id’ => $prefix . ‘photography_interest’,
‘type’ => ‘text_medium’
),
),
);

$meta_boxes[] = array(
‘id’ => ‘profession_programmer’,
‘title’ => ‘Some details of your <b>programming</b> job’,
‘pages’ => array(‘profession’), // post type
‘context’ => ‘normal’,
‘priority’ => ‘high’,
‘show_names’ => true, // Show field names on the left
‘fields’ => array(
array(
‘name’ => "Your Favorite IDE",
‘id’ => $prefix . ‘programming_ide’,
‘type’ => ‘text_medium’
),
array(
‘name’ =>"Your primary language",
‘desc’ => ‘C/PHP/Java/Python/Javascript’,
‘id’ => $prefix . ‘programming_lang’,
‘type’ => ‘text_medium’
),
),
);

return $meta_boxes;
}

add_filter( ‘cmb_meta_boxes’, ‘mytheme_profession_metaboxes’ );
[/sourcecode]

At this point, if we click on “New Profession” from our WordPress admin panel, we will see the editor screen like this. Please notice that we have already disable the “editor” field while registering this custom post (using the “supports” attribute)

The Profession Screen

Uh, oh! that looks very confusing for people of both professions. I mean asking the photographer about their favorite language and ide is utter nonsense, and vice versa. So How can we make sure that only photographers will see the second metabox container, and programmers will see the third metabox container? Lets do this!

Step 4: The Magical Ingredient: Adding the interactivity using Javascript
We need to add some javascript at this point to improve the user experience at this point. Create a new javascript file inside the “js” folder inside your theme folder. Name the file as “profession-admin.js”. Now we need to make sure that this file is loaded properly in the admin panel.

[sourcecode language=”php”]
function mytheme_admin_load_scripts($hook) {
if( $hook != ‘post.php’ && $hook != ‘post-new.php’ )
return;

wp_enqueue_script( ‘custom-js’, get_template_directory_uri()."/js/profession-admin.js" );
}
add_action(‘admin_enqueue_scripts’, ‘mytheme_admin_load_scripts’);
[/sourcecode]

Now open the js/profession-admin.js and add the following code. Please keep in mind that jQuery is loaded in wordpress admin panel by default, and it works in no-conflict mode. So we want code like this if we want to use our favorite $ as a reference to the jQuery object.

[sourcecode language=”javascript”]
(function($){
$(document).ready(function(){
$("#profession_photographer").hide();
$("#profession_programmer").hide();

//lets add the interactivity by adding an event listener
$("#_mytheme_profession_type").bind("change",function(){
if ($(this).val()==1){
// photographer
$("#profession_photographer").show();
$("#profession_programmer").hide();
}else if ($(this).val()==2){
//programmer
$("#profession_photographer").hide();
$("#profession_programmer").show();
} else {
//still confused, hasn’t selected any
$("#profession_photographer").hide();
$("#profession_programmer").hide();
}
});

//make sure that these metaboxes appear properly in profession edit screen
if($("#_mytheme_profession_type").val()==1) //photographer
$("#profession_photographer").show();
else if ($("#_mytheme_profession_type").val()==2) //programmer
$("#profession_programmer").show();

})
})(jQuery);
[/sourcecode]

At this moment, when you click on the “New Profession” you will see like this.
Improved Profession Screen

And if you select a profession, the appropriate metabox will be displayed instantly.
Photography

That looks good eh? So what did our javascript do? Lets have a look at the things it does

  • It passes the jQuery object to our function as $
  • It hides all the secondary metaboxes related to the professions
  • It registers a new event listener that monitors the change event in our profession select box
  • It displays the appropiate metabox when someone picks a profession
  • It also displays the correct metabox when someone edits a profession

So that’s mainly it. We have made our profession screen look much better. And we are now collecting details about the particular profession without confusing people from other professions. And most of all, it is much friendlier than before 🙂

I hope you have enjoyed this article and already started planning to implement it in your next wordpress project. Have fun!

Shameless Plug
If you are looking for a fantastic NGinx+PHP-fpm based WordPress hosting with Solid Performance, give WPonFIRE a try. You will never be disappoint at all. And if you want a 25% discount coupon for life, let me know in the comment and I will arrange you one.

WPonFIRE Premium WordPress Hosting for Everyone

Limit number of posts an user can create in WordPress admin panel

If you, by any chance, want to limit the number of posts an user can create in your multi author WordPress blog, there is a nice way to do it. Add the following code in your theme’s functions.php file

[sourcecode language=”php”]
add_action("load-post-new.php","limit_user_by_post_count");
function limit_user_by_post_count(){
$user = get_current_user_id();
if (!current_user_can( ‘manage_options’)) {
//not an admin – so impose the limit
$user_post_count = count_user_posts($user);
if($user_post_count>=10)
header("Location: /wp-admin/edit.php");
}
}
[/sourcecode]

In this example, if the user has 10 posts he/she can not create a new post anymore. Every time he clicks on the “New Post” menu, he will be redirected to “All Posts” page. But the “admin” will not be limited at all 🙂

Sweet, eh?