Author: hasin

How to make your own springloops in PHP

Springloops is a nice code management service recently came into focus. It helps you to manage the code base of your application, monitor the commit and deploy the final version easily to another server. So if you are wondering how to build such a system and how it actually works, this article is for you.

Please note that I am neither way affiliated with Springloops nor any of it’s contacts. This article expresses completely my own opinion.

The primary obstacles of making such a service are
1. Managing the subversion repositories and users
2. Interaction with subversion repositories (Not same as option 1)
3. Payment gateways
4. Code browser
5. User friendliness
6. Scaling

Among these options, 4 and 6 are out of the scope of this article. There are thousands of article explaining those topics to you. So I am not going to talk about them. There are excellent libraries available to manage many popular payment gateways. Just google it and you are done. And about user friendliness and design, you can hire a consultant who’s specializing on this subject and get it done.

1. Managing the subversion repositories and users
In springloops or any other subversion hosting service, you need to do some basic shell scripting which is required for adding the subversion repositories dynamically and to add users in it. There are some excellent articles how you can do it with apache2. To avoid any traffic related issue, best practice will be hosting these repositories in another server, and using htaccess – just point your user’s svn URL to the exact url. Check out the following urls to find out how to host subversion repositories with apache. Linux should be the first choice, heh heh.

Reference:
1. Setting up subversion with apache in Ubuntu gutsy gibon
2. Setting up subversion with apache2
3. Setting up subversion with apache2 and DAV in debian
4. Host your open source projects in ubuntu in 3 easy steps

All you have to do is writing shell script to automate these steps and restart the apache2 demon once an user register his/her project with your service. You are done

2. Interaction with subversion repositories (Not same as option 1)
Now this is quite a challenging part and many of you are lost how to achieve this kind of functionality for such services. For PHP developers, you know there are an excellent repository of extensions named PECL and also repository of libraries name PEAR. In PECL there is an excellent extension which is cent percent appropriate for this work. Yup, I am talking about “SVN” extension. You have to install this extension to use it with your PHP code. Once you are done with installing it, now you got the complete power to interact with the subversion repositories hosted by your users. This extension is very rich and provides all the functionalities you need to interact. For details please point your browser to the appropriate section in PHP manual.

Reference
1. Installing PECL SVN extension for PHP in Ubuntu Gutsy Gibon
2. PECL svn package
3. SVN extension documentation

4. Code Browser
Another challenging part of the total setup. If you cannot provide excellent code browser which will clearly demonstrate the changes in code from different revisions, figure out the log and the notes made during each commit and finally, make note on it to show to your fellow team members.

Using svn_diff, svn_ls and svn_log you can clearly find out the difference of a file in two different revisions, the file and directory structure of the repository and the log of each commit. So basically once you got the file and directory structure of your repository for a revision, you can just traverse through it and display as a nice report using your PHP code. And when user will ask you to display the difference, you will find the difference using svn_diff which returns the difference as standard diff format. Now using regular expression (or whatever way) you will mark the lines which was changed and just display them highlighting using different colors to your user, as a nice report. And You can also browse the log of any revision using svn_log and show it to your user.

And last but not the least, you can create tags, branch and whatever addition by maintaining a local shadow working copy of your repository. Only the thing that you cannot do (or still I am thinking how-to) is merging, heh heh.

And when it comes about deploy the latest code base to your server, you can do it using svn_update where the path is the working directory in your server.

Reference
1. Standard Diff Format
2. svn_diff
3. svn_log
4. svn_ls
5. svn_add
6. svn_update
7. svn_checkout

Basically this is how a service like Springloops is built. I hope, you’ve enjoyed this article as much as I did to write it, heh heh.

Running on Ubuntu Hardy Heron

Last night I’d migrated from gutsy to the latest release of ubuntu series, Hardy Heron. At a glance it looks really nice to me. Here is a comprehensive list of pros and cons that I’d encountered

Pros
* Clear look with new Human theme
* More support for drivers, it has detected my dell BCM 4328 card automatically
* It has detected appropriate and maximum screen resolution for my laptop automatically which I had to do in gutsy by installing proprietary xorg fglrx driver. But I installed fglrx driver to use the maximum 3D output from my ATI Radeon 1400. I can also use compiz fusion now.
* Blazing fast, really!
* Integration of Wubi (Well, ubuntu is my primary OS and I have only one OS in my machine, but it is very good for those who want to give it a try from windows)

Cons
* so far there is only one con and that is it comes with Firefox 3 beta 5. I really dont like this version of firefox caus all my favorite extensions breaks in it.

So in overall I am very happy to using the new ubuntu Hardy Heron. Give it a try.

Installing PECL subversion extension for PHP in Ubuntu 7.10

I was trying to interact with my subversion repositories using PHP yesterday and I knew that PECL has a extension named “SVN” for PHP users. So I tried to install in in my machine by when I tried to install it with the following command it always failed saying “unable to locate svn_client.h

sudo pecl install -f svn

Then I googled for some time to find out which package actually and I found that it is a part of libsvn which I didnt install in my machine which has ubuntu 7.10. so I found the appropriate package using the following command and it obviously locate the appropriate lib to install, which is “libsvn-dev

sudo apt-cache search libsvn

After that I just installed it via the standard procedure “sudo apt-get install libsvn-dev” and then tried to install the pecl extension once again. And whoa!, it works.

Here’s a small snippet to find out the difference of a single file from the repository under two separate revisions. in the following example svn_diff function returns two streams. one of them contains the difference and another one contains the error block.


<?php
list($diff,$error) = svn_diff("http://orchidframework.googlecode.com/svn/trunk/app/config/configs.php",
52,
"http://orchidframework.googlecode.com/svn/trunk/app/config/configs.php",
61);
echo "<pre>";
fpassthru($diff);
?>

Easy, huh?

proud to be @ trippert labs

Trippert is a small company working worldwide with big giants like Electronic Arts (and some others of course) and specializes developing social networking applications. Some of our applications has millions of users. Beside applications for social networks like facebook, bebo and opensocial we also develop our in house applications for travelers. Though originated in USA, TrippertLabs has wings in seven other countries like Bangladesh, Pakistan, India, China, Philippines, Germany and Indonesia.

I join TripperLabs last July and started managing the local branch here in Bangladesh (Hats off to Anupom for the great intro, you know what I mean). I’ve got some great talents (yes, we’ve found them from every corner in BD) with me. We expanded heavily during this short time and now we are a nice team of 16 developers here in BD. We have got 3 Zend Certified Engineers in our BD team and 2 more are going to be in a few days. We arrange regular tech sessions in our office and let you ignite your passion.

Unlike other traditional company here in Bangladesh we have an excellent environment here. You will never find human robots, cyborgs and people without emotion working here. We are a great family with some outstanding talents working for developing colorful moments, a big bright result. We enjoy outings, lunch together sometime, celebrate achievements, does a lot of fun and surely, we learn usage of cutting edge technologies together.

Yes I am proud to be a part of this big game. When I look to others in our office, I feel very good seeing some great people around me. If you want to part of this, you are most welcome, just know that we will find your very best expertise and let you work with your passion.

Here are some photo taken from our last outing to water park. Its fun, huh?

Trippertians


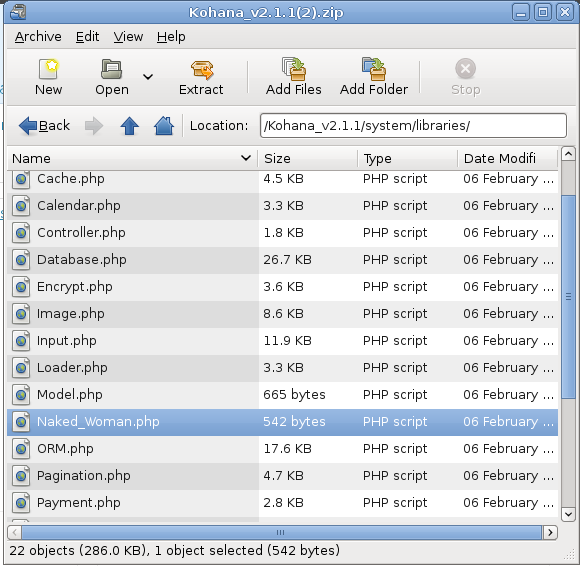
whoops! naked_women are being part of php frameworks – LOL!

i don’t know if anyone before me already noticed this funny and cheap trick that the developers of kohana framework (which is a fork of codeigniter) have integrated with their distribution. while surfing the code base, i’ve found a file name “Naked_Woman.php” as part of kohana, located under system/libraries.

The content of this file is funny as well.


<?php defined('SYSPATH') or die('No direct script access.');
/**
 * Merry Christmas!
 *
 * I wonder if this will be picked up by Google and cause a massive number of
 * hits to just this file....
 *
 * @author     Kohana Team
 * @copyright  (c) 2007 Kohana Team
 * @license    http://kohanaphp.com/license.html
 */
class Naked_Woman_Core {
	public function __construct()
	{
		throw new Kohana_User_Exception
		(
			'cash::generate(), plz?',
			'There are no naked women or cash generators in Kohana. Sorry! ;)'
		);
	}
} // End Naked Woman

didn’t know naked womens are so influencing to even php frameworks! – lol

working with models in orchid

as promised, orchid comes with real flexibility which lets you design your application in less time. in orchid, there is a nice active record object which helps you to interact with your database very easily. beside that, you can also write your own model class to facilitate comples business logics and operations. in this installment, we will learn how to achieve maximum speed and benefit by using the builtin model library of orchid with a toppings of the active record library.

2.1 connecting to a database

the built in data access libraries in orchid will help you to connect to mysql, postgresql, mssqlserver and sqlite in a minute. beside that you can also connect to other database engines by using native wrapper of pdo. all you have to do is to add a few lines in the configuration file and whoa, you are connected. don’t you believe me? lets see

create a file named configs.php in app/config/configs.php with the following contents

$configs['db']['production']['dbname']="";
$configs['db']['production']['dbhost']="";
$configs['db']['production']['dbuser']="";
$configs['db']['production']['dbpwd']="";
$configs['db']['production']['persistent']="";
$configs['db']['production']['dbtype']="";

in orchid you can have as many database state (such as production, development or whatever) as you want. in the example above, we named our db state as “production”. rest of the code is self explanatory, right? the only confusion you might have is about “persistent”. well, if you set it to true, the connection to your database stay alive as long as you are using the same connection strings, which will save some microseconds from connecting every time your script executes.

you are not done yet. there are some more configuration directives we have to add. we haven’t yet specified the type of our database and which db state orchid will use, lets do that. add the following two lines in your configs.php


$configs['db']['usedb']=""; //true or false
$configs['db']['state']="development";

the value of “usedb” could be either one of “mysql”,”mysqli”,”pgsql”,”mssql”,”pdo” or “sqlite”. and using usedb you can tell orchid to use database engines or not. so you can save the connection parameters for use later by specifying the “usedb” parameter to “false”.

ding dong! you are connected to your favorite db engine in a minute, as said.

2.2 good coding and bad coding while working with database

in orchid (and in most other framework possibly) you can directly use the internal dbmanager to execute sql, fetch the result and manipulate that through out your application. i have seen developers manipulating records in controllers, in views and skipped the most appropriate part where these manipulation should take part in fact, models. many of you dont make use of the models in your application and write the business logic entirely in your controller, feeding the inner monster of your application to be the most vigorous unmanageable giant. dont blame php as a tool to write unmanageable code because this unmanageable code solely depends on you – you. always try to use models to encapsulate the business logic and separate it from your controller. lets model do it’s job.

2.3 working with models

in this section we will write a simple model and insert some data inside a table. here comes the schema of the table.


CREATE TABLE `comics` (
  `id` int(11) NOT NULL auto_increment,
  `comicname` varchar(255) default NULL,
  `comicurl` varchar(255) default NULL,
  PRIMARY KEY  (`id`)
)

in orchid, you can instantly create a reference to any table in your database by auto model feature of orchid, which looks like the code below, which will reside in a controller.


$comicsmocdel = $this->model->comics;

orchid will dynmically create a reference of the “comics” table instantly, no more hassle for you. but there are significant causes why we will write models by coding it. the auto models support only the very basic data manipulation. if you want to encapsulate business logic inside, we definitely need to write the code inside. lets learn first how to work with a auto model like this one.

a model in orchid supports the following methods

  • selecting data
  • basic joining
  • insert
  • delete
  • update
  • finding based on criteria

as we have already created a model, lets make use of it. the following piece of code will insert a record in the comics table using the model.


$comicsmodel = $this->model->comics;
$comicsmodel->comicname = "Nancy and Sluggo";
$comicsmodel->comicurl = "http://comics.com/comics/nancy/index.html";
$comicsmodel->insert();

this is really simple to work with models in orchid, like as i said, the above example will insert a data in your data table named “comics”. now lets see how we can modify the existing data. in the following example we will change the name of the comic to the data which we’d just inserted.


//inside the controller action
$comicsmodel = $this->model->comics;
$data = $comicsmodel->find("comicname = 'Nancy and Sluggo'");
print_r($data);
if(!empty($data))
{
$comicsmodel->comicname="Nancy & Sluggo";
$comicsmodel->update();
}

the find method can take any clause and find records according to that. similarly as update and insert, you can delete records using models in orchid.

in upcoming tutorials we will learn more on models and encapsulating business logic by writing in by our own 🙂

facebook data storage api can really be the replacement of memcache

why not! all you need is a fast-n-furious caching storage for your facebook application which stores values against a key, same like a hash table. facebook data storage api does the same for you. using the batch api in facebook rest client you can seriously think it as an alternative of memcache. there are many developers who cache the data using memcache. memcache is definitely the state of the art caching solution for those who can afford hosting their application in a dedicated or vps server and knows how to install and successfully manage it. it. in other hand, facebook’s data storage api is an excellent solution for those who really want to make use of this awesome development platform without minimum hassle. all you have to do is remember some api and thats it.

lets see how you can use the facebook data storage api.

1. create the object manually (not using api)
an object in data storage api stands for something like a table. it contains some properties (columns) and their values(field values) stored against a key (think about a primary id). using the application control panel you can easily create such an object.

a. visit http://www.facebook.com/developers/apps.php?ret=2
b. select your application and click the link “http://www.facebook.com/developers/dsadmin.php?app_id={your application id}”

from this page you can create an object and create the properties. lets consider that the object name is ‘comics’ and the properties are “comicname[string]” and “comicurl[text/blob]”.

2. insert data into this object
using the storage api you can insert data into this object against a hash value. for example, lets have a look at the following piece of code

<?php
//after initializing the app client
//set value to the properties in a batch process
$facebook_api_client->begin_batch();
$facebook_api_client->data_setHashValue("comics","nancy","Nancy And Sluggo","comicname");
$facebook_api_client->data_setHashValue("comics","nancy","http://url_of_this_comic","comicurl");
$facebook_api_client->end_batch();
?>

the example showed above will set the value of two properties in “comics” object against the common key “nancy”.

setting up the values to the properties of an object in a batch process will speed up your application execution time by running all the api calls in that batch at once. the same thing applies if you want to retrieve the values of those properties.

3. retrieve the values
now when you need to re use the value of that object in your facebook application, you can do it like this

<?php
//retrieve the values of two properties "comicname" and 'comicurl"
$facebook_api_client->begin_batch();
$comicname = $facebook_api_client->data_getHashValue("comics","nancy","comicname");
$comicurl = $facebook_api_client->data_getHashValue("comics","nancy","comicurl");
$facebook_api_client->end_batch();
?>

thats a tiny introduction to the storage api of facebook. there are lots more you can do by defining associations (much like table relations between two tables) and other available apis in this category. i will focus some of them in my upcoming blog posts.

before ending, revise the title of this blog post as “facebook data storage can really be the replacement of memcache for facebook application developers”.

getting started with orchid framework

today i was planning to start the documentation of orchid framework for the rest of us(?). so this one is the first installment of this series. you will find small tutorials everyday. just stick with the series and you will see how far we can fly you. time to get high 🙂 [please note that the text in this series will be all-small cap]

getting started with orchid

orchid is a small framework with bare necessities to kick start developing killer php web applications. this framework is not flooded with unnecessary features and libraries. it only contains the essential helpers and libraries to boost up your development, not slowing it down. orchid features a very short learning curve, which will keep you trouble free. small footprint and excellent profile will be your first choice, which you will definitely realize once you start realizing the power that orchid brings in your hand. long story short, orchid is the next framework going to rock.

you can checkout orchid from it’s subversion repository
svn checkout http://orchidframework.googlecode.com/svn/trunk/ orchidframework

orchid comes pre equipped with excellent configuration directives in a config file, which we will focus in details in the upcoming tutorials. for now lets just start as is.

to create your first application, we need to create a folder named “app” inside the orchidframework directory. after you create that, there will be three directories named app, core and tests.

in orchid, controllers reside in app/controllers directory. views (templates) reside in app/views/controller_name/ directory, which means if the name of your controller is “blog”, all your views remains in app/views/blog/ directory. lets create our first controller named “talk”. the controller file will be app/controllers/talk.php.

a controller in orchid is a normal php class file which extends the base controller class. all the public methods in a controller class are considered as action. a method named “base” is the primary action for all the controller in orchid. and for now, this is all the information you need to create your first controller in orchid.

lets write a sample action in our controller, named “base”

<?php
/**
 * the source file is app/controllers/talk.php
 */
class talk extends controller
{
	public function base()
	{
		echo "hello";
	}
}
?>

now you can see this controller in action by pointing your browser to the following location. i’ve considered that you hosted orchid in your document root (i.e /var/www/orchid)

http://localhost/orchid/talk

whoops, what have we done wrong? why do we get an error?

we are seeing this error because we didnt write our view (or template, whatever you call it) yet. and this is not a good coding practice to output anthing directly from your controller. whatever the size of the output, you should display it by passing the data to a view first. this will ensure the consistency of your project through out the application. orchid is flexible, but keeping the word “flexibility with responsibility”

lets write the view file, named “<i>base.php</i>” which will reside in app/views/talk/ directory.

<?//the source file is app/views/talk/base.php?>
<?=$talkings;?>

so where from do we get the variable named $talkings? dont worry, you will have to pass it to the view from your controller. in fact through out your application you have to pass all the data to a view from the controller in almost every mvc framework and orchid is not the exception in this case. lets re write the controller

<?php
/**
 * the source file is app/controllers/talk.php
 */
class talk extends controller
{
	public function base()
	{
		$this->setViewParam("talkings","hello world");
	}
}
?>

now you will see the output “hello world” as output when you point your browser to http://localhost/orchid/talk

orchid is very flexible and if you need to raw output (for example after a ajax request) some content from your controller, you can even do that. orchid wont restrict you from not doing so, but what we really said is that for good coding you should follow this guideline.

so that’s it. getting started in orchid wont take more than 5 minutes and that is where the blessings of using a framework is in. in next tutorial we will learn how to use a model in orchid.

Whoops, I was dead for last 3 weeks

I’ve just found that my last post was about 3 weeks ago. Thats quite a looooong time. I have done so many things during last couple of weeks and was unable to manage time for blogging. Here is a short update since I wrote last.

I’ve bought a white Macbook, specially for development purpose. I want to give it a try beside my Dell on ubuntu. I am feeling so proud to be a macbook owner.

I attended the seminar “lighting talks” arranged by SQABD and sponsored by Therap. That was just awesome. Found a lot of friends present in the show.

I was so fucked up by xnet, the ISP which was providing internet connection at TrippertLabs(BD) that I said “good bye” to them, finally!

I’ve finished correcting the chapters of my upcoming book “Facebook Application Development”

And finally, the most important one is that I’d released gopsop, a local community based web application which is still a beta version and not open for all. You can only register if you have an invitation code.

I’ve submitted a php class which has been nominated for the PHP class contest of April. You can vote my class “World Time Engine” by visiting http://www.phpclasses.org/vote.html